
Star-shaped crochet gloves-Step by Step Tutorial is a delightful and creative crochet project that combines style, warmth, and personality into one accessory. These gloves stand out because of their unique star shape construction, giving them a decorative flair that traditional gloves do not usually offer. When making star-shaped crochet gloves, you are not only crafting something cozy for colder seasons, but also creating a visually appealing and expressive piece that can complement outfits or make beautiful handmade gifts. This guide will walk you through the steps in a clear and beginner-friendly manner, ensuring you enjoy the process from start to finish.
Working on this Star-shaped crochet gloves-Step by Step Tutorial allows both experienced and beginner crocheters to develop new skills. Even though the final result looks intricate, the basic techniques involved are accessible to most skill levels. The process mainly involves crocheting star-shaped motifs and joining them to form the glove structure. You will also learn how to size the gloves correctly to fit different hand shapes and ages, making this design very adaptable. Additionally, you can personalize your gloves by choosing your favorite colors, adding borders, or incorporating textured stitches.
When crocheting these gloves, you’ll discover that they are not only functional but also fun to create. Crocheting can be a relaxing hobby and a mindful activity that reduces stress and promotes creativity. The star motif gives a fresh twist to typical crocheted winter accessories and adds a bit of artistic character. Whether you are making them for yourself, as a gift, or for a craft fair, the star-shaped crochet gloves-Step by Step Tutorial will guide you to produce a beautiful and comfortable pair of gloves that are sure to bring joy to their wearer.
Materials Needed
To begin creating your star-shaped crochet gloves, selecting the right materials is essential. You will need yarn that is soft, warm, and comfortable to wear on the skin. Acrylic, wool, or blended yarns are great choices because they provide both warmth and flexibility. Medium-weight yarn is recommended for gloves because it offers the right balance between thickness and ease of movement.
Next, choose the correct crochet hook size according to the yarn label—usually a 4.0 mm or 4.5 mm hook works well. Using the correct hook size ensures your fabric will be balanced and comfortable. If you want the gloves to be tighter and warmer, use a slightly smaller hook; for looser and softer gloves, use a slightly larger one.
A yarn needle will be needed for sewing the star motifs together and weaving in loose ends. It is important to finish your pieces neatly to ensure the gloves look high-quality and are durable. Small scissors will also be useful for trimming any leftover yarn.
You may want to use stitch markers to help keep track of your stitches while forming the stars. This is especially helpful if you are new to crocheting motifs or working in the round. Stitch markers help maintain accuracy and save time.
For added decoration, you can choose to attach small buttons or beads, though this step is optional. If the gloves are meant for children, avoid small detachable pieces for safety reasons. Once you have all materials gathered, you are ready to begin crocheting your beautiful star-shaped crochet gloves.
Creating the Star Motifs
The foundation of the star-shaped crochet gloves-Step by Step Tutorial lies in creating the star motifs. These motifs are typically composed of multiple points and are formed in rounds. Begin by making a magic ring or a chain circle to form the center. This helps create a smooth and flat starting point.
Work your first round using single or half-double crochet stitches, depending on your chosen pattern style. The center should be firm and even. After establishing the center, begin creating the points of the star by adding chain spaces and stitch groups that extend outward. These increases create the star’s signature points.
Each point is built in a repetitive manner to maintain symmetry. Pay attention to your stitch count so that the shape stays balanced. Using a stitch marker to mark the beginning of each round is very helpful. Adjust tension if the motif begins curling or becomes too stiff.
Repeat the pattern for each round until the star reaches the desired size. The stars should be large enough to cover the top part of the hand comfortably when joined together. Once you have crafted enough stars for both gloves, block them lightly if needed to flatten and smooth their shape.
Continue making the number of stars required to construct the glove. Each glove typically requires several star motifs arranged strategically. When your motifs are complete, prepare to join them to form the glove shape.
Assembling the Gloves
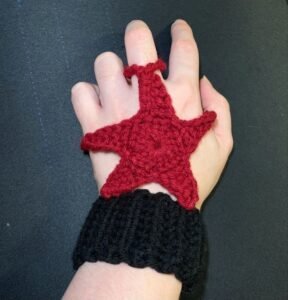
Assembly is where your star-shaped crochet gloves begin to truly take form. Lay out the star motifs in the arrangement that will form the glove. One star typically forms the base, and the others attach to it, shaping the wrist, palm, and thumb area.
Use a yarn needle and matching yarn to sew the motifs together. Work carefully and evenly, ensuring that each stitch is secure. Avoid pulling too tightly to maintain flexibility in the glove’s fabric. The joins should be strong enough to withstand stretching while worn.
Leave an opening where the thumb will fit. To shape the thumb area, you may crochet an extra small motif or a narrow strip and attach it to the glove to form a comfortable fit. The thumb construction ensures the gloves sit naturally on the hand and allow movement.
After assembling the main structure, try the glove on to ensure the fit is comfortable. Make adjustments if needed. You can add rounds of single crochet around the wrist to create a snug cuff. This helps keep the gloves in place while being worn.
Once all pieces are joined and the fit is correct, weave in all loose yarn ends. This step ensures durability and a polished appearance. Your star-shaped crochet gloves are now nearly complete!
Final Touches and Customization
At this stage, your gloves are assembled, but adding finishing details can make your project truly special. You may crochet a border around the wrist opening using a contrasting yarn color to add a decorative touch. A scalloped or ribbed edge can enhance the appearance.
Consider adding small embroidered accents for uniqueness. Simple designs like dots, spirals, or tiny stars can emphasize the star theme. Just be sure to sew securely and avoid bulky additions, especially around areas that require stretch.
If the gloves feel too loose, lightly tightening the seams or adding an extra border row can help improve the fit. If they are too snug, stretching the motifs while they are slightly damp can help relax the stitches for a more comfortable feel.
You may also create matching accessories like a scarf, hat, or even star-themed slippers to complete a coordinated set. Handmade items like these make excellent gifts for holidays and special occasions.
Once you are satisfied with the look and fit, your star-shaped crochet gloves-Step by Step Tutorial is complete. Your gloves are now ready to wear, gift, or showcase proudly.
FAQ
1. Are these gloves difficult to make?
No, the gloves look intricate but rely on repeating star motif patterns that beginners can learn with practice.
2. Can I make the gloves in different sizes?
Yes, adjusting yarn weight, hook size, and motif count allows you to customize glove size.
3. What type of yarn works best?
Medium-weight acrylic or wool blends provide warmth, flexibility, and durability.
4. How do I wash crocheted gloves?
Hand wash gently in cold water and lay flat to dry to maintain their shape and softness.
5. Can I make the gloves fingerless?
Yes, leaving the fingertips uncovered is an easy modification and adds convenience for everyday activities.
Conclusion
This Star-shaped crochet gloves-Step by Step Tutorial has guided you through choosing materials, creating motifs, assembling your gloves, and adding unique finishing touches.
Not only did you learn how to craft a functional accessory, but you also had the opportunity to explore creativity and personalization through crochet design.
Now it’s your turn to create your own pair and show your style. If you enjoyed this tutorial, please leave a sincere opinion and suggestions so we can continue improving and creating more inspiring crochet projects together.