
Learning how to make a Striped crochet blanket pattern- Step by Step Tutorial is one of the most enjoyable experiences for anyone who loves crochet. Whether you are a beginner exploring your first big project or an experienced crocheter looking for a relaxing design, striped blankets are perfect. They combine simple stitches with endless color possibilities, allowing you to create a cozy, beautiful piece for your home or as a gift for someone special.
The beauty of a Striped crochet blanket pattern- Step by Step Tutorial lies in its simplicity and versatility. You can make it in any size, choose your favorite yarn colors, and customize it to suit your style. Stripes are easy to work with, and they create a stunning visual effect without requiring complicated techniques. Plus, crocheting a blanket is a soothing, repetitive process that many people find calming and rewarding.
In this article, you will learn everything about creating your own striped crochet blanket. We will start with the materials and tools you need, go step by step through the entire process, explore creative ideas for colors and designs, and provide tips for keeping your blanket soft and beautiful for years to come. By the end, you will be ready to start this project with confidence and creativity.
Materials and Tools for the Striped Crochet Blanket
Before you start working on the Striped crochet blanket pattern- Step by Step Tutorial, gathering all the right materials is essential. Preparing everything in advance helps the project flow smoothly and prevents interruptions later.
The first thing you need is yarn. The choice of yarn affects the blanket’s texture, warmth, and durability. Soft acrylic yarns are a popular choice because they are affordable, easy to wash, and come in many colors. Cotton yarns work well for lighter blankets, while wool or blended yarns are perfect for warm, cozy throws.
Next, you need the correct crochet hook size for your yarn. Most yarn labels include a recommended hook size. Using the right hook ensures that your stitches are even and the fabric feels comfortable. A larger hook creates a softer, looser blanket, while a smaller hook produces a denser texture.
You will also need basic crochet supplies like scissors for cutting yarn, a yarn needle for weaving in loose ends, and stitch markers if you want to keep track of your rows easily. These small tools make the process neater and more enjoyable.
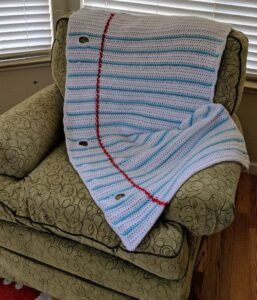
For striped designs, choosing the right colors is important. Many crocheters like to plan a color sequence in advance, alternating bold and neutral tones for a balanced look. You can create random stripes or follow a repeated pattern, depending on the style you prefer.
Finally, make sure you have enough yarn for the entire project. It is better to buy a little extra in the same dye lot to avoid color differences if you run out midway. Planning your project carefully will save time and frustration later.
Step by Step Instructions for the Striped Crochet Blanket
Now let’s dive into the Striped crochet blanket pattern- Step by Step Tutorial. This section breaks the process into clear, easy-to-follow steps so that even beginners can create a beautiful blanket without stress.
Start by making a foundation chain as long as you want your blanket’s width to be. Remember that crochet stitches add height, so the initial chain determines the blanket’s overall size horizontally.
Next, choose the stitch pattern you want to use. Many people prefer basic stitches like single crochet, half-double crochet, or double crochet for striped blankets because they create a flat, even surface that shows off the colors beautifully.
Work the first row in your chosen stitch, then continue for several rows before switching to a new color. Changing colors is easy: simply finish the last stitch of the row with the new color and keep crocheting. This creates clean transitions between stripes.
Repeat this process, alternating colors according to your plan. You can make thin stripes by changing colors every few rows or thick stripes by working many rows in each color before switching.
As you work, check the edges of your blanket to ensure they remain straight. Consistent stitch counts in each row will prevent uneven sides and keep the blanket looking neat and professional.
Continue crocheting until the blanket reaches your desired length. Finish with a few rows in the same color to give the edges a polished look before cutting the yarn and weaving in all loose ends securely.
Creative Color Ideas for Your Striped Blanket
One of the most exciting parts of the Striped crochet blanket pattern- Step by Step Tutorial is choosing colors. The possibilities are endless, and your choices can completely change the mood and style of the blanket.
For a classic look, consider neutral colors like beige, gray, white, and soft pastels. These tones create a calm, elegant blanket that fits well with almost any home décor.
If you prefer something cheerful and playful, use bright colors like yellow, turquoise, pink, and orange. A rainbow-striped blanket brings energy and happiness to any room, making it perfect for children’s bedrooms or summer decorations.
Seasonal color palettes are another great idea. For example, warm oranges, reds, and browns work beautifully for autumn blankets, while cool blues, whites, and silvers create a cozy winter vibe.
You can also experiment with ombre effects by using shades of the same color, starting with a dark tone at one end and gradually moving to lighter shades at the other. This creates a stunning gradient effect.
For a modern, minimalist look, stick to just two or three contrasting colors and alternate them evenly across the blanket. Simple combinations like black and white or navy and cream are always stylish.
Finally, don’t be afraid to mix solid colors with variegated yarns. Variegated yarn changes colors on its own, so combining it with solids creates unique and eye-catching patterns.
Tips for a Perfect Striped Crochet Blanket
Even though the Striped crochet blanket pattern- Step by Step Tutorial is beginner-friendly, there are some helpful tips to make your project turn out beautifully.
First, keep your tension consistent. Uneven tension can make some rows tighter or looser than others, affecting the blanket’s shape. Practice a little before starting if you are new to crochet.
Second, always carry the unused yarn neatly along the edge or cut it at the end of each color section. Weaving in loose ends as you go saves time later and keeps the back of the blanket tidy.
Blocking your finished blanket is another useful step. Lightly wet the blanket, lay it flat, and shape it to the correct dimensions. When it dries, the stitches will look even, and the edges will stay flat.
Consider adding a border once you finish the main body of the blanket. A simple single crochet or scalloped edge can make the blanket look professionally finished and more durable.
If you are making a gift, think about the recipient’s preferences for colors and textures. A handmade blanket in someone’s favorite shades makes a thoughtful, personal present.
Lastly, be patient with yourself. Large crochet projects take time, but the process is relaxing, and the final result is always worth the effort.
FAQ about Striped Crochet Blanket Pattern
1. Is the Striped crochet blanket pattern- Step by Step Tutorial good for beginners?
Yes, it uses simple stitches and clear instructions, making it perfect for beginners and experienced crocheters alike.
2. How much yarn do I need for a striped crochet blanket?
The amount depends on the size of the blanket and the thickness of the yarn. A small baby blanket needs less, while a large throw requires more skeins.
3. Can I use leftover yarn for the stripes?
Absolutely! Striped blankets are perfect for using up leftover yarn from other projects, creating a colorful, eco-friendly design.
4. How do I keep the edges straight on my blanket?
Count stitches at the end of each row to make sure the number stays consistent. This prevents accidental increases or decreases.
5. What is the best stitch for a striped blanket?
Basic stitches like single crochet or double crochet work best because they create a flat surface that shows off the colors clearly.
6. Can I make the blanket in any size?
Yes, simply adjust the length of the foundation chain and the number of rows to create the size you want.
Conclusion
Making a Striped crochet blanket pattern- Step by Step Tutorial is a fun, relaxing project that lets you combine creativity and practicality.
In this guide, we explored the materials you need, step-by-step instructions, color inspiration, and tips for making your blanket perfect.
Now it’s your turn to try this project and create a beautiful handmade blanket. We would love to hear your honest opinion and suggestions—share your experience and ideas so others can be inspired to start their own striped crochet blanket journey too!