
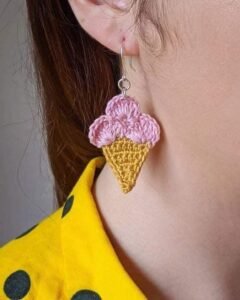
If you love making adorable and unique accessories, this Super Cute Ice Cream 🍦 🍨 Crochet Earrings Tutorial – Step by Step Tutorial will melt your heart. These mini ice cream earrings are fun to make, lightweight to wear, and guaranteed to grab attention wherever you go. Crochet jewelry is not only creative but also a perfect way to express your personality through handmade art. With a few materials and basic crochet skills, you can create something sweet, fashionable, and truly one of a kind.
One of the best things about this project is that it’s perfect for both beginners and experienced crocheters. The pattern is simple enough for anyone to follow but still offers room for creativity. You can choose your favorite yarn colors, mix different textures, and even add beads or sprinkles for a playful touch. By following this Super Cute Ice Cream 🍦 🍨 Crochet Earrings Tutorial – Step by Step Tutorial, you’ll learn how to crochet miniature ice cream cones that can be transformed into cute and trendy earrings.
These crochet earrings also make amazing handmade gifts. Whether it’s for a friend who loves sweets or someone who enjoys unique accessories, this small yet delightful project will definitely make them smile. You can make several pairs in different colors — strawberry pink, vanilla cream, chocolate brown, or mint green — to match any outfit or occasion. Crochet projects like this one are also a great way to use leftover yarn and practice your fine motor skills while creating something fun and wearable.
Materials Needed for the Super Cute Ice Cream 🍦 🍨 Crochet Earrings Tutorial
Before diving into the steps, it’s important to gather all the materials you’ll need for this Super Cute Ice Cream 🍦 🍨 Crochet Earrings Tutorial – Step by Step Tutorial. Since this is a small crochet project, you won’t need much, and most of these items are easily available in any craft store or online.
Start with yarn — choose lightweight cotton or embroidery thread. These materials are ideal because they create delicate, detailed stitches that look neat and professional. You can pick colors that represent your favorite ice cream flavors: soft pink for strawberry, beige for vanilla, or brown for chocolate. Don’t be afraid to get creative with pastel shades or bold tones to make your earrings stand out.
Next, you’ll need a small crochet hook, typically between 1.25mm and 2mm, depending on your yarn thickness. A smaller hook helps maintain the tiny and intricate size suitable for earrings. Make sure your hook glides smoothly through the thread to keep your stitches even and tight.
For assembling the earrings, you’ll need earring hooks, small jump rings, and pliers. These jewelry findings allow you to attach your crochet ice creams securely and comfortably. If you prefer a more playful style, you can also use clip-on earring bases or turn your creations into keychains.
A small needle and scissors will also be necessary for weaving in ends and trimming excess yarn neatly. If you want to add extra charm, gather some mini beads, sequins, or tiny pearls to decorate the ice cream scoop like sprinkles.
Finally, have a bit of patience and a comfortable workspace. Working on small projects requires precision, but once you see your tiny ice creams come to life, the satisfaction will be worth it.
Step-by-Step Instructions: Making the Ice Cream Earrings
Let’s get started with the actual crocheting part of this Super Cute Ice Cream 🍦 🍨 Crochet Earrings Tutorial – Step by Step Tutorial. The first thing you’ll make is the cone base. Start by using light brown or beige yarn and create a magic ring. Work six single crochets into the ring and pull tight to close. In the next rounds, increase gradually to form the cone’s shape. You can stop increasing after the third or fourth round to keep it small and pointed.
Once you have the cone, continue crocheting a few rounds without increasing to give it height. The cone should look slightly tapered but sturdy. When you reach the desired size, fasten off and leave a long tail for sewing. Set it aside as you move to the ice cream scoop.
To make the scoop, switch to your chosen color — perhaps pink for strawberry or mint for pistachio. Create another magic ring and work six single crochets into it. Then increase in the next round by working two stitches in each loop. Continue crocheting in the round until it forms a small half-sphere shape that fits nicely on top of the cone.
If you want to make your scoop look fluffier, you can lightly stuff it with a tiny bit of fiberfill before closing. Once the scoop is complete, sew it securely onto the cone using the yarn tail. Make sure the stitches are tight so the pieces stay together.
Now, you can add details like “dripping syrup” by crocheting a small chain with a contrasting color and sewing it around the top edge of the ice cream. You can even embroider tiny sprinkles or sew on small beads for a realistic, decorative touch.
After completing both ice creams, attach the jump ring and earring hook to the top of each scoop. Use pliers to close the rings tightly and ensure the earrings hang evenly. And there you have it — your adorable crochet ice cream earrings are ready to wear!
Creative Ideas for Customizing Your Crochet Ice Cream Earrings
One of the joys of making these Super Cute Ice Cream 🍦 🍨 Crochet Earrings is the endless creativity it allows. You can design your ice creams in so many different ways that each pair feels unique. For instance, you can make a classic double-scoop version by stacking two different colors, like chocolate and vanilla. This adds depth and makes your earrings even cuter.
You can also experiment with textures. Using fuzzy yarn for the scoop gives it a soft, realistic “ice cream” look, while metallic thread adds sparkle and a modern twist. Mixing matte and glossy yarns creates visual interest, making your earrings look both elegant and playful.
For an extra pop, you can crochet tiny embellishments like cherries or whipped cream to place on top of your ice cream. These tiny details make your jewelry look professionally crafted and full of personality.
If you’re feeling adventurous, try making seasonal versions — for example, red and green cones for Christmas, pastel shades for spring, or black and orange for Halloween. Handmade accessories like these are always conversation starters and perfect for themed outfits.
Adding scent is another fun idea! Lightly spray your yarn with a sweet vanilla or cotton candy fragrance before assembling the earrings. This adds a subtle aroma that enhances the “ice cream” vibe.
Finally, display your creations beautifully. You can hang them on a small jewelry stand or gift them in tiny boxes. Presentation matters, especially when your pieces are as cute as these Crochet Ice Cream Earrings.
Helpful Tips and Tricks for Perfect Results
While the Super Cute Ice Cream 🍦 🍨 Crochet Earrings Tutorial – Step by Step Tutorial is simple, following a few expert tips can make your final results more polished and professional.
First, keep your stitches tight and even. Loose stitches can make your ice cream shape floppy and uneven. Consistent tension is key for a neat look.
Second, use lightweight yarn or embroidery thread. Heavy yarn can make your earrings bulky and uncomfortable to wear. The lighter the material, the better the final look and feel.
Third, when attaching your metal findings, double-check that the rings are closed tightly. You don’t want your earring pieces to slip off accidentally. Pliers are essential for securing all connections.
Another great tip is to starch your crochet work lightly if it feels too soft. A quick spray with fabric stiffener helps maintain the shape of the cone and scoop. Let it dry completely before wearing or storing.
If you plan to sell or gift these earrings, create small matching sets in different colors. Label them with cute names like “Mint Magic,” “Berry Bliss,” or “Chocolate Dream.” It adds charm and personality to your handmade items.
Lastly, always work in good lighting. Since these are small details, proper visibility helps you achieve clean, precise stitches that make your mini ice cream earrings look flawless.
About Super Cute Ice Cream 🍦 🍨 Crochet Earrings
1. Are crochet ice cream earrings suitable for beginners?
Yes! This Super Cute Ice Cream 🍦 🍨 Crochet Earrings Tutorial – Step by Step Tutorial is beginner-friendly. It uses basic stitches like single crochet and slip stitch, and the project is small enough to complete in under an hour.
2. What type of yarn is best for crochet earrings?
Lightweight cotton or embroidery thread works best. They hold their shape and provide the fine detail necessary for small crochet projects like earrings.
3. Do I need to stuff the ice cream scoop?
Stuffing is optional. A tiny bit of fiberfill can make the scoop rounder, but leaving it unstuffed gives a flatter, lightweight look.
4. Can I use glue instead of sewing the parts together?
Sewing is more durable and professional-looking. Glue might work for decoration, but it’s better to stitch the pieces to ensure they last longer.
5. Are crochet earrings heavy?
Not at all! When made with thin yarn or thread, crochet earrings are extremely lightweight and comfortable for everyday wear.
6. How can I clean crochet earrings?
Gently wipe them with a damp cloth and avoid soaking them in water. Keep them in a dry place to maintain their shape and freshness.
Conclusion
In this Super Cute Ice Cream 🍦 🍨 Crochet Earrings Tutorial – Step by Step Tutorial, you learned how to create adorable, wearable art pieces that combine creativity, fashion, and fun. From crafting the cone and scoop to adding cute finishing touches, every step allows you to express your personal style.
These earrings are perfect for any season, outfit, or occasion. They make wonderful handmade gifts and can even be sold at craft fairs or given as party favors. With just a bit of yarn, imagination, and patience, you can bring your sweet crochet creations to life.
Now that you’ve discovered how easy and enjoyable this project is, it’s time to grab your hook and yarn to make your own Crochet Ice Cream Earrings. Share your results, leave your honest opinion, and tell us your favorite ice cream flavor combination in the comments! Your feedback and suggestions inspire more creative tutorials like this one.