
Tutorial on how to make a beautiful crocheted hair clip with a bow is a delightful and creative project that allows crafters to transform simple materials into a charming and stylish accessory. Learning this Tutorial on how to make a beautiful crocheted hair clip with a bow is perfect for anyone who enjoys handmade crafts and wants to create something both practical and visually appealing. This project combines basic crochet techniques with a touch of elegance, resulting in a piece that can complement many different hairstyles.
When exploring a Tutorial on how to make a beautiful crocheted hair clip with a bow, you quickly realize how versatile and beginner-friendly this craft can be. With just a small amount of yarn and a few essential tools, it is possible to create multiple variations of this accessory. The process is simple enough for beginners, yet flexible enough for experienced crafters to experiment with unique textures, colors, and embellishments.
Another great advantage of following a Tutorial on how to make a beautiful crocheted hair clip with a bow is the opportunity to personalize your creations. Whether you are making it for yourself, as a gift, or even as part of a small business, this project allows for endless customization. From soft pastel tones to vibrant color combinations, your crocheted hair clip can reflect your personal style and creativity.
Understanding the Basics of the Tutorial on How to Make a Beautiful Crocheted Hair Clip with a Bow
Before starting the Tutorial on how to make a beautiful crocheted hair clip with a bow, it is important to gather the right materials. Typically, lightweight yarn such as cotton or acrylic is recommended because it is easy to handle and provides a clean finish. Choosing the correct crochet hook size ensures your stitches are neat and consistent.
Basic crochet stitches form the foundation of this project. In this Tutorial on how to make a beautiful crocheted hair clip with a bow, you will primarily use chain stitches, single crochet, and sometimes double crochet. These stitches are simple to learn and create a solid base for the bow design.
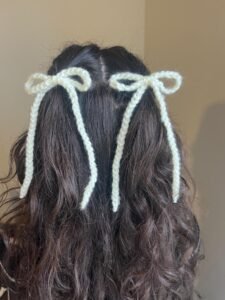
Understanding the structure of the bow is essential. The bow is usually made by crocheting a small rectangular piece, which is then folded and secured in the center. This technique gives the accessory its classic and elegant shape.
Tension control plays a significant role in achieving a professional look. Maintaining even tension throughout your work ensures that the bow appears symmetrical and polished. Practicing this skill will greatly improve your overall crochet results.
Color selection is another important aspect of this Tutorial on how to make a beautiful crocheted hair clip with a bow. Soft colors create a delicate and feminine look, while bold shades can make the accessory stand out.
Finally, attaching the crocheted bow to a hair clip requires careful attention. Using a strong adhesive or sewing it securely ensures durability and long-lasting use.
Step-by-Step Tutorial on How to Make a Beautiful Crocheted Hair Clip with a Bow
To begin the Tutorial on how to make a beautiful crocheted hair clip with a bow, start by creating a foundation chain. The length of the chain will determine the size of your bow, so adjust it according to your preference.
Next, crochet rows using your chosen stitch until you form a small rectangle. This piece will serve as the base of your bow and should have even edges for a clean appearance.
Once the rectangle is complete, fold it in the center to create the bow shape. This step is crucial in the Tutorial on how to make a beautiful crocheted hair clip with a bow, as it defines the final look of the accessory.
Secure the center by wrapping yarn tightly around the middle of the folded piece. This creates the characteristic bow shape and keeps it in place.
After shaping the bow, prepare your hair clip. You can either sew the bow onto the clip or use a strong adhesive to attach it securely.
Finally, check all connections and trim any loose ends. This ensures that your finished piece from the Tutorial on how to make a beautiful crocheted hair clip with a bow is neat, durable, and ready to use.
Creative Variations of the Tutorial on How to Make a Beautiful Crocheted Hair Clip with a Bow
One of the most exciting aspects of the Tutorial on how to make a beautiful crocheted hair clip with a bow is the ability to explore different designs. You can experiment with various sizes to create small, delicate bows or larger statement pieces.
Texture variations can add depth and uniqueness. Using different stitches such as puff stitches or shell patterns can transform a simple bow into a more intricate design.
Color combinations offer endless possibilities. You can create striped bows, gradient effects, or even use multicolored yarn to make your accessory stand out.
Adding embellishments is another creative option. Small beads, buttons, or embroidery details can enhance the beauty of your crocheted hair clip.
Seasonal themes can inspire your designs. Soft pastel colors are perfect for spring, while deeper tones work well for autumn and winter styles.
You can also create matching sets, combining your hair clip with other crochet accessories. This adds a coordinated and stylish touch to your handmade collection.
Tips for Perfecting the Tutorial on How to Make a Beautiful Crocheted Hair Clip with a Bow
Consistency is key when following the Tutorial on how to make a beautiful crocheted hair clip with a bow. Taking your time with each stitch ensures a neat and professional finish.
Practicing regularly helps improve your technique. The more you work on similar projects, the more confident and efficient you will become.
Keeping your workspace organized can make the process smoother. Having all your tools and materials ready allows you to focus fully on your project.
Choosing high-quality yarn enhances the overall look and durability of your hair clip. Investing in good materials makes a noticeable difference.
Paying attention to finishing details is essential. Properly securing the bow and trimming loose ends ensures that your accessory looks polished.
Most importantly, enjoy the creative process. The Tutorial on how to make a beautiful crocheted hair clip with a bow should be a relaxing and enjoyable experience.
Tutorial on How to Make a Beautiful Crocheted Hair Clip with a Bow
What materials are needed for the Tutorial on how to make a beautiful crocheted hair clip with a bow
You will need yarn, a crochet hook, scissors, a yarn needle, and a hair clip base to complete the project.
Is this tutorial suitable for beginners
Yes, the Tutorial on how to make a beautiful crocheted hair clip with a bow is beginner-friendly and uses simple crochet techniques.
How long does it take to complete the project
Most hair clips can be completed within a short time, often less than a few hours depending on your experience.
Can I customize the design
Absolutely, you can personalize your bow with different colors, sizes, and decorative elements.
What type of yarn works best
Lightweight yarn such as cotton or acrylic is ideal for creating a clean and durable finish.
How can I ensure my hair clip is durable
Secure attachment, strong materials, and careful finishing will help ensure your crocheted hair clip lasts longer.
Conclusion
The Tutorial on how to make a beautiful crocheted hair clip with a bow is a simple yet rewarding project that allows you to create elegant and personalized accessories.
Throughout this article, you learned about the basic materials, step-by-step instructions, creative variations, and essential tips to perfect your technique. This project is ideal for anyone looking to explore crochet while producing something practical and beautiful.
Now it is your turn to try the Tutorial on how to make a beautiful crocheted hair clip with a bow and bring your creative ideas to life. Feel free to experiment with different styles and make each piece unique. I would love to hear your honest opinion and any suggestions you may have, so please share your feedback to help improve future content!