
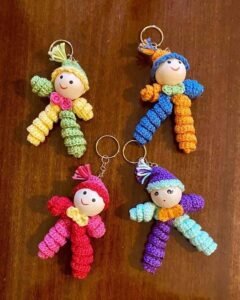
If you are looking for a creative and joyful crochet project, this We make a crochet clown keychain with wooden beads – Step by Step Tutorial will inspire you to bring color and fun into your handmade accessories. Combining crochet techniques with natural wooden beads creates a unique and charming item that can be used as a keychain, bag charm, or gift. The best part? It’s simple enough for beginners and detailed enough for experienced crocheters who want to explore something new.
Crocheting small projects like this clown keychain allows you to use leftover yarn, experiment with different colors, and practice your fine motor skills. The addition of wooden beads adds a rustic and natural touch, making the piece look both playful and elegant. You can customize it by changing the colors of the clown’s hat, hair, or outfit, giving each creation its own unique personality.
In this Step by Step Tutorial, we’ll go through everything you need to know—from choosing the right materials to finishing touches that make your keychain stand out. Whether you want to create it as a gift, a craft fair product, or a fun addition to your key collection, you’ll find this guide easy to follow and rewarding. So, let’s dive into the details of how to make this adorable crochet clown keychain with wooden beads that will surely bring a smile to anyone’s face.
Materials Needed for the Crochet Clown Keychain
To begin this We make a crochet clown keychain with wooden beads – Step by Step Tutorial, you’ll need a few simple materials that are easy to find and affordable. Gather these before starting to make the process smooth and enjoyable.
First, choose your yarn. Cotton yarn is ideal for this project because it provides a neat and firm stitch, which helps your clown hold its shape. Select vibrant colors such as red, blue, yellow, or green to match the joyful theme of a clown. You’ll also need a small amount of white yarn for the clown’s face and other accent colors for details.
Next, pick a crochet hook that matches your yarn weight—usually a 2.5 mm or 3.0 mm hook works perfectly for small projects like this. You’ll also need wooden beads in different sizes: a larger bead for the head and smaller ones for decoration or limbs. These beads not only enhance the visual appeal but also help maintain the keychain’s structure.
Don’t forget the basics—scissors, a tapestry needle for sewing parts together, and some stuffing material to give your clown a soft yet firm body. You’ll also need a keychain ring or lobster clasp to attach your finished creation.
Before starting, it’s helpful to organize all these materials on your workspace. Having everything ready avoids interruptions and makes the crafting experience more relaxing. Once you’re set up, you can move on to creating the base of your crochet clown keychain and assembling it step by step.
Creating the Base of the Clown Keychain
In this section of the We make a crochet clown keychain with wooden beads – Step by Step Tutorial, we’ll start by crocheting the main parts of the clown. The base includes the head, body, arms, and hat, which will later be assembled with the wooden beads.
Begin with the clown’s head. Use your white yarn to crochet a small ball using the amigurumi method—start with a magic ring, then increase evenly until you reach the desired size. Place a wooden bead inside the crocheted ball before closing it completely. This will make the head sturdy and give it a polished look.
For the body, switch to colorful yarn and create a slightly elongated shape using single crochet stitches. You can choose any color combination—try red and yellow or blue and green for a lively effect. Stuff the body lightly before closing it, ensuring that it maintains its form without being too stiff.
The arms and legs can be made with small crocheted tubes or even short strands of yarn tied with knots. Attach smaller wooden beads at the ends to represent the hands and feet. These details give the clown a playful appearance and make the design more dynamic.
Finally, crochet a tiny hat for your clown using a contrasting color. You can add stripes or dots using surface crochet techniques. Attach the hat securely to the head and add a small pompom or bead on top for a cheerful finish.
Assembling and Decorating the Crochet Clown
Now comes the fun part of the We make a crochet clown keychain with wooden beads – Step by Step Tutorial—assembling and decorating your clown. This step brings the individual parts together to form a complete, adorable keychain.
Start by attaching the head to the body using your tapestry needle and matching yarn. Make sure it’s well secured since the keychain will move around frequently. Then, sew the arms and legs symmetrically, keeping them evenly spaced to ensure balance.
Once the body is complete, you can begin decorating. Embroider small black eyes and a red nose using embroidery thread or yarn. Add a gentle smile to bring life to your clown’s expression. You can also use small felt pieces or safety eyes if preferred.
Attach the hat carefully, making sure it’s straight and well-positioned. Some crafters like to add small embellishments such as buttons, ribbons, or even glitter thread to give extra sparkle to their clowns. The wooden beads on the arms or body create a lovely contrast against the yarn and make the keychain stand out.
After finishing the decorations, connect a metal ring or keychain clasp to the top of the hat or back of the head. Ensure it’s securely fastened, as this is what will hold the keychain in place when attached to keys or bags.
You can now admire your completed crochet clown keychain—a delightful piece that showcases your creativity and craftsmanship. Each one you make can have different colors and expressions, making them perfect for gifting or collecting.
Creative Ideas and Personalization
In this final section of the We make a crochet clown keychain with wooden beads – Step by Step Tutorial, let’s explore ways to personalize your project. Customizing your clown adds a personal touch and makes it even more special.
Experiment with different color themes. You can create a pastel clown for a soft, delicate look, or use bold primary colors for a classic circus style. Mixing textures—like metallic yarn or glitter thread—adds a festive touch suitable for holidays or special occasions.
If you love adding charm to your accessories, try incorporating wooden beads of varying shapes or painted designs. You can even paint small patterns on the beads before assembling them to create a more whimsical appearance.
Adding scent sachets or essential oil drops inside the stuffing can transform your keychain into a lightly scented accessory. This little trick adds a pleasant aroma to your keys or purse.
Consider using this project as a meaningful handmade gift. Personalize each crochet clown keychain with the recipient’s favorite colors or initials. It’s a thoughtful gesture that shows time and effort.
Finally, you can turn this simple keychain idea into a larger decorative project. Make a set of clowns and string them together to create a festive garland or car ornament. The possibilities are endless when creativity meets crochet!
Crochet Clown Keychain with Wooden Beads
1. Can beginners make this crochet clown keychain?
Yes! This project is perfect for beginners because it uses simple crochet stitches and small pieces. The step-by-step approach makes it easy to follow and fun to complete.
2. What kind of yarn should I use?
Cotton yarn is recommended because it provides a neat finish and holds the shape well. You can also use acrylic yarn if you prefer a softer texture.
3. Can I replace the wooden beads with something else?
Yes, you can substitute wooden beads with plastic or crocheted beads. However, wooden beads give a more natural and polished look to the finished product.
4. How can I clean my crochet clown keychain?
Gently wipe the yarn and beads with a damp cloth. Avoid soaking in water, especially if you’ve used painted or varnished beads.
5. What other accessories can I make using this pattern?
You can adapt this design into bag charms, zipper pulls, or even car mirror decorations by adjusting the size or adding more beads.
6. How long does it take to make one keychain?
It typically takes about two hours to complete, depending on your crochet speed and the number of details you add.
Conclusion
In this We make a crochet clown keychain with wooden beads – Step by Step Tutorial, we explored how to craft an adorable and cheerful accessory that combines creativity with crochet techniques. You learned how to select the right materials, assemble your clown with precision, and personalize it with colors and wooden bead accents.
This project proves that small crafts can bring great joy and make perfect gifts or decorative items. Now that you’ve mastered the process, experiment with new variations and colors to make each clown truly your own.
Did you enjoy this tutorial? Leave your honest opinion and suggestions below—I’d love to hear how your clown keychain turned out and what creative ideas you added to make it special!