
The Witch Hat Granny Square-Step by Step Tutorial is the perfect project for anyone who loves combining classic crochet techniques with a touch of Halloween magic. This pattern is creative, fun, and easy to follow, making it a great addition to your seasonal decorations or handmade gift collection. Whether you’re an experienced crocheter or just starting, this step-by-step guide will help you make an enchanting witch hat design right in the center of a traditional granny square.
This project blends traditional granny square charm with a whimsical twist. The witch hat design adds a playful Halloween vibe while maintaining the versatility that granny squares are known for. You can use your finished Witch Hat Granny Square-Step by Step Tutorial creations in blankets, pillows, banners, or even bags. The best part is how customizable this project is—you can play with colors, sizes, and textures to make it uniquely yours.
The Witch Hat Granny Square-Step by Step Tutorial is not just about crafting something cute; it’s also about learning essential crochet techniques while expressing your creativity. Each stitch brings you closer to a handmade piece that reflects your love for cozy and festive decorations. With patience and creativity, you’ll complete a witch hat granny square that’s charming enough to become a Halloween favorite year after year.
Materials and Preparation
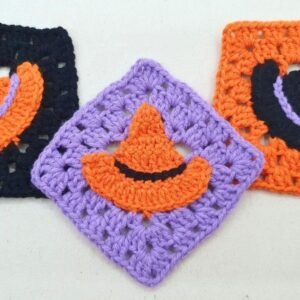
Before starting your Witch Hat Granny Square-Step by Step Tutorial, it’s important to gather all the necessary materials. You’ll need yarn in traditional Halloween colors—black for the witch hat, orange or purple for the background, and maybe a bit of green or yellow for decorative accents. Cotton or acrylic yarn works best since it holds its shape well and is comfortable to work with. You’ll also need a crochet hook suitable for your yarn weight, a yarn needle for weaving ends, and a pair of scissors.
Choosing the right yarn colors can make a big difference in your final result. If you want a bold Halloween feel, stick to the classic black and orange combination. For a more modern touch, you can use muted tones like gray, lavender, or cream with a touch of sparkle. The versatility of this Witch Hat Granny Square-Step by Step Tutorial allows for endless creative possibilities.
Next, prepare your workspace. Good lighting and a comfortable chair can make your crocheting experience much more enjoyable. Keep your materials organized so you can focus on the creative process instead of searching for tools. Having a small project bag nearby also helps keep everything neat and tidy.
Before beginning the main square, it’s a good idea to practice a few basic stitches. The pattern will mainly use chains, double crochets, slip stitches, and half double crochets. These stitches are the foundation of most granny squares, so mastering them ensures a smooth crafting experience.
If this is your first time making a themed granny square, don’t rush. Take your time to understand each step of the Witch Hat Granny Square-Step by Step Tutorial. It’s better to crochet slowly and accurately than to make mistakes that require unraveling. Patience is key in creating beautiful handmade items.
Finally, have fun with the process. Crocheting is not only a craft but also a relaxing and rewarding hobby. Each time you pick up your hook, you’re creating something unique and filled with your personal touch.
Step-by-Step Crochet Instructions
To start your Witch Hat Granny Square-Step by Step Tutorial, make a magic ring. This will be the base of your witch hat. Using black yarn, crochet several stitches into the ring to form a small triangle—the tip of the hat. You can start with two chains and a few double crochets, increasing as you go to shape the hat.
Once the tip is formed, continue adding rows to widen the hat. Each new row should begin and end with an increase stitch, allowing the shape to expand evenly. This technique creates a natural triangular silhouette that resembles a classic witch hat. Be sure to keep your stitches even for a clean finish.
When the hat shape is complete, it’s time to crochet the brim. Use the same black yarn to make a wider row at the bottom of the triangle. You can add a few extra stitches to make the brim flare out slightly. This detail gives your hat a charming, authentic look.
Now, switch to your chosen background color to form the granny square around the hat. Attach your yarn to one corner of the hat base and start crocheting the first round of the square. Work your stitches evenly along the edges of the hat to keep it centered. As you complete each round, the hat will appear framed within the square, creating the perfect Halloween motif.
Continue working your rounds until you reach your desired square size. The beauty of this Witch Hat Granny Square-Step by Step Tutorial is that you can make your squares small for coasters or large for blankets and decorative banners. Make sure to keep your tension consistent throughout so all squares match in size if you plan to connect several together.
When you finish your square, weave in all loose ends using a yarn needle. Then, lightly block your square to ensure it lies flat. This final touch enhances the overall look and helps your stitches stand out beautifully.
Creative Variations and Uses
The Witch Hat Granny Square-Step by Step Tutorial can be customized in so many ways. You can add a decorative band to the witch hat by switching to a contrasting color—such as orange or gold—to mimic a hat buckle. You can even crochet a tiny star or moon to sew onto the background for an extra magical touch.
These squares are perfect for Halloween-themed home décor. You can join several of them together to create a festive blanket or table runner. Imagine wrapping yourself in a cozy witch hat granny square blanket while watching your favorite Halloween movies—it’s the ultimate cozy vibe.
If you prefer smaller projects, you can turn your Witch Hat Granny Square-Step by Step Tutorial into coasters, mug rugs, or even wall art. Frame one square or string several together to make a decorative banner. Handmade Halloween decorations like these always add warmth and personality to any space.
You can also experiment with textures by using different yarn types. For example, try using a metallic or glitter yarn for the background to make your witch hat pop. Alternatively, use a fluffy yarn for a soft, whimsical look. This flexibility allows you to personalize your project for any theme or style.
For a more advanced touch, you can incorporate other Halloween symbols into your granny square set. Combine your witch hat squares with pumpkin, ghost, or spider web squares to create a complete Halloween-themed blanket. This approach showcases your creativity and makes your crochet collection stand out.
Finally, these projects make excellent gifts for friends and family who appreciate handmade crafts. A set of witch hat coasters or a mini Halloween banner can make thoughtful, festive presents that bring smiles and seasonal joy.
Tips for Beginners and Finishing Touches
If you’re new to crochet, don’t be intimidated by this Witch Hat Granny Square-Step by Step Tutorial. It’s designed to be beginner-friendly while still offering opportunities for creative expression. Start slowly, follow each step carefully, and enjoy the process of seeing your design come to life.
Keep your tension steady to maintain consistent stitch sizes. Uneven tension can cause your square to warp or lose shape, so practice a few test stitches before starting your main piece. It’s perfectly fine to redo a section if needed—crochet is all about patience and practice.
When connecting multiple squares, use a join-as-you-go method or whip stitch technique for neat seams. Matching yarn colors create a clean look, while contrasting yarn can add a decorative touch.
Blocking is another essential finishing step. To block your granny square, lightly dampen it, pin it to shape on a flat surface, and let it dry. This process helps even out your stitches and gives your work a professional finish.
If you want to make your Witch Hat Granny Square-Step by Step Tutorial extra durable, consider adding a fabric lining when creating larger items like bags or pillows. This prevents stretching and keeps the shape intact over time.
Lastly, take pride in your creation. Every handmade piece is a reflection of time, effort, and creativity. Your finished witch hat granny square is not only beautiful but also a reminder of your craftsmanship and imagination.
FAQ
1. Can beginners make the Witch Hat Granny Square?
Yes! This tutorial is beginner-friendly and includes simple stitches like chains and double crochets, making it easy for newcomers to follow.
2. What type of yarn works best for this project?
Medium-weight cotton or acrylic yarn is ideal because it’s easy to handle and maintains the square’s shape well.
3. Can I use other colors besides black for the hat?
Of course! You can use purple, gray, or even green for a playful twist on the classic witch hat.
4. How can I make my granny square bigger?
Simply add more rounds around the hat section using your chosen background color until you reach your desired size.
5. Can I join several squares together?
Yes, these squares are perfect for blankets, banners, and other large crochet projects.
6. How do I keep my square from curling or warping?
Blocking your square after finishing helps keep it flat and even. Maintaining consistent tension also prevents warping.
Conclusion
The Witch Hat Granny Square-Step by Step Tutorial is a creative and rewarding crochet project that perfectly blends traditional craftsmanship with festive charm. From the first magic ring to the final stitch, every step helps you improve your skills while producing something unique and delightful. Whether you’re making a single decorative square or an entire Halloween blanket, this pattern offers endless opportunities for creativity.
Through this tutorial, you’ve learned how to shape a witch hat, build a neat granny square, and customize your project with fun details. Now it’s your turn to bring your imagination to life—grab your yarn and hook, and start crocheting your magical creation today!
We’d love to hear your thoughts about this Witch Hat Granny Square-Step by Step Tutorial. Share your honest opinion and suggestions below—your feedback helps inspire more creative and enjoyable crochet projects for everyone!