
Learning How to sew a pot holder – Step by Step Tutorial is a valuable skill for anyone who enjoys cooking or wants to add a personal touch to their kitchen accessories. Pot holders are essential tools that protect your hands from hot pots and pans, and sewing your own allows you to customize the size, shape, and fabric to match your kitchen style. This article will walk you through the entire process of making a functional and attractive pot holder, from choosing the right materials to finishing the edges neatly. Whether you’re a beginner or looking to improve your sewing skills, this tutorial is designed to be clear, practical, and enjoyable.
Sewing a pot holder might seem like a simple project, but it actually requires careful attention to detail to ensure safety and durability. A well-made pot holder needs to be thick enough to resist heat while remaining flexible enough to grip cookware securely. By following this how to sew a pot holder – Step by Step Tutorial, you will gain a better understanding of fabric choices, layering techniques, and sewing tips that result in a quality kitchen accessory you can be proud of.
Additionally, handmade pot holders make excellent gifts for family and friends. Personalized colors and patterns can reflect the recipient’s taste, and a thoughtfully crafted pot holder is both useful and heartfelt. The how to sew a pot holder – Step by Step Tutorial will help you master this project quickly so you can start creating gifts or practical items for your own kitchen.
Materials and Tools Needed to Sew a Pot Holder
Before diving into the how to sew a pot holder – Step by Step Tutorial, it’s important to gather all necessary materials. Choosing the right fabric is key: 100% cotton is highly recommended because it withstands heat well and is easy to clean. Avoid synthetic fabrics as they can melt or catch fire when exposed to high temperatures.
You will also need heat-resistant batting or insulating material specifically designed for pot holders. This layer protects your hands from heat and adds thickness and sturdiness to the pot holder. Popular options include cotton batting or specialty heat-resistant batting made with materials like Insul-Bright.
For sewing, have a strong thread that can handle multiple layers of fabric. Use a matching or contrasting color depending on your style preference. A basic sewing machine is ideal for this project, but hand sewing is possible with patience.
Other helpful tools include fabric scissors, pins or clips to hold layers together, a ruler or measuring tape for accuracy, and an iron for pressing seams and fabric before sewing. Finally, consider adding a loop made from fabric or ribbon for easy hanging, which can be sewn onto one corner of the pot holder.
Step-by-Step Process to Sew Your Pot Holder
Start the how to sew a pot holder – Step by Step Tutorial by cutting two fabric squares and one batting square to the desired size, typically around 8×8 inches or 9×9 inches. Make sure all pieces are cut precisely to ensure even layers.
Next, create a fabric sandwich by layering the two cotton fabric squares on the outside, right sides facing out, and the batting sandwiched in the middle. Pin or clip the layers together carefully to prevent shifting while sewing.
Sew around the edges, leaving a small gap for turning the pot holder right side out. Use a straight stitch and reinforce the corners for durability. After sewing, clip the corners to reduce bulk and turn the pot holder inside out through the gap.
Press the pot holder flat with an iron to smooth seams and edges. Close the opening by hand stitching or using your machine with a top stitch to give a neat finish. This step ensures no raw edges are visible and the pot holder looks polished.
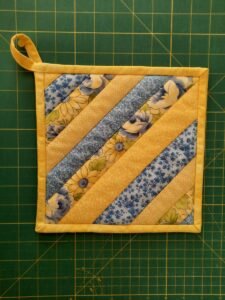
Quilting the layers is an optional but recommended step. You can sew diagonal lines, squares, or decorative patterns to keep the layers from shifting inside and add a stylish touch. This quilting also enhances the pot holder’s structure and heat resistance.
Finally, sew a small fabric loop onto one corner for hanging. This makes the pot holder easy to store and access while cooking.
Tips for Perfecting Your Sewn Pot Holder
When learning how to sew a pot holder – Step by Step Tutorial, paying attention to detail is crucial. Make sure to use fabrics that have been prewashed to avoid shrinkage after the pot holder is completed.
If you don’t have specialty heat-resistant batting, consider doubling regular cotton batting for extra protection. Always test your materials before using them with hot cookware to ensure safety.
Try to keep your seam allowances consistent, usually about ¼ inch, to achieve a neat and balanced finish. Uneven seams can cause the pot holder to look lopsided or have uneven thickness.
Use pins or clips generously during assembly. Multiple layers can shift, which affects the sewing accuracy and final look. Pinning every few inches helps keep everything aligned.
Experiment with decorative stitches when quilting the pot holder layers to add personality. Zigzag or scallop stitches can be both functional and decorative.
Keep your sewing machine well-maintained and use the correct needle type for thicker fabric layers to avoid thread breaks or skipped stitches.
Creative Ideas to Customize Your Pot Holder
The how to sew a pot holder – Step by Step Tutorial offers room for creativity beyond basic sewing. You can mix and match fabrics with different colors or patterns to create unique designs that brighten your kitchen.
Adding embroidery or applique to the front fabric before sewing the layers together personalizes your pot holder further. Initials, kitchen-themed shapes, or fun quotes are popular options.
Consider using seasonal fabrics to make pot holders for holidays or special occasions. These can be great gifts or festive accents in your home.
If you want a reversible pot holder, sew two different patterned fabrics with batting in between and quilt both sides. This doubles your design options and adds fun versatility.
Adding a layer of waterproof fabric to one side creates a dual-purpose pot holder and trivet, protecting your table from hot dishes.
Finally, experiment with shapes beyond squares. Round or heart-shaped pot holders can add charm and variety to your kitchen set.
FAQ
Q: Can I use polyester fabric for pot holders?
A: It’s not recommended because polyester is heat-sensitive and may melt or catch fire.
Q: What kind of batting is best for pot holders?
A: Heat-resistant batting like Insul-Bright is ideal, but thick cotton batting also works well.
Q: How do I make sure my pot holder is heat safe?
A: Use multiple layers including heat-resistant batting and test with hot pots to ensure protection.
Q: Can I wash my sewn pot holder in the washing machine?
A: Yes, if you use cotton fabrics and batting. Use gentle cycle and avoid bleach.
Q: What size should I make my pot holder?
A: A common size is about 8×8 or 9×9 inches, but adjust based on your needs.
Q: How do I prevent the layers from shifting inside the pot holder?
A: Quilting the layers together helps keep everything secure and flat.
Conclusion
The how to sew a pot holder – Step by Step Tutorial has guided you through creating a practical and beautiful kitchen accessory from start to finish. By selecting the right fabrics, assembling layers carefully, and sewing with precision, you can craft pot holders that are both safe and stylish.
This project is great for beginners and seasoned sewers alike, offering opportunities for personalization and creativity.
We encourage you to try making your own pot holder and share your honest feedback and suggestions for future tutorials. Your handmade creation will bring warmth and charm to your cooking space for years to come.