
If you love crafting and want to create something both cute and practical, then this mouse-shaped coin purse- step by step tutorial is the perfect project for you. This adorable little purse combines creativity and functionality, making it ideal for storing coins, small accessories, or even as a thoughtful handmade gift. The best part is that you don’t need to be a professional seamstress to make one—just follow the simple instructions in this article, and you’ll have a charming coin purse in no time.
Handmade items like the mouse-shaped coin purse- step by step tutorial are becoming increasingly popular because they offer a personal touch that mass-produced products simply can’t provide. Not only will you have a unique accessory that shows off your style, but you will also gain the satisfaction of making it yourself. With a little time and creativity, you can turn fabric scraps and a few basic sewing materials into a beautiful, functional purse.
This guide will walk you through every step of creating the mouse-shaped coin purse- step by step tutorial, from gathering materials to sewing and assembling the final product. By the end, you will have learned useful crafting techniques, including cutting fabric accurately, sewing neatly, and adding finishing touches that make your purse both durable and stylish.
Materials Needed for the mouse-shaped coin purse- Step by Step Tutorial
Before you begin your mouse-shaped coin purse- step by step tutorial, it’s important to gather all the necessary materials. Having everything ready will make the process smoother and more enjoyable.
First, you will need fabric for the outer layer of the purse. Cotton works well because it is easy to sew and comes in many colors and patterns. For a sturdier purse, you can use denim or canvas, while felt adds a soft, cozy look. Using fun patterns, like polka dots or floral prints, can make your purse even more eye-catching.
Next, choose a lining fabric to give the inside of your purse a neat finish. This can be a simple solid color or a contrasting print for a fun surprise when you open it. Lining fabric also helps protect the purse’s contents and makes it more durable.
You will also need a zipper to keep your coins secure inside the purse. Choose a zipper length that matches the size of your mouse-shaped coin purse, usually around 5–6 inches. Matching thread, a pair of fabric scissors, sewing pins, and a needle or sewing machine are essential tools for the project.
Interfacing is another important material because it provides structure to the purse, preventing it from feeling flimsy. You can use fusible interfacing, which sticks to the fabric when ironed, making the sewing process easier.
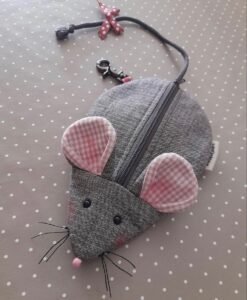
Finally, for the mouse details, you will need small pieces of felt or fabric for the ears, a tiny button or bead for the nose, and embroidery thread for the eyes and whiskers. These details bring your mouse-shaped coin purse- step by step tutorial to life, giving it personality and charm.
Cutting and Preparing the Fabric Pieces
Now that you have all your materials ready, the next step in the mouse-shaped coin purse- step by step tutorial is cutting the fabric pieces accurately. Taking your time with this stage ensures that your purse comes out neat and professional-looking.
Start by deciding the final size of your mouse-shaped coin purse. A typical size might be about 6 inches wide and 4 inches tall. Draw the main body of the mouse shape on paper first to use as a template. This shape should look like a triangle with rounded edges to resemble a mouse’s body.
Once you have the template, place it on your outer fabric and trace it twice—once for the front and once for the back. Repeat this process for the lining fabric so you have four pieces in total: two outer layers and two lining layers.
For the ears, cut two small circles or semi-circles from felt or fabric. These will be sewn onto the top of the purse to give it the signature mouse look. If you want, you can also cut a small tail from fabric or ribbon to attach at the back for extra cuteness.
Don’t forget to cut interfacing pieces the same size as your outer fabric layers. Iron or sew them to the wrong side of the fabric to provide strength and durability to your purse. This step is especially important if you are using lightweight fabrics like cotton.
Before moving on to sewing, arrange all the pieces on your workspace in the order they will be assembled. This helps you visualize the final product and ensures nothing gets left out during the process.
Sewing the mouse-shaped coin purse- Step by Step Tutorial
Now comes the fun part of the mouse-shaped coin purse- step by step tutorial—sewing everything together. Even if you are a beginner, this project is beginner-friendly and uses simple stitching techniques.
Start by sewing the ears onto the front piece of the outer fabric. Place them near the top edge, with the curved part facing inward, so when the purse is assembled, they stick out like real mouse ears.
Next, attach the zipper. Place it face down along the top edge of the front outer fabric and line it up with the front lining fabric underneath. Sew across the edge to secure the zipper between the two layers. Repeat the same process with the back pieces on the other side of the zipper. When you open the fabric pieces, the zipper should sit neatly in the middle, connecting the front and back panels.
Once the zipper is attached, open it halfway so you can turn the purse right side out later. Then, place the outer fabric pieces right sides together and the lining pieces right sides together. Pin everything in place carefully to avoid shifting while sewing.
Sew around the entire edge, leaving a small opening in the lining section. This opening allows you to turn the purse right side out after stitching. Make sure to sew slowly around the corners to keep the mouse shape smooth.
Turn the purse right side out through the opening, then sew the opening in the lining closed with a small stitch. Push the lining inside the purse, and you will see your mouse-shaped coin purse- step by step tutorial taking shape beautifully.
Adding Final Details and Personalization
The last step in the mouse-shaped coin purse- step by step tutorial is adding the final touches that make it truly unique. These little details bring your mouse purse to life and add personality to your creation.
Use embroidery thread to sew small eyes on the front of the purse. You can make simple stitches for eyes or use tiny beads for a more defined look. A small button or bead can serve as the mouse’s nose, and short stitches with black thread create adorable whiskers on each side.
If you cut out a tail earlier, attach it securely to the back of the purse using a few strong stitches. This detail adds charm and makes the mouse design even more realistic.
For extra decoration, you can use fabric paint or small patches to personalize the purse with initials, patterns, or even tiny flowers. This step is completely optional but allows you to express your creativity.
Double-check all the seams to ensure they are secure. A coin purse will be used frequently, so strong stitching is essential to prevent wear and tear over time.
Finally, give the purse a quick press with a warm iron to smooth out any wrinkles. Your handmade mouse-shaped coin purse- step by step tutorial is now ready to use or gift to someone special.
FAQ about mouse-shaped coin purse- Step by Step Tutorial
1. Can I make the purse without a sewing machine?
Yes, you can sew the entire purse by hand using a needle and thread. It will take longer but will be just as functional and cute.
2. What fabric works best for the mouse-shaped coin purse?
Cotton, felt, or denim works well. Felt is especially beginner-friendly because it doesn’t fray.
3. How long does it take to make this purse?
Beginners may need 2–3 hours, while experienced crafters can finish it in about an hour.
4. Can I make the purse in different sizes?
Absolutely! You can enlarge or shrink the pattern to create different sizes for various purposes.
5. Is this project suitable for kids?
Yes, with adult supervision, kids can help with cutting fabric pieces and decorating the final purse.
Conclusion
In this article, we explored the mouse-shaped coin purse- step by step tutorial, covering every stage from gathering materials to adding final decorative touches.
You learned how to cut fabric accurately, sew the purse neatly, attach a zipper, and personalize it with fun details like ears, eyes, and whiskers.
Now it’s your turn to try this project and create a charming, practical purse that reflects your style. We hope you enjoyed this tutorial! Please share your honest opinions and suggestions for future crafting guides—we would love to hear from you.