
Creating an Apple-shaped patchwork- Step by Step Tutorial is a delightful way to combine quilting techniques with a touch of creativity. Patchwork projects shaped like fruits, especially apples, are perfect for seasonal decorations, kitchen accessories, or even as thoughtful handmade gifts. This type of project is beginner-friendly yet enjoyable for experienced quilters who want to explore shapes beyond the traditional square or rectangular blocks. By following a clear tutorial, you can create a piece that is functional, decorative, and uniquely yours.
The beauty of an apple-shaped patchwork lies in its charm and versatility. With just a few fabric scraps, you can turn leftover materials into something beautiful and practical. Apples are symbolic of freshness, nature, and coziness, which makes this project a perfect fit for home décor. Whether you want to make a small coaster, a pot holder, or even a wall hanging, the apple design adds a cheerful vibe to any space. This tutorial will guide you step by step to achieve a clean and creative result.
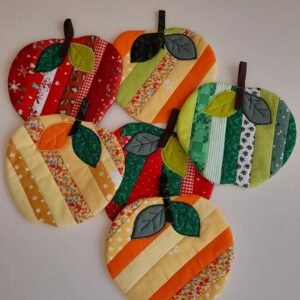
Another reason why this step by step tutorial is so appealing is the opportunity to play with colors and textures. From red and green fabrics to patterned prints with polka dots, florals, or even checks, you can design apples that reflect your personal style. Patchwork is about piecing different fabrics together, and an apple shape adds a fun twist. Let’s explore how to prepare, design, and complete your own apple-shaped project while building skills that can be applied to other creative sewing ideas.
Materials and Preparation for Apple-shaped Patchwork
Before diving into the sewing process, it is important to gather everything needed for the Apple-shaped patchwork- Step by Step Tutorial. Having materials ready ensures that you can focus on the creative part without interruptions. Common supplies include fabric scraps, batting, scissors, sewing pins, needles, a sewing machine, and an iron. If you are new to patchwork, start with simple cotton fabric because it is easy to handle.
Choosing the right fabrics is essential to achieve the apple look. Red fabrics naturally work for the apple body, but you can also experiment with green or even yellow to represent different apple varieties. The leaf can be made from green fabric scraps, while brown or dark-colored fabric works well for the stem. Mixing prints and solids creates depth and adds charm to your project.
Batting is another key component. It provides thickness and stability to your apple-shaped patchwork, making it more functional as a coaster, pot holder, or ornament. Thin batting is ideal for coasters, while thicker batting works well for padded projects like potholders. Always cut the batting slightly smaller than your fabric pieces to reduce bulk along the edges.
Pins or clips help hold the fabric pieces in place during sewing. This step is important because patchwork involves joining multiple pieces, and keeping them aligned ensures clean seams. Beginners sometimes skip this step, but using pins makes the process much easier and prevents frustration.
Using an iron is also crucial in patchwork. Pressing fabric before and after stitching keeps the pieces flat and neat. It also helps seams lie smoothly, giving your final apple-shaped project a professional finish. Investing a little time in pressing makes a big difference in the quality of your patchwork.
Lastly, prepare your sewing space. A clean and organized area with good lighting allows you to focus on accuracy and creativity. Having a cutting mat and rotary cutter can make the process faster, but scissors also work well if used carefully. With preparation complete, you’re ready to start shaping your apple design.
Cutting and Designing the Apple Shape
The next step in the Apple-shaped patchwork- Step by Step Tutorial is cutting and designing the shape. Unlike traditional square patchwork, this project requires curved lines to create the apple form. Begin by sketching an apple shape on paper to use as a template. Keep it simple, with a rounded body, a small stem at the top, and a leaf if you’d like to add extra detail.
Once you have your template, place it on the selected fabric pieces. Use a pencil or fabric marker to trace the outline carefully. Remember that patchwork involves joining smaller pieces together, so you can either cut whole shapes or piece together different scraps for a more creative look. Adding a seam allowance of about ¼ inch around your traced shape is important for sewing.
At this stage, think about color placement. A classic red apple looks cheerful and familiar, but a green apple design might suit your décor better. You can also alternate fabrics to create a patchwork effect, such as combining stripes, dots, or floral patterns. This is where creativity shines, as patchwork is all about personal expression.
If you decide to piece together multiple fabric scraps, arrange them in a way that mimics the roundness of the apple. Sew the smaller scraps together first, press the seams flat, and then cut the final apple shape using your template. This ensures that your apple has both structure and style.
Don’t forget about the leaf and stem. These small details add personality and make the apple instantly recognizable. Green fabric scraps work best for the leaf, while brown or beige fabric can be used for the stem. You can even add embroidery details later to make them stand out.
Once all your pieces are cut, lay them out on a flat surface before sewing. Visualizing the final design helps you adjust fabric placement and ensures you’re happy with the look before stitching begins.
Sewing the Apple-shaped Patchwork
Now comes the most exciting part of the Apple-shaped patchwork- Step by Step Tutorial: sewing your design. Start by joining the fabric pieces if you’re working with patchwork scraps. Sew them together using a straight stitch, keeping a consistent seam allowance. Press the seams flat after each step to maintain neatness.
After preparing the apple body, place it on top of the batting and cut the batting to match. Then, cut a backing fabric of the same shape. This creates a sandwich with the apple front on top, batting in the middle, and backing fabric at the bottom. Pin the layers together to keep them stable.
Begin sewing around the edge of the apple shape, leaving a small opening for turning it inside out. Curves can be tricky, so go slowly and guide the fabric gently through the machine. If you are hand sewing, use small, even stitches for durability.
Once stitched, trim the excess seam allowance and clip small notches around the curves. This step helps the apple shape lie smoothly without puckering when turned right side out. Be careful not to cut through the stitches.
Turn the apple right side out through the opening and gently push out the edges with a blunt tool. At this point, stuff lightly if you want extra padding. For a flat project like a coaster, stuffing is not necessary. Press with an iron to smooth out the shape.
Finally, close the opening with an invisible stitch or by topstitching around the edge. Topstitching not only secures the opening but also gives the project a finished look. Now your apple-shaped patchwork is ready to display or use.
Creative Uses and Variations
The versatility of the Apple-shaped patchwork- Step by Step Tutorial makes it a favorite among crafters. One of the most popular uses is creating coasters. Small apple-shaped patchwork coasters add charm to your table setting and protect surfaces from cups and glasses. They are easy to wash and make wonderful handmade gifts.
Another variation is turning the design into a potholder. By adding thicker batting and a loop at the top, you can create a practical kitchen accessory that is both decorative and functional. Apple-shaped potholders are especially popular for autumn or harvest-themed kitchens.
Wall hangings are another creative idea. Several apple-shaped patchworks can be joined together into a quilted panel, perfect for decorating a kitchen, dining area, or classroom. This project allows you to experiment with colors and create a larger patchwork display.
You can also make stuffed apples as soft ornaments. By adding more stuffing, your patchwork apple becomes a three-dimensional decoration. These can be placed in a decorative bowl, used as pin cushions, or turned into toys for children.
For festive occasions, apple patchworks can be customized with embroidery or embellishments. Adding a stitched name, date, or small details like buttons can make your apple project even more personal and memorable.
Lastly, think about sustainability. This project is perfect for using fabric scraps that would otherwise go to waste. Not only do you create something beautiful, but you also contribute to eco-friendly crafting by repurposing materials creatively.
FAQ About Apple-shaped Patchwork
1. Is apple-shaped patchwork suitable for beginners?
Yes, it is a beginner-friendly project since it uses basic sewing skills and simple shapes.
2. Do I need a sewing machine to make it?
No, you can complete it with hand stitching, though a machine makes the process faster and neater.
3. What type of fabric works best?
Cotton fabric is recommended because it is easy to cut, sew, and press.
4. Can I wash apple-shaped patchwork items?
Yes, most patchwork projects made with cotton can be machine washed, though gentle handwashing helps them last longer.
5. How long does it take to make one apple-shaped patchwork?
Depending on size and complexity, a simple coaster version can be completed in less than an hour.
6. Can I use this design for gifts?
Absolutely. Apple-shaped patchwork projects make unique and thoughtful handmade gifts for family and friends.
Conclusion
In this article, we explored the Apple-shaped patchwork- Step by Step Tutorial, starting from materials and preparation, moving through cutting, designing, sewing, and finally discovering creative uses.
This project combines practicality with creativity, making it suitable for both beginners and experienced crafters.
Now it’s your turn to try making your own apple-shaped patchwork. Remember that patchwork is about creativity, personal expression, and enjoying the process. I’d love to hear your sincere opinion about this tutorial and your suggestions for future projects. Share your thoughts and let’s keep inspiring creativity together!