
Creating an apron with quilt pattern – step by step tutorial is a wonderful way to combine functionality with creativity. Quilted aprons not only protect your clothing while you cook, craft, or garden, but they also add a unique, handmade charm to your daily routine. Whether you are a beginner in quilting or already have experience, this project allows you to practice basic patchwork, enhance your sewing skills, and end up with a beautiful and practical piece.
The idea of making an apron with quilting techniques goes beyond utility. It is also about expressing your personal style and using fabric scraps in an eco-friendly way. A quilted apron is durable, washable, and highly customizable. You can play with colors, fabric textures, and traditional quilt blocks, making each apron a one-of-a-kind creation. This is why learning an apron with quilt pattern – step by step tutorial has become increasingly popular among sewing enthusiasts.
In this article, we will go through all the details you need to create your own quilted apron. We will explain how to choose fabrics, prepare the quilt blocks, assemble the apron, and finish with neat binding. With this apron with quilt pattern – step by step tutorial, you will learn how to transform small fabric pieces into a practical accessory that makes daily tasks more joyful. Let’s get started and discover how this project can bring both beauty and functionality to your handmade creations.
Choosing Materials for Your Quilted Apron
When beginning an apron with quilt pattern – step by step tutorial, the first step is selecting the right materials. Your choice of fabric will influence not only the look of your apron but also its durability and comfort. Cotton is the most popular fabric for quilting projects, as it is easy to cut, sew, and wash. It is also breathable, making it comfortable to wear for long periods.
In addition to cotton fabrics, you will need quilt batting to give the apron thickness and structure. Batting also provides softness and protects your clothing from heat or spills while cooking. When choosing batting, opt for a lightweight option, as a heavy one may make the apron bulky. This detail is important to keep your quilted apron practical and wearable.
Thread is another crucial element in quilting projects. Choose a high-quality cotton or polyester thread that matches or contrasts nicely with your fabric. The thread color can either blend with your quilt blocks or stand out as decorative stitching. In this apron with quilt pattern – step by step tutorial, using a visible topstitch can add extra charm to your design.
Don’t forget the essential sewing tools: rotary cutter, quilting ruler, self-healing cutting mat, pins, and a sewing machine. If you prefer a more traditional approach, you can sew parts of the apron by hand, but a sewing machine will save time and create strong seams. Having the right tools ensures precision and makes the quilting process smoother.
Once your materials are gathered, think about the design of your apron. You can choose classic quilt blocks like the nine-patch, log cabin, or flying geese, or experiment with modern, improvisational styles. Remember that the layout of your quilt blocks will define the visual personality of your apron.
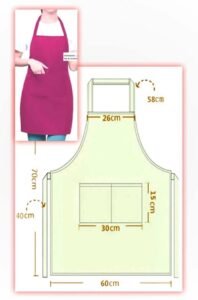
Finally, prepare a simple apron pattern or trace one from an apron you already own. By combining this pattern with quilt blocks, you’ll merge two crafts into one functional and artistic piece. This preparation step will make the following instructions of the apron with quilt pattern – step by step tutorial easier to follow.
Creating the Quilt Blocks
The heart of this apron with quilt pattern – step by step tutorial lies in the quilt blocks. Quilt blocks are small units of patchwork that, when sewn together, form the fabric panel used for the apron. Start by cutting your chosen fabrics into equal-sized squares or rectangles. Accuracy in cutting is essential to achieve neat seams and alignments later.
Once you have your fabric pieces ready, arrange them in your desired layout. Play with color balance, contrast, and symmetry until you are satisfied with the design. Laying out the pieces before sewing prevents mistakes and helps you visualize the final result. This step is particularly enjoyable because it allows you to be creative and experiment with different patterns.
Next, sew the pieces together using a quarter-inch seam allowance, which is standard in quilting. Press the seams open or to one side with an iron to keep the fabric flat and tidy. Proper pressing ensures that your quilt blocks align correctly and the apron looks polished when finished.
Repeat this process until you have enough quilt blocks to cover the apron shape. Depending on your chosen apron size, you may need several blocks for the front panel. It’s important to measure frequently to make sure your quilted fabric matches the apron pattern you prepared earlier.
After sewing the quilt blocks together, layer them with batting and backing fabric. This quilt sandwich is what gives structure and durability to the apron. Pin the layers securely before stitching, to prevent shifting during the quilting process.
Finally, quilt the layers together by sewing straight lines, diagonal lines, or decorative stitching. The quilting design adds both strength and beauty to the apron. With this step complete, you’ll have the quilted panel ready for apron assembly.
Assembling the Apron
Now that the quilted panel is finished, the next stage of the apron with quilt pattern – step by step tutorial is assembling the apron. Begin by cutting the apron shape out of the quilted fabric using the pattern you prepared earlier. Make sure to cut carefully so that the quilt blocks remain aligned and the design stays symmetrical.
Add a lining to the back of the apron if you want a neat finish inside. This is optional but recommended for durability and comfort. The lining hides raw seams and batting, giving the apron a professional look. Use a lightweight cotton fabric for the lining to keep the apron breathable.
Next, prepare the apron ties and neck strap. These can be made from fabric strips folded and stitched, or you can use pre-made bias tape. Attach the ties securely at the waist and neck area, making sure they are long enough to adjust comfortably. Strong stitching in these areas is important because they will handle the most stress during use.
Attach pockets if desired. Pockets are not only practical for holding utensils or small tools, but they also offer another opportunity to showcase quilt patterns. You can make patch pockets using leftover quilt blocks to keep the design cohesive.
Once all pieces are assembled, bind the raw edges of the apron with bias tape. Binding is both decorative and functional, as it protects the fabric edges from fraying. Choose a binding color that complements your quilt blocks for a polished finish.
Give the apron a final press with an iron to smooth out any wrinkles. At this stage, you have completed the main construction of your apron. With the apron with quilt pattern – step by step tutorial, your apron is now ready to wear or gift to someone special.
Tips, Variations, and Creative Ideas
One of the advantages of following an apron with quilt pattern – step by step tutorial is that it opens endless possibilities for personalization. You can make aprons for different occasions, such as holiday themes, floral designs for spring, or rustic styles for gardening. By varying fabric colors and quilt block patterns, each apron will tell a unique story.
For beginners, start with simple quilt blocks like squares or strips. These are easy to cut, sew, and assemble, reducing the risk of mistakes. As you gain confidence, try incorporating more complex patterns such as stars, pinwheels, or applique designs. Each new block you master will expand your quilting skills.
If you prefer a modern look, consider using solid fabrics in bold colors instead of traditional prints. Geometric arrangements and asymmetrical layouts can give your apron a fresh and contemporary feel. This flexibility shows how versatile quilting can be when applied to everyday accessories.
For a functional twist, make reversible aprons by quilting two panels and sewing them together. This way, you get two looks in one apron, which is practical for everyday use. Reversible aprons also last longer, as you can alternate sides to reduce wear.
Another creative idea is to upcycle fabric scraps or old clothing into quilt blocks. This eco-friendly approach not only reduces waste but also gives sentimental value to the apron. Imagine creating a quilted apron using pieces of your children’s old clothes or fabric from past projects.
Finally, don’t forget presentation. If you plan to gift your quilted apron, wrap it nicely and include a handmade note. A personalized apron makes a thoughtful gift for birthdays, holidays, or housewarming events.
FAQ About Apron with Quilt Pattern – Step by Step Tutorial
1. Can a beginner make a quilted apron?
Yes, a beginner can absolutely follow an apron with quilt pattern – step by step tutorial. Start with simple quilt blocks and use easy fabrics like cotton.
2. How much fabric is needed for a quilted apron?
Typically, 1 to 1.5 yards of fabric is enough for the apron body, plus additional fabric for lining, ties, and binding. The exact amount depends on the apron size and quilt block design.
3. Do I need batting for a quilted apron?
Yes, batting is recommended to give the apron structure, durability, and protection. However, you can make a lighter version without batting if you prefer.
4. What is the best quilt block for an apron?
Simple quilt blocks such as nine-patch or log cabin are great choices. They are easy to sew and create a balanced look. More advanced quilters may try stars or pinwheels.
5. Can I wash a quilted apron in the washing machine?
Yes, quilted aprons made with cotton fabrics are machine washable. Use gentle cycles and mild detergent to preserve the colors and stitches.
6. How long does it take to make an apron with a quilt pattern?
Depending on skill level, it may take anywhere from 4 to 8 hours. Beginners may take longer, while experienced quilters may finish more quickly.
7. Can I add pockets to my quilted apron?
Yes, adding quilted pockets is both functional and decorative. Use leftover quilt blocks to create matching pockets.
8. Is it possible to make a reversible quilted apron?
Yes, simply quilt two panels and sew them together. This creates an apron with two different looks.
Conclusion
Making an apron with quilt pattern – step by step tutorial is a rewarding project that blends creativity, sewing skills, and practicality.
From choosing fabrics and designing quilt blocks to assembling the apron and adding finishing touches, every step offers an opportunity to express your style. The result is not only useful but also a piece of handmade art.
I hope this tutorial has inspired you to try making your own quilted apron. If you follow the steps and let your creativity flow, you will end up with something beautiful and functional. Please feel free to share your honest opinion and leave suggestions about this article—I’d love to hear your experiences and ideas!