
If you love creative sewing projects, this Beautiful “half moon boston bag” with a circle made of an old shirt-Step by Step Tutorial is the perfect DIY idea for you. This project combines recycling and fashion design, transforming something as simple as an old shirt into a stunning handmade accessory. Using simple sewing techniques, a bit of creativity, and basic materials, you can create a chic and practical half moon boston bag that’s perfect for everyday use or as a thoughtful handmade gift.
What makes this project truly special is that it’s sustainable and stylish at the same time. Instead of throwing away your old clothes, you’ll give them new life by turning them into something useful and beautiful. The “half moon” shape gives the bag a unique and modern appearance, while the soft fabric from the shirt makes it lightweight and easy to carry. Plus, this design can be customized with different fabrics, linings, and handles to suit your personal style.
In this Step by Step Tutorial, you’ll learn how to cut, assemble, and sew your own Beautiful half moon boston bag using materials you already have at home. Even if you’re a beginner, don’t worry—this tutorial is designed to be easy to follow. All you need is patience, creativity, and a love for crafting. Let’s dive into the details of how to create your very own eco-friendly bag that’s both functional and fashionable.
Materials You’ll Need for the Beautiful Half Moon Boston Bag
To start this Beautiful “half moon boston bag” with a circle made of an old shirt-Step by Step Tutorial, gather all your materials before beginning. This will make the process smoother and more enjoyable. The great thing about this project is that most of the materials are inexpensive or already available at home.
You’ll need one old shirt that you no longer wear but still has good-quality fabric. Cotton or linen shirts work best for this kind of sewing project because they are easy to handle and maintain their shape. You’ll also need scissors, a sewing machine (or needle and thread if you prefer hand-sewing), a zipper, lining fabric, pins, and matching thread. Don’t forget to grab a ruler or tape measure to make sure your pattern pieces are even and precise.
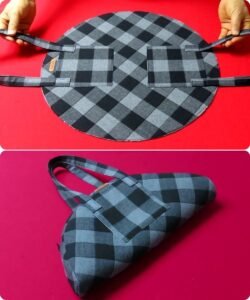
The half moon boston bag gets its name from its curved design. To create that signature shape, you’ll use a circular template, such as a dinner plate or bowl, to trace and cut the rounded edges from your shirt fabric. Make sure to cut two identical pieces for the front and back of the bag. Then, cut a long rectangular strip that will form the side and bottom section connecting the two circles.
Lining your bag is optional, but it adds a professional touch and makes it more durable. For the lining, you can use another piece of recycled fabric, such as the inside of another shirt or even an old pillowcase. The zipper should match or complement your fabric color for a polished finish.
Once you’ve prepared your materials, take a moment to iron the fabric to remove wrinkles. This step might seem small, but it will make sewing much easier and help you achieve clean, crisp seams.
Lastly, organize everything neatly on your workspace. Having all your materials ready will make following this Step by Step Tutorial easier and more enjoyable. Now, you’re ready to begin the fun part—assembling your beautiful handmade bag!
Cutting and Preparing the Fabric Pieces
The next stage of the Beautiful “half moon boston bag” with a circle made of an old shirt-Step by Step Tutorial is cutting your fabric. This part requires precision, so take your time. Use your template to trace two perfect circles on the shirt fabric. Make sure both circles are equal in size. Then, cut them carefully with sharp fabric scissors to avoid frayed edges.
Once your two circles are ready, cut the side panel. This is a long rectangular piece that will connect both circles and form the depth of your bag. The width of this rectangle determines how wide your bag will be. For example, a 4-inch width gives a compact, slim bag, while a 6-inch width creates a more spacious design.
If you’re adding a lining, repeat the same cutting process with the lining fabric. Matching the inner and outer shapes will ensure your bag looks well-finished inside and out. Pin each lining piece to its corresponding outer fabric circle to keep everything in place while sewing.
Before sewing, it’s a good idea to reinforce your fabric by adding interfacing. This material gives structure to your bag and prevents it from sagging. Simply iron the interfacing to the wrong side of your fabric following the manufacturer’s instructions.
You can also use this stage to add any decorations or embellishments you want—like lace, patches, or embroidery. Personalizing your half moon boston bag makes it even more unique and gives it character.
Once everything is cut, labeled, and prepared, you’re ready to move to the most exciting part: sewing and assembling your beautiful upcycled creation.
Assembling and Sewing the Bag
In this section of the Beautiful “half moon boston bag” with a circle made of an old shirt-Step by Step Tutorial, we’ll sew the bag together. Start by attaching the zipper to the side panel. Lay your zipper face down along the top edge of the fabric and sew it using a zipper foot. Then, attach the other side of the zipper to the opposite edge of the panel. This step creates a neat, zippered closure for your bag.
Next, take one of your circular pieces and pin it to one side of the side panel. Make sure the right sides of the fabric are facing each other. Sew slowly along the edge, following the curve. Repeat the same process for the second circle, pinning and sewing it to the opposite side of the panel. Once both circles are attached, you’ll start to see the “half moon” shape come together beautifully.
Turn the bag right side out and check your seams. Trim any loose threads and make small snips along the curved seams to help the fabric lay flat. Be careful not to cut through the stitching. This step gives your bag smooth, rounded edges.
Now, attach the lining by sewing it in the same way—connecting the circular lining pieces to the lining’s side panel. Once that’s done, place the lining inside the main bag, wrong sides together. You can stitch the top edges together for a clean finish or hand-sew them for a more delicate look.
For handles, you can recycle fabric strips, use old belt pieces, or even crochet your own straps. Secure them firmly on both sides of the bag to ensure they can handle weight. If you want to give your bag a designer-inspired finish, you can add small metal rings or hardware to connect the handles.
At this point, your half moon boston bag should look complete. Take a moment to admire your work—you’ve successfully transformed an old shirt into a fashionable accessory!
Tips and Creative Variations
Now that you’ve completed the basic Beautiful “half moon boston bag” with a circle made of an old shirt-Step by Step Tutorial, let’s explore some creative ideas to make your design even more special. The beauty of this project lies in its versatility—you can modify it to match your personal style.
One great idea is to use shirts of different patterns or colors. For example, a striped shirt gives your bag a modern, geometric look, while a floral pattern makes it more feminine and romantic. You can even mix two shirts for a patchwork effect that stands out.
Adding embellishments like buttons, beads, or appliqué can also give your bag personality. If you enjoy embroidery, try stitching a small floral or name design on one side of the bag. It adds a handmade touch that makes it one-of-a-kind.
Another variation is adjusting the size. You can make a mini version to use as a cosmetic pouch or clutch, or enlarge the pattern to create a weekend travel bag. The possibilities are endless, and that’s what makes this project so fun and rewarding.
If you’re into sustainability, try using leftover fabric scraps to make matching accessories like a small wallet, pouch, or even a coin purse. This way, nothing goes to waste.
Lastly, remember that practice makes perfect. The more you experiment with different fabrics and designs, the more professional your sewing will become. With time, you’ll develop your own signature style when creating bags and accessories.
1. Can I make the half moon boston bag without a sewing machine?
Yes! You can sew this project entirely by hand using a backstitch. It takes longer but gives great results if you’re patient and precise.
2. What kind of shirt works best for this project?
Cotton or linen shirts are ideal because they are sturdy and easy to sew. Avoid stretchy fabrics like jersey, as they can lose shape.
3. Do I have to add a zipper?
No, the zipper is optional. You can use buttons, snaps, or Velcro instead for a different closure style.
4. Can I wash the bag after finishing it?
Yes, but it’s best to hand-wash it gently with mild soap and air dry. Avoid using the dryer, as it might damage the fabric or shape.
5. How can I make my bag sturdier?
Use interfacing or add a second layer of thicker fabric to the inside. This helps the bag hold its shape and makes it more durable.
6. Can I sell bags made from this pattern?
Absolutely! Since this is a DIY project, you can sell your handmade bags as long as they are your own creations.
Conclusion
The Beautiful “half moon boston bag” with a circle made of an old shirt-Step by Step Tutorial is a wonderful example of how creativity and sustainability can go hand in hand. You’ve learned how to transform an old shirt into a practical, stylish, and eco-friendly accessory while practicing valuable sewing skills. Each bag you make can reflect your personality through your choice of fabric, color, and details.
By following this tutorial, you’ve taken a step toward more mindful crafting—creating beauty without waste. If you enjoyed this project, try making variations or experimenting with different fabrics to develop your skills even more.
I hope you found this tutorial inspiring and easy to follow! Please share your honest opinions and suggestions below—I’d love to hear how your half moon boston bag turned out and what creative twists you added to your design!