
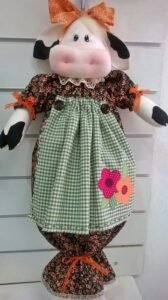
If you are looking for a practical and adorable project, the Berenice fabric bag holder for cows-step by step tutorial is an excellent choice. This tutorial guides you through creating a unique fabric bag holder designed in a cow motif, perfect for kitchens, barns, or craft spaces. The project combines functionality with a fun, farm-inspired design that adds charm to any environment. Following this guide, you can make a holder that is both practical and decorative, ensuring your fabric bags stay organized while adding a personalized touch to your space.
The beauty of the Berenice fabric bag holder for cows-step by step tutorial lies in its simplicity and creativity. Even beginners can follow along to create a high-quality fabric holder. You can select different fabrics to create the cow design, whether using traditional black and white cow print or colorful alternatives for a more playful look. The versatility of this project allows you to adapt the size and style to your needs, whether you are making it for home use or as a gift.
Before starting the Berenice fabric bag holder for cows-step by step tutorial, gather all necessary materials. You will need cotton or linen fabric in two or three colors for the cow’s body and accents, scissors, sewing pins, thread matching your fabric, a sewing machine or hand-sewing needles, and optional stuffing for creating a three-dimensional effect. With your supplies ready, you are prepared to craft a charming and functional cow-inspired fabric bag holder.
Preparing and Cutting the Fabric
The first step in this Berenice fabric bag holder for cows-step by step tutorial involves selecting and preparing your fabric. Begin by choosing the main fabric for the cow’s body and coordinating fabrics for the details such as the spots, ears, and snout. Prewash the fabric to prevent shrinkage later.
Once the fabrics are ready, lay them flat on a clean surface. Use a template or pattern to trace the shapes of the cow body, head, and other parts onto the fabric. Accuracy in this step is crucial to ensure that the pieces fit together neatly.
Carefully cut out all the pieces, keeping your scissors sharp for clean edges. Take your time to follow the outlines precisely, as small deviations can affect the final appearance of your fabric bag holder.
After cutting, organize the pieces according to their placement. This will make assembly more straightforward and help you visualize the final design before sewing.
Optional: Iron the fabric pieces to remove wrinkles. Smooth fabric makes it easier to sew accurately and ensures the final product looks polished and professional.
Finally, check that you have all the pieces required for the project. Missing elements can cause frustration later, so double-check your layout against the pattern before proceeding to sewing.
Sewing the Cow Body
In this step of the Berenice fabric bag holder for cows-step by step tutorial, you will assemble the main body of the cow. Begin by placing the front and back pieces of the cow body together, right sides facing each other. Pin the edges to hold them securely in place.
Sew along the edges with a 1/4 to 1/2-inch seam allowance, leaving an opening at the top where the bag will be inserted. This opening is essential for the functionality of your fabric bag holder.
Reinforce the bottom seam with a double stitch to ensure it can support the weight of the bags without tearing. A strong base is crucial for long-term use.
Once sewn, clip the corners to reduce bulk and carefully turn the body right-side out. Use a blunt tool to push out the corners for a smooth finish.
Optional: Press the seams with an iron for a crisp, professional look. Pressing also helps the fabric lie flat and makes the next steps easier.
Finally, check the structure of the cow body. It should stand upright and maintain its shape, ready to attach additional decorative elements like the spots and ears.
Adding the Cow Features
The next step in the Berenice fabric bag holder for cows-step by step tutorial is attaching the decorative cow features. Start with the spots by sewing them onto the cow’s body. Position the spots symmetrically or randomly, depending on your preferred style.
Next, prepare the ears by folding and stitching the fabric pieces to create a slight three-dimensional effect. Attach the ears securely to the top sides of the cow’s head.
For the snout, cut a contrasting fabric piece in an oval shape and sew it to the center of the cow’s face. This step gives your fabric bag holder its distinctive cow appearance.
You can also add embroidered eyes or use fabric paint or buttons for a playful look. Small details like this add personality to your project.
Ensure that all sewn pieces are securely attached to withstand regular use. A sturdy construction is key to a functional and long-lasting bag holder.
Finally, step back and evaluate the appearance. Adjust any details or sewing if needed to achieve a balanced and appealing cow design.
Finishing the Fabric Bag Holder
The final step of this Berenice fabric bag holder for cows-step by step tutorial involves completing the bag holder for practical use. Fold the top edge of the cow body and stitch a casing if you want to insert a rod or ribbon for hanging.
Ensure all raw edges are finished, either with a zigzag stitch or by using pinking shears to prevent fraying. This adds durability and a polished look.
Insert optional stuffing into the body if you want a slightly puffy, three-dimensional effect. This gives the cow a charming and tactile quality.
Check that the bag holder opening is wide enough to accommodate your fabric bags comfortably. Adjust the casing or opening if needed to ensure ease of use.
Finally, iron the completed bag holder to remove any remaining wrinkles and set the stitches. This step ensures your project looks neat and professionally finished.
Your Berenice fabric bag holder for cows-step by step tutorial is now ready to hang and use. It will keep your fabric bags organized while adding a delightful farm-inspired touch to your space.
Berenice Fabric Bag Holder for Cows-Step by Step Tutorial
1. Is this project suitable for beginners?
Yes, the Berenice fabric bag holder for cows-step by step tutorial uses simple sewing techniques that are accessible for beginners.
2. What type of fabric works best?
Cotton or linen is recommended for durability and easy sewing. Avoid fabrics that fray easily.
3. Can I adjust the size of the holder?
Absolutely. Modify the pattern pieces to accommodate larger or smaller bags as needed.
4. How do I hang the bag holder?
Add a casing at the top and use a rod, ribbon, or hook to hang your bag holder securely.
5. Can I make multiple holders in different colors?
Yes, experiment with different fabric patterns and colors to create a charming collection.
6. How do I care for the fabric bag holder?
Hand wash or machine wash gently on a delicate cycle. Avoid harsh detergents to preserve the fabric and colors.
Conclusion
In this Berenice fabric bag holder for cows-step by step tutorial, you’ve learned how to create a functional and decorative cow-themed fabric bag holder from start to finish.
From cutting and preparing the fabric to assembling the cow body, adding features, and finishing the holder, every step is designed to be approachable and rewarding. This project is perfect for organizing fabric bags while adding a unique and charming touch to your home or gifting to someone special.
Now it’s your turn to bring this project to life. Experiment with colors, textures, and sizes, and enjoy crafting your very own Berenice fabric bag holder for cows. Leave your honest feedback and suggestions to share your experience with others and inspire the crafting community.