
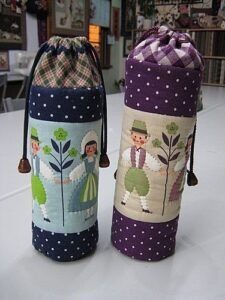
Learning how to make a Bottle holder bag- Step by Step Tutorial is a fun and practical project for beginners and experienced crafters alike. This type of bag is perfect for carrying your water bottle hands-free, making it a great accessory for hiking, going to the gym, or even running errands. Handmade items like this are not only functional but also stylish, and creating them yourself allows for full customization in terms of color, design, and size.
When you follow a Bottle holder bag- Step by Step Tutorial, you gain valuable crafting skills while also ending up with a useful item that you can use every day or gift to friends and family. The tutorial makes the process simple and enjoyable, even if you are completely new to crochet or sewing techniques. Each step is broken down so you can confidently follow along without feeling overwhelmed.
Additionally, making a bottle holder bag is an eco-friendly choice. By using reusable bottles and carrying them in your handmade bag, you help reduce plastic waste and contribute to a more sustainable lifestyle. It is a small yet meaningful step toward a greener planet, and crafting your own bag makes it even more rewarding.
Materials Needed for the Bottle Holder Bag
Before starting the Bottle holder bag- Step by Step Tutorial, it is important to gather all the necessary materials. Being well-prepared saves time and ensures a smooth crafting experience from start to finish.
First, you will need yarn or fabric, depending on whether you are crocheting or sewing the bag. Cotton yarn is a popular choice because it is durable, easy to work with, and washable. For a sewn version, lightweight yet sturdy fabrics like canvas or denim work well.
Next, choose a crochet hook size suitable for your yarn if you are crocheting. Common sizes range from 4 mm to 5 mm, but you can adjust according to the thickness of your material and the size of your water bottle. For sewing, you will need a sewing machine, thread, scissors, and pins.
A drawstring or long strap is also essential for carrying the bag comfortably over your shoulder. You can crochet the strap, sew a fabric one, or even use a ready-made strap for convenience.
Measuring tape is helpful to ensure your bag fits the bottle perfectly. Take measurements of your bottle’s height and circumference before starting to avoid mistakes.
Finally, gather optional decorations like buttons, appliqués, or patches if you want to personalize your bottle holder bag with extra style and creativity.
Once you have everything ready, you can begin crafting without unnecessary interruptions, making the process smoother and more enjoyable.
Step by Step Instructions to Make the Bottle Holder Bag
The Bottle holder bag- Step by Step Tutorial is designed to be simple enough for beginners while offering customization options for advanced crafters. Follow these instructions carefully to create a functional and beautiful bag.
Start by making the base of the bag. For crochet, begin with a magic ring and work single crochet stitches in the round, increasing gradually until the circle matches the diameter of your bottle’s bottom. For sewing, cut a fabric circle using your bottle’s measurements as a guide.
Once the base is ready, work upwards to create the body of the bag. In crochet, continue stitching in the round without increasing to form straight sides. For sewing, cut a rectangular piece of fabric with the same height as your bottle and sew it around the circular base.
Make sure the height is tall enough to cover most of the bottle while leaving space at the top for easy access. Adjust stitch counts or fabric width if needed to fit your bottle snugly.
Next, create the top section where you can insert a drawstring or simply leave it open. For crochet, you can make chain spaces to thread the drawstring through. For sewing, fold and stitch a casing at the top for the cord to go through.
Prepare and attach the strap. If crocheting, make a long chain and work rows of single crochet until it reaches the desired width. If sewing, cut and hem a fabric strip or use ready-made webbing for durability.
Finally, sew or crochet the strap ends to the bag securely. Double-check all seams and stitches to ensure the bag is strong enough to carry the bottle’s weight without tearing or stretching too much.
Customizing and Decorating Your Bottle Holder Bag
One of the best things about following a Bottle holder bag- Step by Step Tutorial is the freedom to customize the design according to your style. You can choose from endless colors, patterns, and decorations to make your bag unique.
For a fun look, consider using variegated yarns or printed fabrics that add visual interest without requiring complicated techniques. These materials automatically create eye-catching designs as you work.
You can also add functional features like small pockets on the outside for carrying keys, coins, or even a phone. This makes the bottle holder bag even more practical for everyday use.
If you enjoy embroidery or appliqué, decorate the sides of the bag with flowers, animals, or geometric patterns. This adds personality and charm while showcasing your creativity.
Changing the strap length is another way to customize your bag. A long strap allows you to wear it crossbody, while a shorter one works well for carrying it by hand or on your shoulder.
Finally, experiment with different closure styles. While drawstrings are common, you can also try button closures, snaps, or even zippers for a more secure design.
Tips for Beginners and Common Mistakes to Avoid
For those new to crafting, the Bottle holder bag- Step by Step Tutorial is an excellent project to start with. However, beginners often face some common challenges, so here are tips to make the process easier.
Always measure your bottle carefully before starting. Making the bag too small or too big can lead to frustration when it does not fit properly.
Use quality materials to ensure durability. Cheap yarns or weak fabrics may tear easily, especially if the bottle is heavy or used frequently.
If crocheting, keep your tension consistent. Loose stitches can make the bag floppy, while overly tight stitches may make it hard to fit the bottle inside.
For sewing projects, press your fabric pieces with an iron before stitching. This helps achieve neat and professional-looking seams.
Do not rush the strap attachment. Make sure it is securely sewn or crocheted to prevent accidents while carrying the bottle.
Finally, practice patience. Your first bottle holder bag may not look perfect, but each project helps you improve your skills and confidence.
FAQ About Bottle Holder Bag Step by Step Tutorial
1. Is a bottle holder bag beginner-friendly?
Yes, it is a simple project suitable for anyone learning crochet or sewing basics.
2. How long does it take to make one?
Depending on the method, it usually takes 2–4 hours to complete.
3. Can I wash my bottle holder bag?
Absolutely. Use machine-washable yarn or fabric for easy cleaning.
4. What size bottle fits best?
Standard reusable bottles between 16–24 oz work perfectly. Adjust measurements for larger bottles.
5. Can I sell handmade bottle holder bags?
Yes, they make excellent craft fair products or personalized gifts for friends and family.
Conclusion
In this article, we explored Bottle holder bag- Step by Step Tutorial in detail, covering materials, instructions, customization ideas, and helpful tips for beginners.
We also answered common questions to ensure you feel confident about starting this project.
Now it is your turn to create a stylish and functional bottle holder bag. Share your honest opinions and suggestions—we would love to hear about your experience and see how you personalize your handmade creations!