
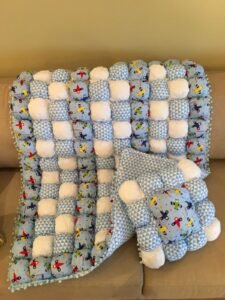
Bubble quilt pattern is one of the most charming and visually captivating techniques in the quilting world, and from the very first stitch, it invites creativity, texture, and softness into your handmade projects. The Bubble quilt pattern stands out because of its unique three-dimensional effect, where each fabric square is slightly puffed to create a cozy, pillowy surface. This technique is perfect for beginners and experienced quilters alike, offering both simplicity and endless customization possibilities.
The beauty of the Bubble quilt pattern lies in its versatility and tactile appeal. Whether you’re crafting a baby blanket, a decorative throw, or a personalized gift, this quilting style adds depth and warmth that traditional flat quilts may not provide. With the right choice of fabrics, colors, and stuffing, your quilt can transform into a stunning centerpiece that reflects your personality and craftsmanship.
In addition to its aesthetic charm, the Bubble quilt pattern is also practical and functional. Its soft, cushioned texture makes it ideal for comfort-focused items such as nursery quilts or cozy lap blankets. As you explore this technique, you’ll discover how easy it is to adapt the pattern to different sizes, themes, and purposes while maintaining its signature look and feel.
Understanding the Basics of the Bubble Quilt Pattern
The Bubble quilt pattern is constructed by sewing small fabric squares into slightly larger backing squares, creating pockets that are then filled with soft stuffing. This process gives each square its signature “bubble” appearance. Unlike traditional quilting, which involves layering and stitching flat surfaces, this method emphasizes dimension and softness.
To begin, you will need two sets of squares: one for the top (slightly larger) and one for the base. The difference in size allows the top fabric to puff when stitched to the base. This simple adjustment is what creates the iconic look of the Bubble quilt pattern, making it instantly recognizable.
Fabric selection plays a crucial role in achieving the desired effect. Cotton is the most commonly used material because of its durability and ease of handling. However, you can experiment with different textures and prints to enhance the visual appeal of your Bubble quilt pattern and make it uniquely yours.
Another essential element is the stuffing. Polyester fiberfill is widely used because it is lightweight and maintains its shape over time. The amount of stuffing you use will determine how pronounced each bubble appears, allowing you to customize the texture of your quilt.
Precision is important when cutting and sewing your squares. Consistent measurements ensure that the bubbles align properly, resulting in a polished and professional finish. Taking the time to measure accurately will significantly improve the final outcome of your Bubble quilt pattern.
Finally, assembling the quilt involves sewing rows of stuffed squares together. This step requires patience, as the bulkiness of the bubbles can make stitching slightly more challenging. However, with practice, you will find a rhythm that makes the process enjoyable and rewarding.
Step-by-Step Guide to Creating a Bubble Quilt Pattern
The first step in creating a Bubble quilt pattern is planning your design. Decide on the size of your quilt and the number of squares needed. Sketching your layout or arranging fabric pieces beforehand can help you visualize the final product and ensure a cohesive design.
Next, cut your fabric into two sets of squares. The top squares should be about one inch larger than the base squares. This difference allows the fabric to gather slightly when sewn, forming the characteristic puff of the Bubble quilt pattern.
Sew each top square to a base square, leaving a small opening. As you stitch, gently fold or pleat the edges of the top fabric to fit the base. This step is where the magic begins, as the fabric starts to take on its three-dimensional shape.
Once the squares are partially sewn, fill each pocket with stuffing. Be careful not to overfill, as this can make the quilt too bulky and difficult to assemble. Finding the right balance is key to achieving a soft yet structured Bubble quilt pattern.
After stuffing, close the opening with a secure stitch. Repeat this process for all squares, ensuring consistency in size and fullness. This repetition may take time, but it is essential for creating a uniform and visually appealing quilt.
Finally, sew the completed squares together in rows, then join the rows to form the full quilt. Adding a backing layer and binding the edges will give your Bubble quilt pattern a finished and professional look.
Creative Variations of the Bubble Quilt Pattern
One of the most exciting aspects of the Bubble quilt pattern is its adaptability. You can experiment with color gradients to create an ombré effect, transitioning smoothly from one shade to another. This technique adds depth and visual interest to your quilt.
Another popular variation involves using themed fabrics. For example, you can create a baby quilt with playful prints or a seasonal design using holiday-inspired patterns. The Bubble quilt pattern lends itself well to storytelling through fabric choices.
You can also vary the size of the bubbles to create different textures. Larger bubbles provide a bold and dramatic look, while smaller bubbles result in a more delicate and intricate design. Mixing sizes within the same quilt can add a unique artistic touch.
Incorporating different materials is another way to enhance your Bubble quilt pattern. Adding minky fabric or soft fleece can increase the quilt’s comfort and make it even more inviting. These materials also add contrast and dimension to the overall design.
For a modern twist, consider using a limited color palette or monochromatic scheme. This approach highlights the texture of the bubbles and creates a sleek, contemporary aesthetic that stands out in any setting.
Lastly, personalizing your quilt with embroidery or appliqué can make it truly special. Adding names, dates, or meaningful symbols transforms your Bubble quilt pattern into a cherished keepsake.
Tips for Perfecting Your Bubble Quilt Pattern
Achieving a flawless Bubble quilt pattern requires attention to detail and a few helpful techniques. One important tip is to use pins or clips to secure the fabric while sewing. This helps maintain the shape of each bubble and ensures even stitching.
Working in small sections can make the process more manageable. Instead of trying to assemble the entire quilt at once, focus on completing one row at a time. This approach reduces stress and allows for greater precision in your Bubble quilt pattern.
Using a walking foot on your sewing machine can also be beneficial. It helps feed the bulky layers evenly, preventing shifting and ensuring smooth seams. This tool is especially useful when joining rows of stuffed squares.
Pressing your seams carefully is another key step. Although the quilt is three-dimensional, flattening the seams slightly can help maintain structure and improve the overall appearance of your Bubble quilt pattern.
Patience is essential when working with this technique. The process may take longer than traditional quilting, but the results are well worth the effort. Taking your time ensures that each bubble is consistent and beautifully crafted.
Finally, don’t be afraid to experiment and learn from mistakes. Each project is an opportunity to refine your skills and discover new ways to enhance your Bubble quilt pattern.
the Bubble Quilt Pattern
What is a Bubble quilt pattern?
A Bubble quilt pattern is a quilting technique that creates a three-dimensional effect by stuffing fabric squares, resulting in a soft and textured surface.
Is the Bubble quilt pattern suitable for beginners?
Yes, the Bubble quilt pattern is beginner-friendly, as it involves simple sewing techniques and repetitive steps that are easy to learn.
What materials are best for a Bubble quilt pattern?
Cotton fabric and polyester fiberfill are commonly used, but you can experiment with other materials to achieve different textures and effects.
How long does it take to make a Bubble quilt pattern?
The time required depends on the size of the quilt and your experience level, but it generally takes longer than traditional quilting due to the stuffing process.
Can I wash a quilt made with a Bubble quilt pattern?
Yes, most quilts made with this pattern are machine washable, but it’s recommended to use a gentle cycle and mild detergent to preserve the fabric and stuffing.
What are common mistakes to avoid?
Overstuffing, inconsistent measurements, and uneven stitching are common issues. Paying attention to detail can help you avoid these problems.
Conclusion
The Bubble quilt pattern offers a delightful blend of creativity, comfort, and craftsmanship, making it a favorite among quilting enthusiasts of all skill levels. Throughout this article, you’ve learned the fundamentals of the Bubble quilt pattern, explored step-by-step instructions, discovered creative variations, and gained valuable tips to improve your technique.
By understanding the importance of fabric selection, precise measurements, and careful assembly, you can create a quilt that is not only beautiful but also durable and functional. The versatility of the Bubble quilt pattern allows you to experiment with different styles, colors, and textures, ensuring that each project is uniquely yours.
Now it’s your turn to bring your ideas to life. Try creating your own Bubble quilt pattern and experience the joy of crafting something truly special. Don’t forget to share your honest opinion and suggestions—your feedback can inspire others and help build a creative and supportive quilting community.