
The Butterfly Quilt Pattern- Step by Step Tutorial is a wonderful way to bring color, creativity, and warmth into your home. Quilting has been an art form for centuries, but butterfly-inspired designs carry a unique charm that feels both delicate and inspiring. Whether you are a beginner or an experienced quilter, this pattern offers a project that is not only enjoyable but also rewarding. The beauty of butterflies stitched into fabric makes this quilt perfect for decorating bedrooms, gifting to loved ones, or simply enjoying as a cozy handmade treasure.
Creating a butterfly quilt pattern may seem like a challenge at first, especially if you are new to quilting. However, when broken down into manageable steps, you will discover that the process is straightforward and highly beginner-friendly. This step by step tutorial will guide you through choosing fabrics, cutting pieces, assembling blocks, and finishing your quilt with care. By the end, you will have a beautiful butterfly-themed quilt that feels personal, meaningful, and crafted with love.
One of the most exciting parts of working on a Butterfly Quilt Pattern- Step by Step Tutorial is how customizable it is. You can choose vibrant fabrics that mimic real butterfly wings or go with soft pastels for a delicate look. Some quilters even prefer using scraps to create patchwork wings, which makes the butterflies look whimsical and unique. No matter your choice, this tutorial ensures that you can adapt the pattern to your own style and preference. With patience and creativity, your butterfly quilt will become a cherished piece in your collection.
Understanding the Butterfly Quilt Pattern
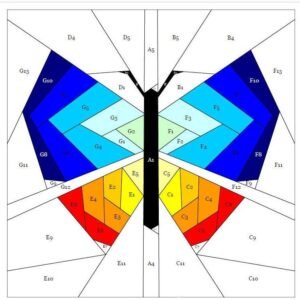
The Butterfly Quilt Pattern- Step by Step Tutorial is designed to simplify the quilting process for beginners while still offering enough creativity for advanced quilters. At its core, the butterfly block is made from simple shapes—triangles, rectangles, and squares—that come together to form a butterfly’s wings and body. Once you understand the construction of one block, you can repeat the process until you have enough blocks to complete your quilt.
When selecting fabrics for your butterfly quilt, it is best to choose a variety of colors and prints. Each butterfly can be unique, allowing you to experiment with bold contrasts or soft blends. For beginners, using pre-cut fabric bundles can make the process much easier since the colors are already coordinated. This is especially helpful when following a step-by-step guide because it removes the stress of fabric matching.
Cutting is an essential step in creating a butterfly quilt. Accuracy matters because every piece will contribute to the final symmetry of your butterfly blocks. Using a rotary cutter, quilting ruler, and self-healing cutting mat will help keep your pieces precise. Beginners often find that measuring twice before cutting helps avoid mistakes. With each cut, you are one step closer to assembling your quilt.
The assembly process of the butterfly quilt block involves sewing smaller pieces together before combining them into larger sections. Typically, you start with the butterfly wings, then add the body, and finally arrange the blocks to create a quilt top. Pinning your pieces before sewing helps maintain alignment, especially if your fabric has patterns or stripes. Even if you are new to quilting, this method makes it easier to create uniform blocks.
Pressing your seams is another vital part of quilting. After sewing each section, press your seams flat with an iron to ensure your quilt top lays smoothly. This also prevents bulk at intersections and helps your finished quilt look polished. Beginners often overlook this step, but in a butterfly quilt, the crispness of seams highlights the delicate wing shapes.
Once your butterfly blocks are complete, you can arrange them in different layouts to achieve the look you want. Some quilters like to place butterflies flying in rows, while others prefer a scattered effect, as if the butterflies are floating freely. This is where your creativity shines, and the Butterfly Quilt Pattern- Step by Step Tutorial encourages you to experiment with layouts before stitching your quilt top together.
Step by Step Tutorial for Beginners
The Butterfly Quilt Pattern- Step by Step Tutorial is crafted with beginners in mind. Each step builds on the previous one, ensuring that the process feels manageable. The first step is gathering your supplies. At a minimum, you will need fabric in different colors, thread, sewing machine, pins, rotary cutter, ruler, and iron. Having the right tools ensures accuracy and efficiency throughout your project.
Next, focus on fabric cutting. Using the measurements provided in the tutorial, cut out your fabric pieces carefully. Beginners often benefit from labeling pieces with sticky notes to stay organized. Since each butterfly block is made of several parts, keeping them sorted will help prevent confusion when sewing them together.
The third step is assembling the butterfly wings. This usually involves sewing triangles and rectangles together to form the upper and lower parts of the wings. Beginners should sew slowly and use a quarter-inch seam allowance for consistency. Once the wings are ready, you can move on to adding the butterfly’s body in the center.
After completing your butterfly blocks, arrange them on a flat surface such as a design wall or large table. This step is important because it allows you to visualize the final quilt before sewing all the blocks together. Beginners often discover that rearranging blocks helps balance colors and patterns across the quilt top.
Sewing the quilt top is the next major step. Start by sewing blocks together in rows, then join the rows to complete the top. Press seams between rows to keep everything flat. Although this step requires patience, it is also one of the most rewarding moments in quilting because you can finally see your butterflies forming a cohesive quilt.
The last step is quilting and binding. Layer your quilt top with batting and backing fabric, then quilt as desired. Simple straight-line quilting works beautifully for beginners, while more advanced quilters may enjoy free-motion quilting to add extra texture. Finish your quilt by adding binding around the edges, and you will have completed a stunning butterfly quilt.
Tips for Success with the Butterfly Quilt Pattern
To make the most of this Butterfly Quilt Pattern- Step by Step Tutorial, it helps to follow some tried-and-true quilting tips. First, always pre-wash your fabrics. This prevents shrinking and color bleeding once your quilt is complete. While it may feel like an extra step, it ensures the longevity of your finished project.
Another helpful tip is to practice your seam allowance before starting. Quilting relies on a consistent quarter-inch seam, and even slight variations can affect the final look of your butterfly blocks. Practicing on scrap fabric allows you to adjust your sewing machine settings and improve accuracy.
Beginners should also invest time in learning how to press seams correctly. Instead of ironing back and forth, gently press with an up-and-down motion. This keeps your fabric from stretching and distorting. Proper pressing also makes piecing your blocks together much smoother.
If you are short on time or overwhelmed by fabric choices, consider starting with a smaller project such as a butterfly pillow or wall hanging before committing to a full quilt. This allows you to practice the techniques in the Butterfly Quilt Pattern- Step by Step Tutorial without the pressure of a large quilt.
Experimenting with color placement can also make your quilt stand out. Try using contrasting fabrics for the wings to give them definition, or opt for gradient shades to create a soft, blended effect. The butterfly design is highly versatile, so you can adapt it to match your style or home décor.
Finally, remember that quilting is as much about the journey as the result. Take your time, enjoy the process, and do not worry about small imperfections. Each quilt tells a story, and your butterfly quilt will reflect your creativity and dedication.
Adding Personal Touches to Your Quilt
One of the most enjoyable aspects of the Butterfly Quilt Pattern- Step by Step Tutorial is the opportunity to add personal touches. This transforms your quilt into something truly one-of-a-kind. Many quilters like to incorporate meaningful fabrics, such as scraps from old clothes, to make their butterfly wings extra special.
You can also personalize your quilt with embroidery. Adding small details such as antennae or flower motifs around the butterflies gives your quilt an extra layer of artistry. Even simple hand-stitching accents can make the butterflies look more lifelike.
For those who enjoy bold designs, consider making each butterfly a different color to represent diversity and vibrancy. This creates a quilt full of energy and personality, perfect for brightening up any space. Alternatively, a monochrome palette can give your quilt a sleek, modern feel while still celebrating the butterfly motif.
Another way to customize your quilt is through the quilting design itself. For example, quilting swirls around the butterflies can create the illusion of movement, while straight lines emphasize symmetry. This step is where your creativity can shine beyond the piecing process.
Adding borders is another method to enhance your quilt. Borders can frame your butterfly blocks and make the overall quilt larger. Depending on your fabric choice, borders can be bold and dramatic or soft and subtle.
Lastly, think about the recipient of the quilt. If you are gifting it, consider choosing colors and fabrics that reflect their personality. A handmade butterfly quilt makes a heartfelt present, and tailoring it to the recipient makes it even more meaningful.
FAQ About the Butterfly Quilt Pattern
1. Is the Butterfly Quilt Pattern suitable for beginners?
Yes, the Butterfly Quilt Pattern- Step by Step Tutorial is designed with beginners in mind. The block construction uses simple shapes, and the tutorial breaks down each step into manageable instructions.
2. How much fabric do I need for a butterfly quilt?
The fabric amount depends on the quilt size you want. A small lap quilt requires fewer yards, while a bed-sized quilt needs significantly more. Beginners may find pre-cut fabric bundles helpful for simplifying the process.
3. Do I need special tools for making a butterfly quilt?
You will need basic quilting tools, including a sewing machine, rotary cutter, ruler, cutting mat, pins, and iron. These tools help ensure accuracy and make the quilting process smoother.
4. Can I make the butterfly quilt using scraps?
Absolutely! Using fabric scraps adds variety and makes each butterfly unique. Scrap quilts often carry extra charm and character, making them a popular choice among quilters.
5. How should I quilt the finished butterfly quilt?
Simple straight-line quilting works well for beginners, but you can also try free-motion quilting for added texture. The choice depends on your skill level and the look you want to achieve.
6. What size should I make my butterfly blocks?
The size of each block can vary depending on the tutorial you follow. Smaller blocks work well for wall hangings, while larger blocks make assembling a full quilt faster.
7. Can I hand-sew a butterfly quilt instead of using a machine?
Yes, hand-sewing is possible, though it requires more time and patience. Some quilters enjoy the meditative process of hand-stitching, while others prefer the speed of machine sewing.
8. How do I prevent mistakes when piecing the butterfly blocks?
The key is accuracy. Measure carefully, cut precisely, and maintain a consistent seam allowance. Pinning pieces before sewing also helps align fabrics correctly.
9. What colors work best for a butterfly quilt?
Bright, contrasting colors highlight the butterfly wings, while soft pastels create a delicate look. You can choose fabrics that match your home décor or go bold with a rainbow of colors.
10. How can I make my butterfly quilt more unique?
You can personalize your quilt with embroidery, creative quilting patterns, unique borders, or meaningful fabric choices. These small touches make your quilt stand out and feel truly yours.
Conclusion
The Butterfly Quilt Pattern- Step by Step Tutorial is a delightful project that combines creativity, skill, and personal expression. From choosing fabrics to assembling blocks and adding finishing touches, every step allows you to explore your artistic side while crafting something functional and beautiful. This tutorial makes the process accessible to beginners while still offering room for customization and creativity for experienced quilters.
Now that you have learned the full process, from fabric selection to finishing, you are ready to create your own butterfly quilt. Remember that quilting is a journey filled with patience and joy, and every stitch brings you closer to a finished masterpiece.
I would love to hear your thoughts—please share your honest opinion and suggestions about this tutorial. What part of the process excites you the most, and how will you personalize your butterfly quilt?