
Butterfly quilt pattern-Step by Step Tutorial is a delightful and inspiring project that brings beauty, color, and creativity to your quilting journey. The butterfly is a timeless symbol of transformation and grace, and incorporating it into a quilt design adds both charm and elegance to your handmade creations. Whether you’re an experienced quilter or just beginning to explore the world of patchwork, this Butterfly quilt pattern-Step by Step Tutorial will guide you through every stage of the process—from choosing fabrics to assembling your final quilt top. With a little patience and imagination, you can turn simple fabric pieces into a stunning work of art.
Creating a butterfly quilt is not only enjoyable but also meaningful. Each butterfly can represent something special—hope, freedom, or change—making the quilt a beautiful keepsake or heartfelt gift. This project offers endless customization options. You can experiment with different color combinations, patterns, and fabric textures to create a quilt that reflects your personal style. The Butterfly quilt pattern-Step by Step Tutorial is also an excellent way to use fabric scraps, turning leftover materials into something vibrant and valuable.
If you’ve ever admired the elegance of butterflies fluttering through a garden, this quilt will let you capture that same magic in fabric form. It’s perfect for decorating a bedroom, nursery, or even as a wall hanging. The detailed steps in this Butterfly quilt pattern-Step by Step Tutorial will ensure that even if you are a beginner, you’ll have all the guidance you need to create a beautiful quilt. So, gather your favorite fabrics, prepare your sewing tools, and let’s start this creative journey together.
Choosing the Right Materials for Your Butterfly Quilt
The first step in the Butterfly quilt pattern-Step by Step Tutorial is gathering the right materials. Choosing quality fabrics will make a big difference in the final look and feel of your quilt. Cotton fabrics are ideal because they’re easy to work with, durable, and available in a wide range of prints and colors. For a butterfly quilt, you can mix floral patterns, solid colors, and even pastel tones to give your butterflies a natural and lively appearance.
When it comes to selecting colors, think about contrast and harmony. The butterfly wings should stand out from the background fabric, so pairing light backgrounds with bright or dark butterfly fabrics creates a stunning visual effect. Consider using shades of yellow, pink, turquoise, and lavender for a cheerful and spring-inspired quilt.
Besides fabric, you’ll need quilting essentials such as a rotary cutter, cutting mat, ruler, sewing machine, pins, and thread. Having these tools ready before you begin ensures a smooth workflow. A good quality batting and backing fabric will also give your quilt a cozy and professional finish.
You might also want to gather some embellishments, like embroidery thread or fabric paint, to add special details to your butterfly wings. These extra touches bring life to your quilt and make it uniquely yours.
Before cutting your fabrics, remember to wash and press them. Prewashing prevents shrinkage and ensures the colors won’t bleed later. Pressing your fabrics makes them easier to cut accurately and sew neatly. Preparation is key in quilting, and this step ensures your project starts off right.
With all your materials organized and ready, you’re set to move on to the exciting part—creating the butterfly blocks that will form the heart of your Butterfly quilt pattern-Step by Step Tutorial.
Creating the Butterfly Blocks
This is where your quilt begins to take shape! Each butterfly block in this Butterfly quilt pattern-Step by Step Tutorial represents a small piece of your overall masterpiece. To start, decide on the size of your butterfly blocks. A common size is 10×10 inches, but you can adjust this depending on your desired quilt dimensions.
Begin by cutting your fabrics according to the pattern templates. You’ll typically need pieces for the wings, body, and background. Use your rotary cutter and ruler to make precise cuts, as accuracy is crucial for the quilt to come together perfectly.
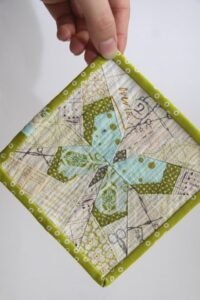
To assemble each butterfly, start with the wings. Sew together the top and bottom wing sections using a ¼-inch seam allowance. Press the seams open to keep your block flat. Once your wings are complete, attach them to the body piece in the center. You can use either straight stitching or appliqué techniques, depending on your comfort level and style preference.
If you choose appliqué, you can hand-stitch or machine-stitch your butterfly pieces onto the background fabric. Appliqué gives a beautiful layered effect, adding depth and texture to your design. Some quilters also enjoy adding embroidery details, such as small veins or outlines, to make the butterflies appear more realistic.
When your butterfly blocks are finished, trim them to uniform sizes to ensure easy assembly later. You can make as many blocks as you like—four, nine, or even twenty—depending on how big you want your quilt to be. The repetition of colorful butterflies across your quilt top creates a stunning visual pattern that captures the essence of nature’s beauty.
Once all your butterfly blocks are completed, you’re ready to start assembling the quilt top and bringing the whole design together.
Assembling and Quilting the Design
Now that you have all your butterfly blocks ready, it’s time to assemble the quilt top. In this Butterfly quilt pattern-Step by Step Tutorial, layout planning plays a vital role. Arrange your butterfly blocks on a flat surface, experimenting with different placements until you find a layout that feels balanced and visually pleasing.
You can arrange the butterflies in rows, diagonally, or even in a scattered pattern to give the illusion of them flying across the quilt. Once you’re happy with your layout, begin sewing the blocks together, row by row. Use a consistent seam allowance and press the seams as you go to keep everything neat.
Next, add sashing (the fabric strips between blocks) if you want to give each butterfly some space to stand out. Sashing helps define each block and adds structure to your quilt top. Borders can also be added around the edges to frame your design beautifully.
After assembling your quilt top, it’s time to layer your quilt sandwich: the quilt top, batting, and backing fabric. Smooth out any wrinkles, and pin the layers together securely with safety pins or basting spray. This step ensures that the layers don’t shift during quilting.
Now comes the quilting itself. You can quilt by hand or with a sewing machine. Straight-line quilting works great for beginners, while free-motion quilting allows for creative patterns like swirls, waves, or even outlines around each butterfly. Choose a quilting style that complements your design.
Once you finish quilting, trim any excess fabric and batting from the edges. Attach the binding around the perimeter of your quilt to seal and finish the edges neatly. Your butterfly quilt is now complete and ready to be admired or gifted.
Adding Personal Touches and Care Tips
This Butterfly quilt pattern-Step by Step Tutorial wouldn’t be complete without adding a personal touch. Your quilt should reflect your creativity and personality, so feel free to customize it in unique ways. You can embroider names, dates, or short messages on the quilt to commemorate a special occasion, such as a baby’s birth, wedding, or anniversary.
Adding decorative stitching or embellishments, such as buttons or beads, can make your butterflies sparkle and stand out even more. However, remember to secure them tightly to ensure durability, especially if the quilt will be used frequently.
When it comes to caring for your finished butterfly quilt, handle it with love. Wash it gently using cold water and mild detergent. Air drying or using a low-heat dryer setting helps preserve the fabric and colors. Avoid bleach or harsh chemicals that might damage your beautiful work.
If you plan to display your quilt, consider hanging it on a wall using quilt hangers or rods. This turns your handmade piece into a stunning home décor accent. The vivid butterfly motifs will brighten up any room and make it feel warm and inviting.
You can also gift your butterfly quilt to someone special. Handmade quilts carry sentimental value and make cherished gifts that last for years. Whether it’s for a friend, family member, or loved one, your thoughtful creation will surely be treasured.
Finally, remember to take pride in your work. Quilting is an art form that connects tradition, creativity, and emotion. Your butterfly quilt represents not only your skill but also the love and care you put into every stitch.
FAQ
1. Is this Butterfly quilt pattern suitable for beginners?
Yes, this Butterfly quilt pattern-Step by Step Tutorial is beginner-friendly. The instructions are simple, and you can adjust the pattern’s complexity to match your skill level.
2. What fabrics are best for a butterfly quilt?
Cotton fabrics are the most popular choice due to their softness and easy handling. You can mix solids, prints, or batiks to make the butterflies more vibrant.
3. How long does it take to complete a butterfly quilt?
It depends on the size and your sewing speed. A small lap quilt can take a few days, while a larger quilt might take a few weeks.
4. Can I make this quilt without a sewing machine?
Yes! You can hand-stitch your quilt if you prefer traditional quilting. It takes more time but adds a personal and authentic touch.
5. How can I make my butterflies look more realistic?
Try adding embroidery details, such as veins on the wings, or use gradient fabrics that mimic real butterfly patterns. You can also outline them with darker thread for emphasis.
Conclusion
This Butterfly quilt pattern-Step by Step Tutorial has guided you through every stage of making a beautiful butterfly quilt—from choosing fabrics and creating blocks to assembling and adding finishing touches.
With patience and creativity, you’ve learned how to turn simple materials into a meaningful piece of art that symbolizes transformation, beauty, and joy.
Now that you’ve finished this project, take a moment to admire your work and enjoy the satisfaction of creating something so special. Quilting is not just about sewing; it’s about storytelling through fabric. We’d love to hear your honest opinion and suggestions about this tutorial—share your thoughts and let us know how your butterfly quilt turned out!