
Creating a handmade quilt during the holidays can bring a deep sense of joy and fulfillment, especially when working on a project as charming and festive as the Christmas angel quilted pattern – step by step tutorial. This beautiful and symbolic design captures the spirit of Christmas with its heavenly motif, making it an ideal gift or decorative piece for your home. In this tutorial, we will walk you through each part of the process, ensuring even beginners can confidently make their own angel-themed quilt.
The beauty of the Christmas angel quilted pattern – step by step tutorial lies not only in its visual appeal but also in the tradition it represents. Quilting has always been a beloved pastime during the colder months, and angel designs are universally recognized as symbols of peace, love, and protection. By creating a quilt with such a meaningful pattern, you not only showcase your creativity but also craft a heartfelt piece that can be treasured for generations.
Whether you’re an experienced quilter or just starting out, following a step by step tutorial will make the entire process more approachable and rewarding. This guide focuses on clarity, structure, and inspiration, offering practical advice and a detailed breakdown of every stage. With your materials gathered and your spirit ready, let’s begin this creative journey and bring your Christmas angel quilted pattern – step by step tutorial to life.
Choosing the Right Materials for Your Christmas Angel Quilt
When beginning your Christmas angel quilted pattern – step by step tutorial, choosing the right materials is essential for both functionality and aesthetic appeal. The base fabric for your quilt should be soft yet durable. Cotton is the most popular choice due to its breathability and ease of sewing. Consider using fabrics in Christmas tones such as deep reds, snowy whites, golds, and forest greens to set the festive mood.
For the angel appliqué or central motif, opt for fabrics with a bit of shimmer or soft pastels to give your angel a gentle glow. Metallic-thread fabrics or those with a slight sheen work beautifully for wings or halos. Don’t hesitate to mix textures to add visual interest, such as pairing flannel for warmth with satin or tulle for delicate details.
Batting is the layer between the top and bottom fabrics of your quilt, and it greatly affects the thickness and warmth. Choose a lightweight batting if you’re making a decorative wall hanging, or go for a heavier option for a cozy throw or bed quilt. Quilters often prefer cotton or polyester batting, both of which are readily available in various sizes.
You’ll also need good-quality thread that complements your fabric. Gold or silver thread can highlight the angel design beautifully, while standard white or beige threads work well for piecing and quilting. Don’t forget other essentials like sharp scissors, rotary cutters, pins, and a quilting ruler to ensure precision.
Finally, prepare any embellishments you want to include. Beads, sequins, or small bells can be added to give your angel a sparkling, festive look. These additions should be sewn securely to ensure they don’t come loose with use or washing.
Having the right materials from the beginning ensures that your project runs smoothly and that your finished quilt not only looks stunning but also holds up beautifully over time.
Designing and Cutting the Angel Pattern
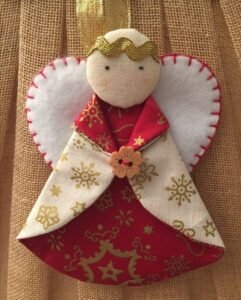
Designing the angel motif is the heart of the Christmas angel quilted pattern – step by step tutorial. You can draw your own angel pattern or use a printed template. The design should feature recognizable elements such as wings, a halo, and a flowing gown. These features make the angel unmistakable and elevate the quilt’s festive charm.
Once you’ve finalized the design, transfer it onto a sturdy piece of cardboard or template plastic. This will make it easier to trace the pattern multiple times without it becoming distorted. Keep in mind the size of your quilt when scaling your angel—too large and it dominates the quilt, too small and it may get lost in the background.
Trace each part of the angel onto the backside of your chosen fabrics. Use a fabric-safe pencil or chalk for accurate lines. Make sure to label the parts so you remember which piece represents which part of the angel. Cut carefully using sharp fabric scissors or a rotary cutter to ensure clean edges.
Arrange the pieces on your quilt top to get a feel for how the angel will look. This step allows you to adjust placement before committing to sewing. You might find that shifting the wings slightly or angling the halo gives the angel more personality and better balance within your design.
Next, fuse the fabric pieces in place using iron-on adhesive (like HeatnBond) or pin them carefully for sewing. If using adhesive, follow the instructions on the package to ensure a strong bond. Ironing the pieces in place helps prevent movement during sewing.
This part of the Christmas angel quilted pattern – step by step tutorial is a wonderful opportunity to get creative. Experiment with colors, layers, and even facial features if you’re comfortable with intricate detailing. Once satisfied with the layout, move on to the stitching.
Appliqué and Quilting Techniques
Appliquéing your angel design is a crucial part of bringing the Christmas angel quilted pattern – step by step tutorial to life. Appliqué involves attaching fabric shapes to your quilt top, and there are multiple ways to do this. Beginners often prefer machine appliqué for its speed and consistency, while more experienced quilters may choose hand appliqué for a more personal touch.
To begin, stitch around the edges of each angel piece using a zigzag, satin, or blanket stitch. A zigzag stitch is common and provides good durability. Choose a thread color that blends with your fabric or a contrasting shade if you want the stitches to stand out.
Take your time with this step to ensure clean lines and secure attachments. Curved areas like halos and wings require slow, careful stitching to avoid puckering. If using a sewing machine, pivot the fabric gently around curves to maintain control.
Once the appliqué is complete, you can start quilting the entire piece. Decide whether to quilt by hand or machine, and choose a quilting pattern that complements your angel. For example, soft cloud-like swirls around the angel can enhance the heavenly theme.
Echo quilting around the angel can also create a beautiful effect, emphasizing the shape of your design. Stitching parallel lines around the silhouette gives a glowing, radiant appearance and adds visual depth.
You can also quilt stars, snowflakes, or other Christmas motifs into the background. This not only adds charm but also helps secure the quilt layers together, increasing durability.
Proper quilting not only decorates but reinforces your fabric layers, turning your Christmas angel quilted pattern – step by step tutorial into a cozy, lasting keepsake.
Binding and Finishing Touches
Binding your quilt is the final step in the Christmas angel quilted pattern – step by step tutorial and ensures a polished, professional finish. Start by trimming any excess batting and backing so that your edges are straight and even. Use a quilting ruler and rotary cutter for precision.
Cut your binding strips from coordinating fabric, usually 2.5 inches wide. Join the strips end to end, press them in half lengthwise, and sew the raw edge of the binding to the front of your quilt using a 1/4-inch seam allowance. Fold the binding over to the back and hand-stitch it down for a neat appearance.
Corners can be tricky, so take your time to create sharp, mitered corners. Fold the fabric neatly and use pins or clips to hold it in place before stitching. With practice, this becomes a smooth and satisfying part of the process.
Now is the perfect time to add any finishing touches. Small embroidery details, like a stitched message or initials, can personalize your quilt. You might also sew a fabric label on the back with the date and creator’s name.
If your quilt is intended as a wall hanging, add small loops or sleeves to the back for easy display. You could also attach a wooden dowel or rod to make it ready to hang immediately.
These finishing steps complete the journey of the Christmas angel quilted pattern – step by step tutorial, leaving you with a beautiful, heartfelt piece that captures the warmth and spirit of the season.
FAQ – Christmas Angel Quilted Pattern
What is the best fabric to use for a Christmas angel quilt?
Cotton is the most recommended due to its durability and ease of use. You can also mix in specialty fabrics like satin or metallics for angelic accents.
Is this project beginner-friendly?
Yes! This step by step tutorial is designed for all skill levels. Beginners can follow each section at their own pace, and more experienced quilters can add advanced details.
Can I use a sewing machine for the entire process?
Absolutely. A sewing machine can be used for appliqué, quilting, and even binding. However, hand-sewn details can add a personal touch.
How long does it take to make a Christmas angel quilt?
Depending on the size and detail, it can take anywhere from a few days to a couple of weeks. Small wall hangings take less time than full-sized throws or bed quilts.
What size should I make my angel quilt?
The size depends on its purpose. A wall hanging might be 20″x20″, while a lap quilt could be 40″x60″. Choose a size that suits your project goals.
Can I customize the angel design?
Yes, and it’s encouraged! Feel free to adjust the wings, dress, or halo, and choose colors that suit your holiday theme or personal preference.
Conclusion
In this Christmas angel quilted pattern – step by step tutorial, we’ve explored everything from choosing fabrics to adding the final stitch. With patience and creativity, you can create a meaningful and beautiful quilt that spreads joy and warmth. Whether it’s a gift for a loved one or a new family tradition, this project is sure to become a holiday favorite.
We’d love to hear about your experience! Leave a sincere opinion in the comments and feel free to share your suggestions or variations of the design. Happy quilting and may your holiday season be filled with peace, love, and creativity!
