
If you’re looking to create a festive and meaningful handmade project this holiday season, learning how to make a Christmas tree quilt – Step by Step Tutorial is the perfect choice. Quilting allows you to combine creativity, precision, and tradition to produce a piece that will be cherished for years. This tutorial will guide you through every stage, from selecting materials to finishing touches, ensuring that even beginners can confidently complete a beautiful Christmas tree quilt.
Creating a Christmas tree quilt is more than just stitching fabric together—it’s about celebrating the spirit of the season with colors, patterns, and textures that evoke warmth and joy. By following this step-by-step guide, you’ll learn how to craft each quilt block, assemble them into a cohesive design, and apply finishing techniques to make your quilt professional-looking and durable. Each section of this tutorial is designed to be clear, practical, and easy to follow.
This step-by-step tutorial also emphasizes the importance of planning, choosing fabrics that complement each other, and understanding basic quilting techniques. By the end of this guide, you will have a festive quilt that can serve as a decorative table topper, wall hanging, or cozy throw for your home. Let’s dive into the wonderful world of quilting and explore how to make a Christmas tree quilt that truly stands out.
Choosing Fabrics and Materials
The first step in making your Christmas tree quilt – Step by Step Tutorial is selecting high-quality fabrics. Cotton is the preferred material for quilting due to its durability, ease of sewing, and ability to hold patterns well. Choose a combination of festive greens, reds, and neutral tones to create a classic Christmas theme.
You will also need a quilting ruler, rotary cutter, and cutting mat for precise cuts. Accurate measurements are crucial to ensure your blocks align perfectly during assembly. Invest in sharp cutting tools, as this will make your quilting experience smoother and reduce fabric fraying.
Batting is another essential material. It provides the quilt’s warmth and texture. Select cotton or polyester batting depending on your preference for weight and feel. Thicker batting creates a puffier, cozier quilt, while thinner batting gives a sleeker appearance.
Thread selection is equally important. Use strong, high-quality cotton or polyester thread that matches or complements your fabric colors. Consistent thread quality ensures durability and prevents breakage during sewing.
Planning your fabric layout before cutting is essential. Arrange swatches to visualize how the colors interact. This step helps avoid clashing tones and allows you to balance bold and subtle colors effectively.
Finally, consider optional embellishments, such as embroidery, applique, or fabric paint, to enhance the Christmas theme. These decorative touches add uniqueness to your Christmas tree quilt and showcase your creativity.
Cutting and Piecing Quilt Blocks
To make a Christmas tree quilt – Step by Step Tutorial, start by cutting your fabric into precise squares, rectangles, and triangles. Each piece forms the building blocks for the quilt’s iconic Christmas tree design. Accurate cutting ensures the quilt aligns properly when sewn together.
Using a rotary cutter and quilting ruler, measure each fabric piece according to your chosen pattern dimensions. Marking with a fabric pencil helps maintain accuracy and prevents mistakes while cutting.
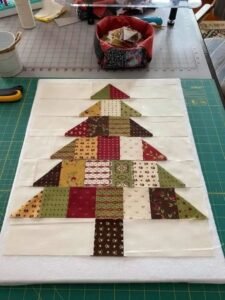
Once the pieces are cut, arrange them in the desired layout. Typically, the Christmas tree shape is created with green triangles or rectangles arranged to form the tree layers. Background pieces, often in neutral tones, frame the tree for contrast.
Sewing the pieces together requires consistent seam allowances, usually ¼ inch. Press seams open with an iron for a flat and professional appearance. Precision in piecing ensures that your blocks remain uniform in size and shape.
After sewing individual blocks, join them to form rows, then assemble the rows to complete the quilt top. Take time to ensure corners and seams match correctly; this alignment is key for a polished look.
Before moving to quilting, double-check the layout and make any necessary adjustments. Minor tweaks at this stage prevent issues during the quilting process and maintain the overall design balance.
Quilting and Adding Batting
Once your quilt top is complete, it’s time to layer and quilt. Start by creating a quilt sandwich with your backing fabric, batting, and quilt top. Smooth out wrinkles and pin or baste the layers to prevent shifting during sewing.
For quilting, you can use straight-line quilting, free-motion quilting, or hand quilting, depending on your skill level and desired style. Quilting not only holds the layers together but also adds texture and dimension to the Christmas tree quilt.
Begin quilting from the center and work outward to avoid fabric bunching. Regularly check the layers to ensure they remain aligned and smooth. Quilting requires patience, but the result is a cohesive, durable piece that can be used or displayed with pride.
Edges and corners are often prone to bunching, so take extra care to guide the fabric evenly through your sewing machine. Pinning frequently helps maintain control and accuracy.
Once quilting is complete, trim the edges of the quilt to even out any irregularities. A clean, uniform edge is essential before adding the binding.
Adding a quilt label or small embroidery details at this stage personalizes your Christmas tree quilt, making it a cherished keepsake or thoughtful handmade gift.
Binding and Finishing Touches
The final step in your Christmas tree quilt – Step by Step Tutorial is adding the binding. Cut strips of fabric for the binding, fold them in half lengthwise, and press. Attach the binding to the quilt edges using a consistent ¼-inch seam allowance.
Miter the corners for a professional finish. Fold and sew corners carefully to ensure a neat, angled appearance. Press the binding flat and stitch it to the back of the quilt using hand or machine stitching.
Additional finishing touches include decorative stitches along the binding or small appliqués on tree branches or ornaments. These enhancements can elevate the quilt’s visual appeal and make it uniquely yours.
Finally, inspect the quilt for any loose threads or uneven stitching. Trim and adjust as necessary to achieve a clean and polished final product.
After completing your Christmas tree quilt, give it a gentle wash and press to soften the fabric and bring out the quilted texture. This finishing step ensures your quilt is ready for use or display.
FAQ About Christmas Tree Quilts
Q: What size should a Christmas tree quilt be?
A: Sizes vary based on purpose. Table toppers may be 30”x30”, while throw quilts often measure 50”x60”.
Q: Can beginners make a Christmas tree quilt?
A: Yes, following this Step by Step Tutorial makes it beginner-friendly with clear guidance.
Q: What type of fabric is best?
A: 100% cotton fabrics are preferred for durability, ease of sewing, and vibrant color retention.
Q: Do I need special tools for quilting?
A: Basic tools include a rotary cutter, ruler, cutting mat, sewing machine, and iron. Optional tools like quilting gloves or walking feet can help.
Q: Can I add a personalized design?
A: Yes, embroidery, applique, and decorative stitching can make your quilt unique.
Q: How do I care for my Christmas tree quilt?
A: Wash gently by hand or machine on a delicate cycle with mild detergent, and air dry or tumble dry low.
Conclusion
Creating a Christmas tree quilt – Step by Step Tutorial combines creativity, craftsmanship, and festive cheer.
From selecting fabrics to piecing blocks, quilting, and adding finishing touches, each step enhances your skills and produces a beautiful, lasting piece.
Whether for personal use, home décor, or as a heartfelt gift, this quilt reflects your dedication and artistic vision. Share your experience, offer suggestions, and inspire others to embrace the joy of quilting this holiday season.