
If you are looking for a practical and eco-friendly project, learning Cloth bag for drinking water bottles- Step by Step Tutorial is a fantastic choice. These bags are not only useful for carrying your bottles safely but also help reduce the use of plastic bags. This tutorial will show you how to create a durable, reusable, and stylish cloth bag using basic sewing techniques. By the end of this guide, you will have a beautiful handmade bag that is both functional and environmentally friendly.
Making a cloth bag for drinking water bottles is also a great beginner sewing project because it requires minimal materials and simple stitches. You do not need advanced sewing skills to complete it, and with a few pieces of fabric, you can create a bag that lasts for a long time. Plus, these bags can be customized with different colors, patterns, and decorations, making them unique and personal.
Another reason to love this project is that it is budget-friendly. Most of the materials needed for the Cloth bag for drinking water bottles- Step by Step Tutorial are affordable or might even be items you already have at home. Old fabric pieces, leftover threads, or simple cotton materials can all be transformed into practical bottle bags with just a bit of creativity and time.
Materials Needed for the Cloth Bag for Drinking Water Bottles
To start this Cloth bag for drinking water bottles- Step by Step Tutorial, you will need a few basic materials. Each item plays an important role in ensuring your bag is sturdy, functional, and visually appealing. The good news is that most of these supplies are easy to find in local stores or online shops.
First, you will need fabric. Cotton fabric is highly recommended because it is strong, washable, and easy to sew. It also comes in a wide variety of colors and patterns, so you can choose one that matches your style. For a more eco-friendly option, you can use recycled fabric from old clothes or curtains.
Second, you need strong thread to make sure the seams hold well even when the bottle is full. Cotton or polyester threads are both good choices because they are durable and easy to work with using a sewing machine or by hand.
You will also need sewing tools like scissors, pins, a measuring tape, and a sewing machine if possible. While it is possible to sew this bag by hand, using a sewing machine makes the process faster and ensures more even stitches.
Additionally, having a drawstring or handle material is important. This will help you easily carry the bottle bag and secure the bottle inside. You can use a cotton cord, ribbon, or even fabric strips for the handle.
Lastly, you can prepare optional decorative elements such as fabric paint, embroidery threads, or patches. These will make your Cloth bag for drinking water bottles more personalized and stylish.
Step-by-Step Instructions to Sew the Cloth Bag
Now that you have all the materials ready, let’s move into the main part of the Cloth bag for drinking water bottles- Step by Step Tutorial. Follow these instructions carefully to create your own handmade bottle bag.
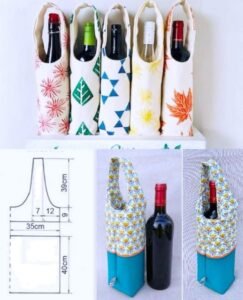
Start by measuring your bottle to determine the size of the bag. The bag should be slightly larger than the bottle itself to make it easy to insert and remove the bottle. Add a few extra centimeters on each side for the seams and top hem.
Next, cut two identical pieces of fabric based on your measurements. These pieces will form the front and back of your bag. Make sure the edges are straight so the final product looks neat and professional.
Place the two fabric pieces together with the right sides facing each other. Pin them along the sides and bottom, leaving the top edge open. This open edge will later become the opening of the bag.
Sew along the pinned edges using a straight stitch, keeping the top side open. After sewing, trim any excess fabric from the seams to reduce bulk and turn the bag inside out so the right side of the fabric is now visible.
Fold the top edge of the bag inward twice to create a clean hem. This will prevent the fabric from fraying and will give your bag a professional finish. Sew along the fold to secure the hem in place.
Finally, attach the handle or drawstring. If you are using a drawstring, sew a small casing at the top edge before hemming so the cord can pass through easily. Pull the cord through, knot the ends, and your Cloth bag for drinking water bottles is ready to use.
Tips to Customize Your Cloth Bag
One of the best things about the Cloth bag for drinking water bottles- Step by Step Tutorial is that you can personalize it in many creative ways. Customizing your bag makes it more fun to use and also a great gift idea for friends and family.
You can add decorative stitching along the edges using colorful threads. This not only strengthens the seams but also adds a beautiful design element to your bag.
Another idea is to use fabric paint or markers to draw patterns, write names, or create fun designs on the bag. This is especially nice if you are making the bags for kids or as party favors.
If you know basic embroidery, you can stitch simple flowers, initials, or geometric shapes on the fabric before sewing the pieces together. This makes the bag look handmade and unique.
You can also experiment with different fabric combinations. For example, use a patterned fabric for the main part of the bag and a solid color for the handles or drawstring. This contrast gives the bag a stylish look.
Adding an inner lining is another option. A lining makes the bag more durable and helps absorb any condensation from cold water bottles.
Lastly, you can adjust the size of the bag to fit other items besides water bottles. The same steps can be used to make lunch bags, small tote bags, or storage pouches.
Benefits of Using a Cloth Bag for Drinking Water Bottles
Using a Cloth bag for drinking water bottles has many practical and environmental benefits. By following this tutorial, you are not only learning a new skill but also helping the planet by reducing single-use plastics.
Cloth bags are reusable and washable, making them more hygienic than disposable plastic bags. You can wash them regularly to keep them clean and fresh.
They are also eco-friendly because they reduce plastic waste. Every time you use a cloth bag, you are preventing another plastic bag from ending up in the trash or polluting the environment.
Another benefit is durability. A well-made cloth bag can last for years, saving you money in the long run because you won’t need to buy new bags frequently.
Cloth bags are also safer for carrying water bottles because the fabric provides a better grip, reducing the risk of slipping or breaking.
Finally, making your own bag gives you control over the design, size, and materials, allowing you to create a product that perfectly fits your needs and style.
FAQ – Cloth Bag for Drinking Water Bottles
1. Can I sew the bag by hand instead of using a sewing machine?
Yes, you can sew the entire bag by hand using a simple backstitch. It will take more time, but the result will still be strong and functional.
2. What type of fabric is best for a water bottle bag?
Cotton fabric is the best choice because it is strong, easy to sew, and washable. Canvas and denim are also good options for extra durability.
3. How do I wash the cloth bag?
You can wash it in a washing machine with mild detergent. Let it air dry to maintain the fabric quality.
4. Can I make this bag in different sizes?
Absolutely! Just adjust the measurements according to the size of the bottle or item you want to carry.
5. How can I make the bag waterproof?
You can use waterproof fabric or add a waterproof lining inside the bag for extra protection.
6. Is this project suitable for beginners?
Yes, this Cloth bag for drinking water bottles- Step by Step Tutorial is perfect for beginners because it involves basic sewing techniques and simple materials.
Conclusion
In this article, we learned how to make a Cloth bag for drinking water bottles- Step by Step Tutorial using simple materials and easy sewing techniques.
We covered everything from choosing the right fabric to customizing the design and understanding the benefits of using reusable cloth bags.
Now it is your turn to try this project at home! Share your honest opinion about this tutorial and let us know if you have any creative suggestions or ideas for future projects. Your feedback will help us create more helpful and inspiring content for sewing enthusiasts like you.