
A clothespin holder – Step by Step Tutorial is one of those practical yet charming projects that bring both organization and style into your daily routine. Whether you are a beginner in sewing or someone who enjoys crafting simple yet useful household items, creating your own clothespin holder can be a rewarding experience. Not only does it help you keep all your clothespins in one convenient place, but it also allows you to add a personal touch to an everyday object.
When you make a clothespin holder at home, you have the freedom to choose fabrics, patterns, and colors that match your style. It becomes more than just a storage solution; it turns into a small handmade piece that reflects your creativity. Many people enjoy these types of DIY projects because they combine functionality with a sense of accomplishment. A well-made clothespin holder will make laundry days easier and keep your pins safe, clean, and always within reach.
This clothespin holder – Step by Step Tutorial is designed to be clear, practical, and beginner-friendly. You don’t need to be a professional seamstress to follow it. With a few simple materials, some basic sewing techniques, and a little patience, you can create a durable and beautiful clothespin bag or hanger. In this guide, you will learn every step, from selecting the right fabric to sewing the final stitches, so you end up with a functional and decorative item for your home.
Materials You Will Need for the Clothespin Holder
Before starting this clothespin holder – Step by Step Tutorial, it’s important to gather all the supplies you’ll need. Having everything prepared in advance makes the process smoother and more enjoyable. The great thing about this project is that it doesn’t require expensive materials, and you may even use fabric scraps or upcycled pieces from old clothes.
The main material you will need is fabric. Cotton fabric works wonderfully because it is easy to sew and durable enough to hold the weight of clothespins. You can choose a plain design for a minimalist look or opt for colorful prints that brighten up laundry day. Make sure the fabric is sturdy but not too thick, so it remains flexible.
Next, you’ll need lining fabric. Adding a lining makes the clothespin holder stronger and ensures it lasts longer. It also helps give a neat finish on the inside, making the holder look more professional. If you want a waterproof version, consider using vinyl or oilcloth as the lining.
You’ll also need thread, scissors, and pins for the sewing process. Choosing matching or contrasting thread can enhance the design. A wooden or plastic hanger is essential if you want a hanging version of the clothespin holder. This makes it easier to carry and hang on a clothesline or hook while you are doing laundry.
Another helpful material is interfacing, which adds structure to your clothespin holder. This is optional but highly recommended, especially if you want the bag to maintain its shape even when empty. Lastly, don’t forget a sewing machine or a needle if you plan to sew by hand. Although sewing by machine is faster, hand-stitching gives a charming handmade feel.
By preparing all these materials before starting the clothespin holder – Step by Step Tutorial, you’ll avoid interruptions and enjoy a more relaxed crafting session. Once everything is ready, you can move on to the exciting part: cutting and sewing.
Step by Step Instructions to Sew a Clothespin Holder
The heart of this clothespin holder – Step by Step Tutorial lies in the sewing process. Each step is simple, but together they create a sturdy and attractive final product. Let’s go through the process step by step so even beginners can follow with ease.
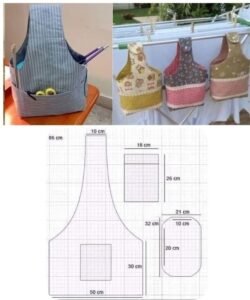
The first step is cutting the fabric pieces. Measure and cut two rectangles of fabric in the size you want your holder to be. A common size is about 12 inches wide and 15 inches long, but you can adjust according to how many clothespins you usually use. Cut the same size pieces for the lining as well.
Next, prepare the opening for the hanger. If you are using a hanger, mark a semi-circle at the top center of your fabric to create an opening. This space allows the hanger hook to fit through. Make sure the cut is neat because it will be visible in the final design.
Now, sew the fabric and lining together. Place the outer fabric and lining right sides together and stitch along the edges, leaving the top part open. After stitching, turn the pieces right side out and press them flat with an iron. This step helps the fabric lay neatly and makes the sewing easier.
Once the base is ready, it’s time to assemble the pocket section. Some clothespin holders have a pocket in the front for extra storage. If you want one, cut an additional piece of fabric, hem the edges, and stitch it onto the front panel. This makes the design more practical and stylish.
Finally, sew the pieces together to form the bag. Place the two main panels together, with the lining inside, and stitch along the sides and bottom. Leave the top open for inserting the hanger. Once done, slip the hanger inside, and your clothespin holder is complete.
By following these easy instructions, you can successfully finish your first clothespin holder – Step by Step Tutorial. The satisfaction of creating something both useful and pretty will encourage you to try more handmade household items.
Creative Ideas for Your Clothespin Holder
One of the most enjoyable parts of this clothespin holder – Step by Step Tutorial is the opportunity to personalize the design. There are countless creative ways to make your clothespin holder unique and stylish. Instead of sticking to a plain design, you can experiment with colors, patterns, and decorative details.
For example, you can choose bright floral fabrics for a cheerful summer look or elegant neutral tones for a minimalist design. If you enjoy themed projects, you might select fabrics with laundry or sewing motifs to make the holder even more fitting for its purpose.
Adding appliqués or embroidery is another way to customize your project. You can stitch a flower, a bird, or even your initials onto the front. These small touches make the clothespin holder a personal piece that reflects your taste and creativity.
Another fun option is to create a quilted clothespin holder. Using quilted fabric or adding a thin layer of batting between the fabric and lining gives the bag extra durability and a cozy appearance. Quilted designs are also great if you love patchwork projects.
You can also experiment with different shapes. Instead of a simple rectangular bag, try a rounded bottom or even a heart-shaped clothespin holder. These variations bring charm and originality to your creation while keeping it functional.
Finally, consider decorative trims such as lace, ribbon, or buttons. These embellishments are inexpensive but can dramatically enhance the final look. By combining practical sewing with decorative ideas, you’ll transform a basic clothespin holder into a handmade piece of art.
Tips for Making Your Clothespin Holder Last Longer
Once you have completed this clothespin holder – Step by Step Tutorial, you will want your creation to last for years. With the right care and small adjustments, you can ensure your clothespin holder remains strong and functional over time.
First, always choose durable fabric. Lightweight fabric may look nice but can wear out quickly under the weight of multiple clothespins. Cotton canvas, denim, or upholstery fabric are excellent choices for long-lasting results.
Second, reinforce the stitching. Clothespins can be heavier than expected when stored together, so double-stitching the seams will give extra strength. Reinforcing the corners also prevents tearing after frequent use.
Third, remember to wash and maintain the clothespin holder. Since it is used outdoors, it may get dusty or dirty. Choosing machine-washable fabric ensures you can easily clean it when necessary. Avoid leaving it under rain or direct sun for long periods to prevent fading.
Adding a lining is another way to extend the life of your holder. The lining not only strengthens the structure but also protects the outer fabric from wear. Waterproof lining is especially helpful if you hang the clothespin holder outside.
You can also consider rotating between two clothespin holders. This way, while one is in use, the other can rest and be washed, reducing overall wear and tear. Many crafters make multiple holders with different designs for variety and practicality.
By applying these simple tips, your handmade clothespin holder will stay beautiful and functional for a long time, making your crafting effort even more rewarding.
FAQ about Clothespin Holder – Step by Step Tutorial
1. What is the best fabric for a clothespin holder?
The best fabrics are cotton, canvas, or denim, as they provide durability and strength to hold multiple clothespins.
2. Do I need a sewing machine to make a clothespin holder?
No, you can sew it by hand, but a sewing machine makes the process faster and ensures stronger seams.
3. How many clothespins fit in a typical holder?
A medium-sized holder usually carries between 50 to 70 clothespins, depending on their size.
4. Can I make a clothespin holder without a hanger?
Yes, you can design a pouch-style holder with a loop for hanging instead of using a hanger.
5. How do I wash my clothespin holder?
If made with washable fabric, you can clean it in a washing machine on a gentle cycle. Always air-dry to maintain its shape.
6. Can I use recycled fabric for this project?
Absolutely! Old jeans, shirts, or tablecloths can be repurposed into a sturdy and eco-friendly clothespin holder.
Conclusion
Creating your own clothespin holder – Step by Step Tutorial is a fun, practical, and budget-friendly project. It combines the joy of crafting with the usefulness of an everyday household item. From choosing fabrics and cutting pieces to sewing and adding creative touches, every step of the process allows you to express your creativity while producing something functional.
Now that you know how to make a durable and beautiful clothespin holder, you can enjoy more organized laundry days. Try experimenting with different fabrics and styles to create unique versions for yourself or as thoughtful handmade gifts.
I’d love to know what you think about this project! Share your honest opinion and suggestions so we can make future tutorials even more helpful and inspiring.