
Learning how to make a cow quilt – Step by Step Tutorial is a rewarding journey for anyone who loves quilting and handmade crafts. Quilts are more than just fabric stitched together; they tell stories, capture creativity, and add warmth to any home. When you combine the art of quilting with a fun design like a cow motif, you not only create a cozy blanket but also a charming piece of décor that reflects personality and style. Whether you are a beginner or an experienced quilter, this tutorial will guide you through the process in a clear and enjoyable way.
The idea of creating a cow quilt can sound intimidating at first, especially when you imagine all the pieces and details needed to form the playful cow blocks. However, by following a structured Step by Step Tutorial, the process becomes simple, manageable, and fun. Quilting is not about perfection—it is about the joy of creating something unique with your own hands. With the right fabric choices, careful cutting, and a steady approach to piecing, you can transform basic materials into a quilt that feels like a true work of art.
In this article, we will carefully explain every stage of making a cow quilt – Step by Step Tutorial. You will learn how to select fabrics, cut and piece your blocks, assemble the quilt top, add borders, quilt the layers, and finish with binding. Each section will be broken down into easy steps with detailed explanations so you can feel confident while creating. By the end, you will not only have a beautiful quilt but also gain valuable quilting skills that you can apply to future projects.
Choosing Fabrics and Preparing Materials
When beginning your cow quilt – Step by Step Tutorial, the very first step is fabric selection. Choosing the right fabrics can make or break the design. For the cow pattern, you will need black, white, and cream fabrics to mimic the cow’s classic look, along with additional accent fabrics for the background and borders. Quilters often use high-quality cotton because it is durable, soft, and easy to sew.
Once you have your fabrics, preparation is essential. Wash and press your fabrics before cutting to prevent shrinking later. Pressing the fabric also makes it easier to cut cleanly and accurately. Accurate cutting is one of the foundations of quilting, and it ensures that all your blocks will fit together neatly.
You will also need a rotary cutter, cutting mat, and quilting ruler for precision. These tools save time and make sure your pieces are consistent in size. When cutting out the cow quilt blocks, measure twice and cut once to avoid waste. Small mistakes in measurement can add up and cause misalignment during assembly.
Beyond fabric, gather other supplies like thread, pins, scissors, and a sewing machine. You may also want batting for the middle layer and backing fabric to complete the quilt. Organizing everything before you start ensures a smoother and more enjoyable quilting experience.
Consider choosing playful background fabrics to add extra character to your quilt. Pastel blues, soft greens, or even barnyard prints complement the cow design beautifully. Don’t be afraid to experiment, as quilting allows space for creativity and personal expression.
Finally, prepare a pattern or template for the cow block. Some quilters prefer using paper piecing for precision, while others rely on traditional patchwork. Having a clear plan will save time and reduce stress when piecing the quilt together.
Cutting and Piecing the Cow Blocks
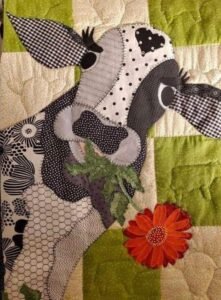
The heart of a cow quilt – Step by Step Tutorial is the cow block itself. Each block represents the main motif, and repeating these blocks across the quilt creates a cohesive theme. Start by cutting squares and rectangles of black, white, and cream fabrics to build the cow’s body and spots.
Piecing begins with assembling the smaller units. For example, sew half-square triangles to form ears or horns, and join rectangles for the face and body sections. Press seams carefully after each step to keep the fabric flat and neat. Pressing is just as important as stitching, as it helps the blocks line up correctly when joined together.
When creating the cow’s face, small details such as eyes, nose, and spots bring the design to life. These details can be added with applique techniques, embroidery, or carefully pieced shapes. Applique allows for more flexibility and creativity, especially if you want to give each cow a slightly different expression.
After piecing individual units, sew them together to form the complete cow block. Pay attention to seam alignment so that the block looks balanced and professional. A ¼-inch seam allowance is standard in quilting and helps ensure consistency across blocks.
Repeat the process until you have enough blocks for your desired quilt size. Smaller quilts may use just a few blocks with borders, while larger quilts may require dozens of cow blocks arranged in rows and columns.
Finally, lay out all your blocks on a design wall or large flat surface before sewing them together. This helps you visualize the overall quilt design, balance colors, and adjust placement as needed.
Assembling the Quilt Top and Adding Borders
Now that you have completed the cow blocks, the next stage in this cow quilt – Step by Step Tutorial is assembling the quilt top. Begin by joining your blocks row by row, carefully matching seams at the intersections. Pinning helps keep seams aligned and prevents shifting while sewing.
After sewing rows together, press the seams flat to reduce bulk. A well-pressed quilt top not only looks better but also makes quilting easier in later steps. Take your time during this stage because neat assembly creates a polished finish.
Next, consider adding sashing between your cow blocks. Sashing is a strip of fabric placed between blocks to give them breathing space and highlight the individual motifs. White, gray, or light blue sashing works well with cow blocks, adding contrast and structure to the design.
Borders are another important element. Adding a border frames the quilt and helps bring all the blocks together into a unified piece. Choose borders that complement your cow theme, such as solid colors, gingham, or barn-inspired prints. Borders also give you flexibility in adjusting the final size of your quilt.
Once the quilt top and borders are complete, prepare the quilt sandwich. This consists of the quilt top, batting, and backing fabric. Layer them carefully, making sure everything is smooth and wrinkle-free. Use safety pins or basting spray to hold the layers together before quilting.
Lastly, step back and admire your quilt top. Seeing the completed design at this stage is incredibly rewarding, and it motivates you to continue to the final steps of quilting and binding.
Quilting and Binding the Final Cow Quilt
The final stage of this cow quilt – Step by Step Tutorial is quilting and binding. Quilting refers to stitching through all three layers (top, batting, and backing) to hold them together securely. There are many quilting styles to choose from, ranging from simple straight lines to intricate free-motion designs.
For a cow quilt, simple quilting often works best. Straight lines stitched along the seams (known as “stitch in the ditch”) highlight the piecing without distracting from the cow motifs. However, if you want more creativity, you could quilt patterns like swirls, grass, or barn-themed shapes.
Start quilting from the center of the quilt and work outward to avoid puckering. Make sure to smooth the layers frequently as you sew. Patience is key, as rushing through quilting can create uneven stitches or wrinkles in the fabric.
After quilting, it’s time to bind the edges. Binding is a strip of fabric sewn around the edges to finish the quilt neatly. Cut binding strips, join them into one long piece, and sew them around the quilt’s perimeter with a ¼-inch seam allowance. Fold the binding over to the back and hand-stitch for a clean finish.
Choosing the right binding fabric adds another touch of style. A contrasting color can create a bold frame, while a subtle print blends softly with the quilt’s design. For cow quilts, black or red binding often works beautifully.
Once the binding is finished, give your quilt a final press to smooth out any wrinkles. Your cow quilt is now complete and ready to be used, displayed, or gifted.
FAQ about Cow Quilt – Step by Step Tutorial
What is the best fabric for making a cow quilt?
Cotton fabric is the most popular choice because it is durable, soft, and easy to sew. It also presses well and holds its shape, making it ideal for quilting projects.
Do I need a sewing machine to make a cow quilt?
While it is possible to hand-stitch a quilt, using a sewing machine is highly recommended. It speeds up the process and ensures stronger, more consistent stitches.
How many cow blocks do I need for a quilt?
The number of blocks depends on the quilt size. For a baby quilt, you may only need 9–12 blocks, while a queen-sized quilt might require 30 or more.
Can beginners make a cow quilt?
Yes, beginners can follow this cow quilt – Step by Step Tutorial. The process involves basic quilting skills like cutting, piecing, pressing, and quilting. Start small and build confidence as you go.
How do I care for a finished cow quilt?
Wash your quilt on a gentle cycle with cold water and mild detergent. Air drying or tumble drying on low heat helps preserve the fabric and stitching.
Can I customize the cow design?
Absolutely. Quilting is about creativity, and you can experiment with different fabrics, colors, and embellishments to give each cow its own personality.
Conclusion
Making a cow quilt – Step by Step Tutorial is a rewarding project that combines creativity, patience, and skill. From choosing fabrics and cutting blocks to assembling, quilting, and binding, every stage contributes to the final masterpiece. This tutorial has guided you through each step with practical tips and detailed explanations so that even beginners can succeed.
Now it’s your turn to bring this project to life. A cow quilt not only adds warmth and charm to your home but also becomes a handmade treasure that can be passed down through generations.
I would love to hear your sincere opinions and suggestions about this tutorial. Share your thoughts and let me know how your quilting journey unfolds.