
Starting this project to Create a sewing organizer with the Sew Organized kit – Step by Step Tutorial is a wonderful way to bring more practicality, beauty, and efficiency into your crafting routine. A well-designed sewing organizer allows you to keep your tools accessible, visible, and neatly arranged, ensuring that every creative session flows with ease. With the help of the Sew Organized kit, even beginners can assemble a high-quality organizer that looks professional and functions perfectly for daily sewing needs.
Creating a sewing organizer offers many advantages, especially if you often lose small items like needles, bobbins, buttons, or thread. By following this step by step tutorial, you will learn how to use the structure provided in the Sew Organized kit while adding your own personal touches. The goal is not only to store your supplies but also to enhance your crafting space. A tidy workspace improves focus, boosts productivity, and inspires creativity in every project you start.
Throughout this guide, you will learn how to prepare the materials, assemble the compartments, secure each section, and decorate your sewing organizer. The instructions are designed to be simple yet complete, making it easy for new crafters while still offering useful insights for experienced sewists. Using the kit ensures consistency and durability, while your creativity gives the organizer charm and personality. With this detailed explanation on how to Create a sewing organizer with the Sew Organized kit – Step by Step Tutorial, you will feel confident and motivated to produce a functional and stylish accessory for your sewing corner.
Preparing Your Materials and Understanding the Sew Organized Kit
Before you begin working on your sewing organizer, it is essential to gather the materials included in the kit and understand how each component contributes to the final design. The Sew Organized kit typically includes panels, pockets, fabric pieces, interfacing, and sometimes additional accessories like elastic bands or Velcro. Reviewing the kit ensures you know exactly what is available and how everything fits together to create your functional organizer.
When preparing your tools, make sure you have sharp scissors, a measuring tape, pins, a sewing machine or needle, and matching thread. Having your essentials within reach makes the assembly process much smoother. Because this project involves multiple small pieces, keeping everything organized from the start will help avoid confusion later on and ensure your results look clean and professional.
Study the layout diagram provided in the kit if available. Even though this step by step tutorial will guide you through the process, understanding the original layout helps you visualize the final structure. This also helps you decide whether you want to personalize parts of your organizer, such as choosing your own fabric colors or adding extra pockets for specific tools you use frequently.
A key aspect of preparing your materials is ironing all the fabric pieces beforehand. Wrinkles can distort measurements and cause uneven stitching, so pressing your fabrics ensures everything aligns correctly. Interfacing should be handled carefully as well, since it provides the stiffness needed to keep the organizer upright and stable once assembled.
Take time to choose the best thread color for the project. Neutral tones blend nicely, giving the organizer a clean finish, while contrasting colors highlight the stitching and add a decorative effect. Your choice depends entirely on the aesthetic you want for your sewing organizer, making this an enjoyable part of the creative process.
Once your materials are prepared and organized, you can confidently move on to assembling the main structure. Having everything ready ahead of time greatly improves the flow of the project, helping you truly enjoy the experience of learning how to Create a sewing organizer with the Sew Organized kit – Step by Step Tutorial.
Assembling the Main Body of the Sewing Organizer
To begin assembling the main body, start by identifying the largest panels in the kit. These pieces typically form the background where the pockets and compartments will be attached. Lay them flat on your workspace and verify that all edges match. This step ensures proper alignment and prevents issues later when connecting the smaller sections.
Once the main panels are aligned, apply the interfacing to the back of the fabric pieces. This is an important step because it gives the organizer stability and prevents it from sagging under the weight of your sewing supplies. Always follow the recommended temperature settings for the interfacing to avoid damaging the material.
After applying the interfacing, join the panels together using straight, even stitches. Take your time sewing these foundation seams because they provide the structure for the rest of your organizer. A slow and steady approach ensures that your stitches remain consistent and the organizer’s base looks professional.
With the main body assembled, fold the edges inward and sew them to create neat borders. Clean edges give the final organizer a polished appearance and prevent fraying over time. You may add decorative stitching or piping along the edges if you want to personalize the design further.
Before moving on, double-check the measurements of your assembled body. Ensuring accuracy at this stage avoids future difficulties when attaching pockets and accessories. Use a ruler or measuring tape to verify that all sides remain straight and even. Minor adjustments can still be made at this point without affecting the final structure.
Once the main body is fully assembled, you are ready to start building the functional compartments that will make your organizer truly useful. This is where you begin to see the project come to life, making this Create a sewing organizer with the Sew Organized kit – Step by Step Tutorial especially exciting.
Adding Pockets, Compartments, and Functional Sections
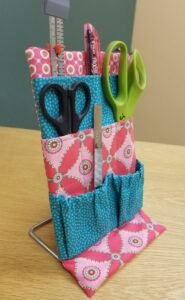
Pockets are the heart of any sewing organizer, providing essential storage space for tools like scissors, needles, seam rippers, thread spools, and measuring tapes. Start by selecting the pocket pieces included in the kit or cutting your own from additional fabric. Ensure each piece is ironed and ready for assembly to achieve crisp and clean lines.
Begin attaching the pockets by folding the top edge downward and stitching it in place. This creates a reinforced border that prevents the fabric from stretching or curling over time. You may also choose to add elastic to the top edge for stretchy pockets, which work well for items that vary in size or shape.
Position each pocket on the main body according to your preferred layout. You can space them evenly for a symmetrical look or customize the placement based on the tools you use most often. Pin each pocket securely before sewing to ensure accurate alignment and avoid shifting during stitching.
When sewing the pockets into place, stitch along the sides and bottom edges, keeping your lines straight and consistent. For added strength, backstitch at the top corners to reinforce stress points. This ensures your pockets remain sturdy even when holding heavier tools.
To create multiple compartments within a larger pocket, sew vertical lines from top to bottom. This technique is ideal for small tools like crochet hooks, pens, or marking pencils. Creating sections helps keep everything neatly separated and prevents items from sliding around.
After attaching all the pockets and compartments, inspect the entire organizer to ensure everything is secure and evenly spaced. At this stage, your sewing organizer is beginning to reach its full potential, showcasing the effectiveness of this Create a sewing organizer with the Sew Organized kit – Step by Step Tutorial.
Final Assembly, Decoration, and Finishing Touches
Once all the pockets and compartments are securely attached, it’s time to assemble the final structure. If your organizer is designed to hang on a wall, attach the loops or straps provided in the kit. Secure them firmly to ensure they can hold the organizer’s weight when filled with tools. If the organizer is meant to stand upright, reinforce the bottom section for extra stability.
The decorative stage is where you can express your creativity. Add embellishments such as fabric appliqués, embroidery, buttons, or labels. These decorative elements give personality to your organizer and make it uniquely yours. Choose colors and patterns that match your sewing space for a cohesive look.
Consider adding a small pin cushion to one of the upper corners. This functional detail is especially helpful for keeping pins and needles available while you work. A well-placed pin cushion reduces interruptions during crafting sessions, improving your workflow and convenience.
If you prefer a more minimalistic look, focus on clean lines and simple stitching. The beauty of using the Sew Organized kit is that it provides structure while still allowing you to customize the design. Even subtle details like decorative topstitching can elevate the final result without overwhelming the appearance.
Before declaring your project finished, inspect every seam, pocket, and strap to ensure everything is tight and properly assembled. This final check guarantees durability and long-lasting use. If you notice any loose threads or stitches, take a moment to correct them for a clean finish.
With all parts complete, your sewing organizer is ready to be used and admired. You now have a functional, beautiful piece created through this complete Create a sewing organizer with the Sew Organized kit – Step by Step Tutorial, combining practicality and creativity in the best way.
FAQ – Frequently Asked Questions
1. Is the Sew Organized kit recommended for beginners?
Yes. The kit simplifies the process by providing pre-cut pieces and clear instructions, making it suitable for beginners while still enjoyable for experienced sewists.
2. What materials do I need besides the kit?
Basic tools such as scissors, pins, thread, a needle or sewing machine, and a measuring tape. These common items ensure a smooth assembly process.
3. Can I customize the sewing organizer?
Absolutely. You can add extra pockets, choose different fabrics, or incorporate decorative elements to personalize the final design.
4. How long does it take to complete the organizer?
Depending on skill level, it may take a few hours to a full day. The project is simple enough to complete in one sitting if desired.
5. Is the organizer durable for heavy tools?
Yes, especially when interfacing is applied correctly. Reinforced stitching and quality fabric contribute to long-lasting durability.
6. Can I wash the sewing organizer?
Yes, but hand-washing is recommended to preserve its structure, especially if it contains interfacing or decorative elements.
Conclusion
This tutorial has shown you how to Create a sewing organizer with the Sew Organized kit – Step by Step Tutorial, guiding you through material preparation, assembling the main body, adding pockets, and completing the final touches.
With patience and creativity, you can craft a beautiful organizer that improves your workspace and keeps your sewing tools perfectly arranged.
I hope this tutorial was helpful and inspiring. Please leave your honest opinion and share your suggestions—I would love to know how your sewing organizer turned out!