
Starting a curtain made of scraps – step by step tutorial is not only a creative project but also a sustainable way to reuse fabric you already have at home. Instead of buying expensive new materials, you can give new life to those leftover pieces of fabric that may otherwise go unused. With a little patience and imagination, a curtain made of scraps can add charm, color, and personality to any room. It is an eco-friendly approach that embraces both function and creativity while reducing waste.
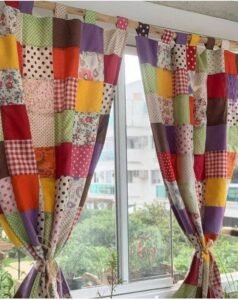
When you create a curtain using scraps, you are essentially making a piece of art that reflects your unique style. Each piece of fabric you choose tells its own story, whether it’s from an old shirt, a dress, or leftover quilting materials. The mix of patterns and textures creates a vibrant patchwork effect, making your curtain stand out as a one-of-a-kind item. Following a curtain made of scraps – step by step tutorial will help you transform those random fabric pieces into something practical and beautiful.
This kind of project is perfect for beginners and advanced crafters alike. You don’t need to be a professional seamstress to enjoy the process. With some basic tools, fabric scraps, and guidance, anyone can achieve a professional-looking result. By the end of this tutorial, you will not only have learned how to make a curtain but will also have gained valuable sewing skills that you can apply to other projects. Let’s now dive into the process in detail.
Preparing Materials for a Curtain Made of Scraps
Before beginning, gathering the right materials is essential. The beauty of a curtain made of scraps – step by step tutorial lies in the variety of fabrics you can use. Cotton, linen, or lightweight blends work particularly well because they allow light to filter through without being too heavy.
The first step is to collect your fabric scraps. Look through old clothes, leftover sewing projects, or thrifted fabric pieces. Try to keep a balance between colors and textures so that the curtain has a harmonious look. It is also helpful to cut all pieces into consistent shapes like squares or rectangles to make assembly easier.
Next, prepare the sewing supplies you will need. A sewing machine will make the process faster, but if you prefer, you can sew by hand with strong thread. Other essentials include scissors, pins, an iron, and measuring tape. These simple tools are enough to get you started.
Measuring the window is another important step. You want to make sure your curtain covers the entire space while leaving enough allowance for hems and seams. Take accurate measurements of both width and length before deciding how many fabric pieces you’ll need.
Once you have measurements, start laying out the fabric pieces on a flat surface. Experiment with different arrangements until you find a combination that looks visually appealing. Mixing bright colors with neutral tones can give your curtain balance.
Finally, iron each scrap piece to make sewing easier. Wrinkled or folded fabric can cause uneven seams, so pressing them flat before assembling ensures a clean finish. This careful preparation makes the sewing process much smoother.
Sewing the Scrap Curtain Together
After organizing your fabric scraps, it’s time to start sewing them together. Following the curtain made of scraps – step by step tutorial ensures your project stays structured and easy to manage.
Begin by sewing small sections at a time. Take two fabric scraps, place them with their right sides facing each other, and stitch along one edge. Continue adding pieces until you create a strip that matches the width of your curtain measurement. Sewing in strips first makes it easier to handle large amounts of fabric.
Once you have completed a few strips, start sewing them together to form a larger panel. Keep pressing the seams flat with an iron as you go. This not only strengthens the curtain but also keeps it looking professional.
If your scraps are different sizes, you may need to trim them to align with the other pieces. This helps maintain a neat rectangular shape for the overall curtain. Don’t worry too much about perfection—slight irregularities add charm and uniqueness.
To reinforce the curtain, sew a top hem where the rod or hooks will go. Fold the fabric over twice and stitch it securely. Make sure the opening is wide enough to fit your curtain rod. This step is crucial because it ensures your curtain hangs properly.
Finally, hem the sides and bottom to prevent fraying. Even though this is a scrap-based project, finishing touches like neat hems make the curtain durable and attractive. This way, your handmade curtain will last for years.
Styling and Decorating with a Curtain Made of Scraps
One of the joys of following a curtain made of scraps – step by step tutorial is being able to personalize the final look. Scrap curtains are versatile, and their colorful patterns can fit into many interior design styles.
For a rustic or farmhouse look, combine earthy tones like browns, creams, and muted greens. These shades blend well with wooden furniture and natural décor. In contrast, if you want a cheerful, eclectic vibe, use bright and bold scraps with patterns such as florals, stripes, or polka dots.
A patchwork curtain also works beautifully in children’s rooms. Using colorful, playful fabrics can make the room feel cozy and fun. This approach can also be a teaching moment for kids, showing them the value of reusing and recycling.
If you prefer a minimalist style, choose scraps in similar tones, such as different shades of white, gray, or beige. The result will be a soft, elegant curtain that complements modern interiors without overwhelming the space.
You can also add embellishments for extra charm. Lace trims, fabric tassels, or even small appliqués can enhance the curtain and give it a handmade artistic flair. These details make your curtain truly one-of-a-kind.
Placement matters as well. Scrap curtains look stunning in kitchens, craft rooms, or even as room dividers. Wherever you hang them, they bring warmth and character that store-bought curtains cannot match.
Benefits of Making a Curtain from Scraps
Creating a curtain made of scraps – step by step tutorial offers many benefits beyond the finished product. It’s a project that combines sustainability, creativity, and functionality.
One of the biggest advantages is eco-friendliness. By reusing fabric scraps, you reduce waste and contribute to a more sustainable lifestyle. Instead of discarding old textiles, you transform them into something useful.
It is also cost-effective. Curtains can be expensive, especially custom-made ones. By making your own from scraps, you save money while still achieving a personalized design that fits your space perfectly.
Another benefit is the sense of accomplishment. Completing a handmade curtain gives you pride and satisfaction. It’s a rewarding feeling to know that you created something beautiful with your own hands.
Scrap curtains also spark creativity. Choosing fabrics, mixing colors, and deciding on layouts let you express your style. Every project is different, and no two scrap curtains will ever look the same.
Additionally, sewing projects like this can be relaxing and therapeutic. Many people find that working with their hands helps reduce stress and improve focus. It’s a hobby that combines productivity with mental well-being.
Finally, these curtains often become conversation pieces. Guests will notice their uniqueness, and you’ll have a story to share about how you created them from simple scraps.
FAQ about Curtain Made of Scraps – Step by Step Tutorial
1. Do I need a sewing machine to make a curtain from scraps?
No, a sewing machine is helpful but not required. You can sew by hand with strong thread, though it will take more time.
2. What types of fabric work best for a scrap curtain?
Light to medium-weight fabrics such as cotton, linen, or blends are ideal because they allow light to pass through while maintaining structure.
3. How do I make sure my scrap curtain looks balanced?
Lay out the pieces before sewing and arrange colors and patterns in a way that looks harmonious. Mixing bold with neutral tones often works best.
4. Can I make a scrap curtain without hemming the edges?
It is possible, but hemming prevents fraying and gives a polished look. For durability, hemming is recommended.
5. Is a scrap curtain suitable for all rooms?
Yes, but the style may vary. Bright and playful curtains fit children’s rooms, while neutral or earthy tones suit living rooms or kitchens.
6. How long does it take to make a curtain from scraps?
The time depends on the size of the curtain and your sewing speed. A small window curtain might take a few hours, while larger ones could take a full day.
Conclusion
In this curtain made of scraps – step by step tutorial, we explored how to turn leftover fabrics into a functional and stylish home accessory. From preparing materials and sewing pieces together to styling and understanding the benefits, every stage of the process highlights creativity and sustainability. Making your own curtain is not only cost-effective but also deeply satisfying.
Now that you’ve learned the steps, why not try it yourself? Creating a curtain from scraps is a wonderful way to personalize your home décor while practicing eco-friendly crafting.
If you decide to make one, I’d love to hear your opinion and suggestions in the comments. Your feedback helps improve tutorials and inspires others to start their own creative journey.