
If you love sewing and crafting, this Cute Mouse Pincushion Tutorial – Step by Step Tutorial is a delightful project to try. This adorable mouse-shaped pincushion is not only practical but also adds a charming touch to your sewing table. With just a few basic materials and simple sewing techniques, you can create a lovely and functional pincushion that will keep your pins organized while bringing a smile to your face every time you sew.
The cute mouse pincushion is perfect for beginners and experienced crafters alike. It requires minimal fabric, making it a great project to use up your fabric scraps. You can customize your mouse with different colors, prints, or even tiny accessories to give it personality. Whether you’re making it for yourself or as a handmade gift for a friend who loves sewing, this pincushion is sure to become a favorite.
In this Step by Step Tutorial, you’ll learn how to cut, sew, and assemble your pincushion easily. Each part of the process is explained clearly so you can follow along without confusion. By the end, you’ll have a cute and durable mouse pincushion that’s both decorative and functional. Let’s dive into this creative sewing adventure and learn how to make your very own Cute Mouse Pincushion!
Materials Needed for the Cute Mouse Pincushion
Before starting this Cute Mouse Pincushion Tutorial – Step by Step Tutorial, make sure you have all the necessary materials ready. Preparing everything in advance will make your crafting session smoother and more enjoyable.
You’ll need cotton or felt fabric for the mouse’s body. Felt is an excellent choice because it’s easy to sew, doesn’t fray, and gives a soft, plush finish. You can also use patterned cotton for a more decorative look. Choose soft colors like gray, pink, or beige to give your mouse a cute and cozy appearance.
For stuffing, you’ll need polyester fiberfill or any soft stuffing material. Make sure not to overfill the pincushion so that your pins can stick in easily without resistance. You can also add a small amount of rice or sand at the base to make it stable and prevent it from tipping over.
You’ll also need thread that matches your fabric color, a sewing needle, scissors, pins, and a small piece of embroidery thread for the whiskers. If you prefer, you can use a sewing machine to make the process faster, but hand stitching works just as well for this small project.
For the eyes and nose, you can use small beads or embroidery stitches. Adding these tiny details gives your mouse character and charm. A small piece of ribbon can also be tied around the neck for a finishing touch.
Having all materials organized before you start ensures you can focus entirely on crafting and enjoy making your adorable mouse pincushion from start to finish.
Step-by-Step Instructions for Making the Mouse Body
Now that you’ve gathered all your materials, it’s time to start the Cute Mouse Pincushion Tutorial – Step by Step Tutorial. The mouse’s body is the main part of your pincushion, and with a few simple stitches, you can create a perfect shape.
Begin by cutting two identical body pieces from your chosen fabric. These should resemble a teardrop or triangle shape with rounded edges. One piece will be the top, and the other will be the base of your pincushion.
Place the two pieces together with the right sides facing each other. Pin them around the edges to hold them securely in place while you sew. Leave a small opening at the back so you can turn the fabric right side out later.
Sew around the edges using small, even stitches. If you’re using a sewing machine, select a short stitch length for better durability. Once you finish sewing, carefully turn the body right side out through the opening.
Next, stuff the mouse body with fiberfill, adding small amounts at a time until it feels soft but firm. If you want your pincushion to stay stable, place a small pouch of rice or sand at the bottom before adding the stuffing. This weight helps the pincushion sit upright while you work.
Finally, sew the opening closed neatly with a hidden stitch. At this point, you’ll already see the adorable mouse shape taking form. Your basic pincushion structure is now ready for the next steps, where you’ll add the ears, face, and other details that make it truly charming.
Adding Details: Ears, Eyes, and Whiskers
Once your mouse body is complete, it’s time to add the adorable features that bring it to life. This is where your Cute Mouse Pincushion Tutorial – Step by Step Tutorial really starts to shine.
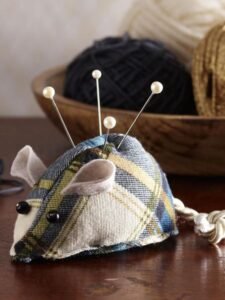
Cut two small circles for the ears from the same or contrasting fabric. You can use felt or cotton for this step. To make them look more natural, fold each ear slightly in half and sew a small stitch at the base to create a curved shape. Then, attach the ears to the top sides of the mouse head using small, neat stitches.
For the eyes, you can use black seed beads or simply embroider tiny dots with black thread. Position them evenly on the face to create a friendly expression. If you prefer a cute cartoon style, you can even add a small white stitch to each bead to mimic a sparkle in the eyes.
The nose can be made with a tiny pink bead or a few embroidery stitches. Place it right at the tip of the mouse’s face. Once the nose is in place, thread a few strands of black embroidery thread on each side to form whiskers. These little touches make your pincushion irresistibly cute.
You can also add a small tail made from yarn, string, or a thin strip of fabric. Sew it securely to the back of the mouse. For an extra touch of personality, tie a mini ribbon or bow around the mouse’s neck.
At this stage, your pincushion will already look delightful, but you can continue adding small embellishments if you wish—such as tiny flowers, buttons, or embroidery patterns. These personal details make your cute mouse pincushion one of a kind and showcase your creativity.
Final Assembly and Creative Tips
Now that your Cute Mouse Pincushion Tutorial – Step by Step Tutorial is almost complete, it’s time for the finishing touches. These last steps ensure your pincushion looks professional and lasts for years.
Check all the seams carefully to make sure they are well secured. If any stitches look loose, reinforce them to prevent the stuffing from coming out over time. Good finishing is essential to make your pincushion durable and neat.
If you added beads or small decorations, double-check that they are tightly sewn so they won’t come off easily. Since pincushions are used frequently, every piece should be securely attached for safety and longevity.
You can also personalize your pincushion by changing the color scheme. Try pastel shades for a soft look, or use bright, fun prints for a cheerful design. Each mouse you make can have its own personality—perhaps a pink mouse with a bow or a gray one with polka dots.
Consider making a set of mouse pincushions in different sizes. A large one can sit on your sewing table, while smaller ones can be given as gifts to your crafting friends. Handmade pincushions are always appreciated and make lovely keepsakes.
Finally, remember to keep your pincushion clean and free from dust. You can gently hand wash it if necessary, or use a lint roller to remove fabric threads and debris. With proper care, your cute mouse pincushion will stay beautiful and functional for a long time.
Cute Mouse Pincushion Tutorial
1. Can beginners make this pincushion easily?
Yes! This Cute Mouse Pincushion Tutorial – Step by Step Tutorial is designed for beginners. It uses simple stitches and requires only basic sewing skills.
2. What type of fabric works best for this project?
Felt and cotton are ideal choices. Felt is easier to handle because it doesn’t fray, while cotton allows more creative designs and patterns.
3. How much fabric do I need to make one pincushion?
A small piece of fabric—about 20×20 cm—is usually enough for one mouse pincushion. You can even use leftover scraps from other projects.
4. Can I use a sewing machine instead of hand stitching?
Absolutely! You can use a sewing machine to make the process faster and more precise. Just remember to leave a small opening for turning and stuffing.
5. How do I keep my pincushion clean?
Gently hand wash it with mild soap and let it air dry completely. Avoid soaking it too much if you added rice or sand for weight.
6. Can I make this pincushion for gifts or to sell?
Yes, this is a wonderful handmade item to gift or sell. People love small, cute, and functional crafts, especially when they’re well-made and unique.
Conclusion
Making a Cute Mouse Pincushion is a joyful and creative experience that allows you to combine practicality with charm. In this Step by Step Tutorial, you learned how to cut, sew, and decorate your mouse, turning a few simple materials into an adorable sewing accessory.
This pincushion not only keeps your workspace organized but also adds a touch of handmade warmth to your sewing area. Whether you keep it for yourself or share it as a gift, it’s sure to bring a smile to anyone who sees it.
Now that you know how to make this cute mouse pincushion, it’s time to get creative! Try new fabrics, colors, and embellishments to make each piece unique.If you enjoyed this tutorial, please leave your honest opinion and suggestions below. Your feedback helps inspire more creative sewing ideas and keeps the crafting community growing!