
If you have ever wanted to create a handmade accessory, then this Easy DIY Simple Bag Sewing Tutorial- Step by Step Tutorial is the perfect place to begin. Sewing a bag from scratch is not only fun but also rewarding, as you get to design something practical and stylish with your own hands. This project is beginner-friendly, requiring only basic sewing knowledge, a few tools, and some creativity. Whether you want a bag for shopping, carrying books, or just as a casual fashion statement, this guide will take you through everything you need to know.
The beauty of this tutorial lies in its simplicity. You do not need to be a professional seamstress or own expensive equipment to follow along. The Easy DIY Simple Bag Sewing Tutorial- Step by Step Tutorial is designed to help even complete beginners learn the process smoothly. With clear instructions, you will be able to create a functional bag that can also serve as a thoughtful handmade gift for friends and family. It’s a great way to personalize your accessories while saving money.
In addition to being a fun craft project, making your own bag also promotes sustainability. Instead of buying mass-produced items, you are learning how to sew something that reflects your personal style. This Easy DIY Simple Bag Sewing Tutorial- Step by Step Tutorial empowers you to choose your fabrics, customize the size, and add unique touches that make your bag one of a kind. Once you complete your first project, you might even feel inspired to make more designs for different occasions.
Materials You Will Need for the Project
When starting the Easy DIY Simple Bag Sewing Tutorial- Step by Step Tutorial, gathering the right materials is the first step. The good news is that the supplies required are minimal, affordable, and easy to find in any craft or fabric store. Having the correct materials prepared in advance will make the sewing process smooth and enjoyable.
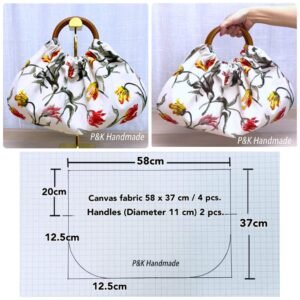
You will need fabric as the main component of your bag. Cotton fabric is highly recommended because it is sturdy yet easy to sew, making it ideal for beginners. You can also experiment with canvas or linen if you prefer a heavier bag. Always choose fabric that matches your style, as the appearance of your bag depends largely on this choice.
In addition to fabric, you will need a pair of sharp scissors, a sewing machine or a needle for hand stitching, and coordinating thread. Thread color should blend well with your fabric to give the bag a clean finish. Don’t forget pins or clips to hold the fabric in place as you sew. These small tools make the process much more manageable.
Handles are another important part of your bag. You can make them from the same fabric as your bag, or you can purchase ready-made straps. Cotton webbing straps are very durable and add a professional touch to your project. The length of the handles depends on whether you want a tote-style bag or a shorter handbag.
A measuring tape or ruler will be necessary to ensure accuracy when cutting your fabric pieces. Precision is key in sewing, as even small measurement errors can affect the overall shape of your bag. Finally, you may want to add optional features such as lining, pockets, or decorative elements to make your bag truly unique.
By organizing all your materials beforehand, you set yourself up for success. This preparation step ensures that once you start following the Easy DIY Simple Bag Sewing Tutorial- Step by Step Tutorial, you won’t have to stop in the middle of the process to search for missing supplies.
Step by Step Instructions for Sewing the Bag
The Easy DIY Simple Bag Sewing Tutorial- Step by Step Tutorial follows a logical process that makes it simple to understand, even for someone who has never sewn before. Taking it step by step will ensure you don’t feel overwhelmed and that your final product turns out well.
First, cut two equal rectangles from your chosen fabric. The size of these rectangles will determine the size of your bag. For a medium tote, 16×14 inches is a good starting measurement. If you want a smaller or larger bag, adjust accordingly. Make sure your cuts are clean and even.
Next, place the two fabric rectangles together with the right sides facing inward. Pin or clip the edges to hold them securely. Sew along the two sides and the bottom using a straight stitch, leaving the top edge open. This forms the main body of your bag. For extra durability, you can sew a second seam just inside the first one.
Once the body is sewn, it is time to work on the corners. Flatten each bottom corner of the bag so that the side seam and the bottom seam align. Measure about two inches from the corner and draw a line across. Sew along this line, then trim the excess fabric. Repeat on the other corner. This technique creates a flat base for your bag.
The next step is to finish the top edge. Fold the raw edge inward about half an inch and press with an iron. Fold it again by another inch to encase the raw edge and create a neat hem. Pin in place and sew all around the top. This step gives your bag a polished look and prevents fraying.
Finally, attach your handles. Position them evenly on the inside of the top hem, ensuring they are the same length on both sides. Sew them securely with a reinforced box stitch to handle the weight when the bag is in use. Once the handles are attached, your bag is ready to use.
Following these steps will complete your Easy DIY Simple Bag Sewing Tutorial- Step by Step Tutorial, giving you a simple yet functional bag that you can proudly carry anywhere.
Tips for Customizing Your Bag
One of the most enjoyable aspects of the Easy DIY Simple Bag Sewing Tutorial- Step by Step Tutorial is the freedom to personalize your project. With just a few creative choices, you can transform a simple bag into something truly unique.
Fabric choice is the first way to customize. Bold prints, floral patterns, or even recycled fabric from old clothes can give your bag character. For a minimalist look, stick with solid colors. Using contrasting fabrics for the lining and outer fabric also adds a stylish touch.
Adding a lining is optional but highly recommended, especially if you want extra durability. Lining not only strengthens the bag but also makes it look professionally finished on the inside. You can even add an interior pocket for storing keys, phones, or other small items.
Decorative touches like embroidery, appliqué, or fabric paint allow you to showcase your creativity. If you enjoy hand-stitching, try adding small embroidered designs to the front of your bag. Appliqué patches or iron-on motifs are another fun way to decorate.
Straps can also be customized. Instead of plain fabric handles, you can use leather straps, rope, or even repurposed belts. Adjustable straps are great if you want to wear the bag crossbody or on your shoulder. Experimenting with strap materials can make your bag stand out.
Closures are another area where you can add personality. A simple magnetic snap, button, or zipper can make your bag more secure. While these features are not required in the basic Easy DIY Simple Bag Sewing Tutorial- Step by Step Tutorial, they add functionality and flair.
By experimenting with these ideas, every bag you create will reflect your personal style. This customization makes sewing bags not just a craft but also a form of self-expression.
Common Mistakes and How to Avoid Them
Even though the Easy DIY Simple Bag Sewing Tutorial- Step by Step Tutorial is beginner-friendly, mistakes can still happen. Knowing what to watch out for will help you create a neat, functional bag without frustration.
One common mistake is inaccurate cutting. If your fabric pieces are not cut evenly, the bag will look lopsided. Always measure carefully and use a ruler or cutting mat for precision.
Another issue beginners face is sewing crooked seams. This can make the bag appear uneven and affect its durability. To avoid this, take your time, sew slowly, and follow the edge of the fabric carefully. Using pins to guide your fabric can help.
Not reinforcing the handles properly is another mistake. Handles carry the weight of the bag, so weak stitching can cause them to detach. Always use a reinforced stitch pattern such as a box with an X inside when attaching straps.
Skipping ironing can also affect the quality of your project. Pressing your fabric before sewing and pressing seams as you go ensures a neat and professional finish. It might seem like an extra step, but it makes a big difference.
Choosing the wrong fabric for beginners is another pitfall. Slippery or stretchy fabrics are harder to manage. Start with cotton, which is stable and easy to sew. Once you are more experienced, you can try other types of fabric.
By being aware of these common mistakes, you will be able to complete your Easy DIY Simple Bag Sewing Tutorial- Step by Step Tutorial with confidence and pride.
FAQ About Sewing a Simple Bag
1. Can I make this bag without a sewing machine?
Yes, you can complete this Easy DIY Simple Bag Sewing Tutorial- Step by Step Tutorial by hand sewing. It will take longer, but with small, tight stitches, your bag will be sturdy and functional.
2. What type of fabric is best for beginners?
Cotton fabric is the best choice for beginners because it is stable, easy to cut, and simple to sew. Heavier fabrics like canvas are also good for durable bags.
3. How long does it take to make a simple bag?
For beginners, it usually takes about two to three hours to complete the project. With practice, you can finish a bag in less than an hour.
4. Can I wash the bag after making it?
Yes, most handmade bags made with cotton or canvas are washable. Just make sure to use pre-washed fabric and strong thread so the bag maintains its shape after washing.
5. How can I make the bag stronger for heavy items?
You can reinforce your bag by adding lining, using stronger fabric, and sewing double seams. Also, make sure the handles are securely stitched with reinforced patterns.
6. Can I resize the bag?
Absolutely. You can make the bag larger or smaller by adjusting the size of your fabric rectangles. The same instructions apply regardless of the size.
Conclusion
The Easy DIY Simple Bag Sewing Tutorial- Step by Step Tutorial is an excellent project for anyone looking to learn sewing while creating something practical and stylish. With just a few materials and some patience, you can design a bag that matches your needs and reflects your personality. This step-by-step guide ensures that even beginners can follow along with ease.
We have covered the materials required, the detailed steps, customization ideas, common mistakes to avoid, and frequently asked questions. Now it is your turn to start sewing your very own simple bag. Once you finish, you will not only have a useful accessory but also the satisfaction of having made it yourself.
I would love to hear your thoughts on this tutorial. Please leave your sincere opinion and suggestions on how we can improve future guides. Your feedback helps make each tutorial more helpful and inspiring for everyone.