
Easy Pincushion Project for Beginners-Step by Step Tutorial is the perfect guide for anyone who wants to start sewing or crafting small handmade accessories. Creating a pincushion may seem like a simple task, but it’s actually a fun and creative project that can be personalized in countless ways. Whether you’re a beginner looking for a quick DIY or an experienced crafter searching for a relaxing afternoon project, this step-by-step guide will help you make a beautiful and practical pincushion from scratch. The Easy Pincushion Project for Beginners-Step by Step Tutorial focuses on clear instructions and simple materials so that anyone can achieve great results.
A pincushion is one of those essential tools every crafter or sewer should have. It not only keeps your pins and needles organized but also adds a touch of personality to your workspace. The great thing about this Easy Pincushion Project for Beginners-Step by Step Tutorial is that it doesn’t require advanced sewing skills or expensive materials. You can easily make one with leftover fabric, some thread, stuffing, and a bit of creativity. Plus, this project is a wonderful way to practice basic hand-sewing techniques, making it ideal for people just starting their crafting journey.
One of the best aspects of this project is the freedom to design your pincushion exactly the way you want. You can choose the shape, colors, and even add decorations like buttons, lace, or small embroidery details. Handmade pincushions also make thoughtful gifts for friends who love to sew or appreciate handmade items. In this Easy Pincushion Project for Beginners-Step by Step Tutorial, we’ll go through each step carefully, from choosing materials to assembling and decorating your pincushion. By the end, you’ll not only have a cute and functional sewing accessory but also a rewarding sense of accomplishment.
Choosing the Right Materials for Your Easy Pincushion Project
Before starting your Easy Pincushion Project for Beginners-Step by Step Tutorial, gather all the materials you’ll need. The beauty of this project is its simplicity—most items can be found around your home or in your sewing kit. To begin, you’ll need a small piece of fabric, some stuffing (cotton, fiberfill, or even fabric scraps), thread, a needle, scissors, and pins. Choosing high-quality materials will ensure your pincushion lasts for a long time and keeps its shape well.
When selecting fabric, cotton is the best choice for beginners because it’s easy to sew and doesn’t stretch. You can use plain fabric or something with a fun print that matches your sewing space. Remember that the fabric color can influence how your pincushion looks and feels—soft pastels give a calm, vintage look, while bold prints make it eye-catching and modern. The Easy Pincushion Project for Beginners-Step by Step Tutorial encourages creativity, so feel free to experiment with different patterns and textures.
For stuffing, fiberfill is ideal because it’s lightweight yet firm enough to hold pins securely. If you prefer eco-friendly alternatives, you can use fabric scraps, wool, or even rice. Just make sure your filling material is clean and dry. The stuffing determines how sturdy your pincushion will be, so don’t overfill it—aim for a firm yet flexible shape. Following the Easy Pincushion Project for Beginners-Step by Step Tutorial, you’ll learn exactly how to get the right balance.
You’ll also need strong thread to sew your pincushion together. Matching thread colors are great for a seamless finish, while contrasting thread can add a decorative touch. A standard sewing needle works fine for this project, and sharp scissors will help cut your fabric neatly. You can also use fabric glue if you prefer a no-sew option, but sewing adds durability. Keep these tools handy as you go through this Easy Pincushion Project for Beginners-Step by Step Tutorial.
To add character, think about decorative touches like buttons, ribbons, or tiny bows. They can transform a simple pincushion into a charming piece of handmade art. Don’t be afraid to personalize it—the best part of DIY crafts is making something truly your own. Whether you’re aiming for cute, elegant, or rustic, your choices in fabric and decoration will reflect your personal style.
Finally, prepare a clean workspace with good lighting. Having your tools and materials organized will make your crafting session smoother and more enjoyable. This small preparation step can make a big difference when following the Easy Pincushion Project for Beginners-Step by Step Tutorial, especially if you’re new to sewing.
Step-by-Step Guide: Making Your Pincushion
Now that your materials are ready, it’s time to start crafting! The Easy Pincushion Project for Beginners-Step by Step Tutorial will guide you through the process carefully. Begin by cutting two pieces of fabric into the same shape. The most common shape is a circle or a square, but you can experiment with hearts, stars, or any fun design you like. Keep the size around 3–4 inches wide for a standard pincushion.
Place the two fabric pieces together, with the right sides facing each other. Using a needle and thread, sew around the edge with a simple running stitch, leaving a small opening to insert the stuffing later. Make sure your stitches are tight and even, as this will help keep the stuffing secure inside. The Easy Pincushion Project for Beginners-Step by Step Tutorial emphasizes patience—don’t rush this step, as neat sewing gives your pincushion a professional finish.
After stitching most of the edge, turn the fabric inside out so the right sides are now visible. Use a pencil or crochet hook to gently push out the corners if your shape has them. Then, begin filling your pincushion with stuffing through the opening you left. Add small amounts at a time to ensure it’s evenly filled. The goal is to make it firm enough to hold pins but still soft to the touch.
Once you’ve added enough stuffing, close the opening with small, tight stitches. Try to make them as invisible as possible for a clean finish. If you’re using fabric glue, apply a thin line along the edge and press it closed until it dries. Now your basic pincushion is ready! The Easy Pincushion Project for Beginners-Step by Step Tutorial proves that simple steps can produce beautiful results.
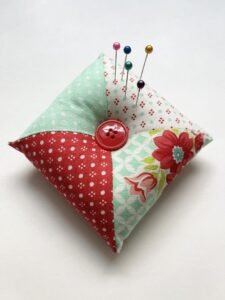
You can stop here or go one step further and decorate your pincushion. Sew a button in the center to give it a tufted look or wrap a ribbon around the middle for extra charm. You can even use embroidery to add initials or cute designs. This step allows you to express creativity and make your pincushion stand out.
Finally, give your pincushion a quick check—make sure the stitches are secure and the stuffing is evenly distributed. Once complete, you can start using it right away! Every pin and needle will have its place, and your sewing station will instantly look more organized.
Creative Variations and Design Ideas
One of the best things about the Easy Pincushion Project for Beginners-Step by Step Tutorial is how customizable it is. Once you’ve mastered the basic technique, you can experiment with different shapes, colors, and styles. Try making themed pincushions for holidays or matching them with your sewing room décor. The possibilities are endless!
If you want something unique, try using felt instead of cotton. Felt doesn’t fray and gives a soft, cozy appearance. You can also create animal-shaped pincushions, like cats, owls, or hedgehogs, for a fun twist. The Easy Pincushion Project for Beginners-Step by Step Tutorial encourages creativity, so let your imagination run wild.
Another fun idea is to use recycled materials. Old jeans, shirts, or fabric scraps can be transformed into beautiful pincushions. Not only is this eco-friendly, but it also gives sentimental value to your creation. You can even use the same technique to make mini gift sets for your sewing friends.
If you’re looking to make your pincushion more functional, consider attaching a small elastic band or strap so you can wear it on your wrist. This makes it easy to access pins while sewing. Add a touch of style by choosing matching colors for the strap and cushion. The Easy Pincushion Project for Beginners-Step by Step Tutorial is great for adapting designs to your personal needs.
For those who enjoy embroidery or applique, a pincushion offers a small yet perfect canvas to practice your skills. Simple floral patterns or initials can transform a plain pincushion into a personalized masterpiece. The process may take a little more time, but the result is worth it.
Lastly, don’t forget to consider practical features like firmness and size. If you use long pins, a slightly thicker pincushion works better. If you often move between sewing spaces, make a smaller one that’s easy to carry. Tailor your design to your lifestyle—it’s what makes handmade projects so rewarding.
Caring for and Maintaining Your Handmade Pincushion
After completing your Easy Pincushion Project for Beginners-Step by Step Tutorial, you’ll want to make sure it lasts a long time. Fortunately, caring for a pincushion is easy. Start by keeping it clean—avoid dropping it on dusty surfaces, and wipe it gently with a damp cloth if needed. Avoid soaking it in water, especially if you’ve used glue or delicate materials.
Over time, your pincushion may lose its firmness. When this happens, you can open a few stitches, add more stuffing, and resew it. This quick refresh keeps your pincushion in great shape for years. Regular maintenance ensures that your Easy Pincushion Project for Beginners-Step by Step Tutorial creation remains functional and beautiful.
If your fabric starts to wear out, consider making a new cover while keeping the same filling. This is a sustainable way to extend the life of your pincushion and refresh its look.
To prevent rust or stains from pins, avoid leaving metal pins stuck in the same spot for too long. Move them around occasionally, or use pins with plastic heads.
If you use your pincushion often, store it in a clean sewing box or drawer when not in use. Keeping it away from sunlight helps prevent fabric fading over time.
Lastly, consider making more pincushions in different styles. Having a small collection allows you to organize different types of pins or needles. Plus, they make wonderful handmade gifts that your friends will appreciate.
1. What is the best fabric for making a pincushion?
Cotton and felt are the best fabrics because they are easy to sew and hold their shape well. Both are suitable for beginners and give professional results.
2. Can I make a pincushion without sewing?
Yes! You can use fabric glue instead of stitching. Just make sure the glue is strong enough to hold the seams together securely.
3. What can I use as stuffing for a pincushion?
Fiberfill, wool, fabric scraps, or even rice can be used. Fiberfill is most popular for its lightness and firmness.
4. How big should a pincushion be?
Most pincushions are 3–4 inches wide, but you can adjust the size based on your preference. Smaller ones are great for travel sewing kits.
5. How can I decorate my pincushion?
You can add buttons, ribbons, lace, or embroidery for a personalized touch. This makes your pincushion unique and stylish.
6. How long does it take to make a pincushion?
On average, it takes about 30–45 minutes, depending on your sewing experience and the complexity of the design.
Conclusion
Making your own pincushion through this Easy Pincushion Project for Beginners-Step by Step Tutorial is not only practical but also a creative way to express your personality.
You’ve learned how to select materials, sew your pincushion, customize it, and take care of it for long-term use.
It’s an enjoyable DIY project for anyone who loves crafting or wants to learn sewing basics. I hope this tutorial inspires you to try new ideas and explore your creativity. Don’t forget to share your experience in the comments and leave your honest opinion and suggestions!