
Creating your own Easy-to-make fabric scrunchies – Step by Step Tutorial is a fun and rewarding DIY project that allows you to design stylish hair accessories while saving money. Scrunchies have made a major comeback in recent years, and they’re now seen as trendy fashion staples that can add a touch of color and charm to any outfit. Whether you’re new to sewing or already have experience, this tutorial will walk you through every step of making your very own fabric scrunchies with ease and confidence.
The best part about this Easy-to-make fabric scrunchies – Step by Step Tutorial is that it doesn’t require much time or materials. You can use leftover fabric scraps from other projects, making this a sustainable and eco-friendly craft. Plus, you’ll have the opportunity to personalize your scrunchies with unique patterns, colors, and textures that reflect your personality. From velvet to cotton, silk, or even satin, each type of fabric gives your scrunchie a different look and feel.
By following this Step by Step Tutorial, you’ll learn the exact techniques to cut, sew, and assemble your scrunchies correctly so that they’re durable and comfortable to wear. You can also create a variety of sizes to suit different hairstyles, from thin ponytails to voluminous buns. Once you’ve mastered the basic method, you can even start making them as thoughtful handmade gifts for friends or sell them as part of your own small business.Let’s dive into this creative journey and discover how to make your own Easy-to-make fabric scrunchies – Step by Step Tutorial, a simple yet satisfying craft that brings beauty and practicality together.
Materials and Preparation for Easy-to-Make Fabric Scrunchies
Before starting this Easy-to-make fabric scrunchies – Step by Step Tutorial, you’ll need to gather a few basic materials. The essentials include fabric, elastic, scissors, a safety pin, a ruler, sewing pins, a needle and thread, or a sewing machine. The type of fabric you choose is entirely up to you—cotton is great for beginners because it’s easy to handle, while satin or silk gives your scrunchies a luxurious finish.
Start by cutting a strip of fabric that measures approximately 18 inches long and 4 inches wide. This size works well for a standard scrunchie, but you can adjust the dimensions depending on how fluffy or tight you want it to be. For example, a longer strip will create a fuller scrunchie, while a shorter one will produce a smaller, more compact look.
Next, prepare your elastic band. Cut a piece of elastic about 8–9 inches long, depending on your desired tightness. Make sure the elastic stretches easily and isn’t too thick, as this can make it difficult to insert into the fabric tube later on. A safety pin will help you thread the elastic through the fabric, so keep one handy.
You’ll also want to iron your fabric before sewing to remove wrinkles and make cutting more accurate. If you’re using a delicate material like silk, set the iron to a low temperature. This step might seem simple, but it ensures a polished and professional finish.
Having all your materials ready before you begin will make the process smoother and more enjoyable. Organization is key when crafting—especially for small sewing projects like this one. Now that everything is set up, you can move on to sewing your fabric strip into the base of your scrunchie.
Step-by-Step Instructions for Making Fabric Scrunchies
The sewing process in this Easy-to-make fabric scrunchies – Step by Step Tutorial is straightforward and beginner-friendly. First, fold your fabric strip lengthwise with the right sides facing each other. This means the patterned side should be inside, as you’ll turn it right side out later. Pin the edges together to hold them in place while you sew.
Using a sewing machine or needle and thread, stitch along the long edge of the fabric with a ¼-inch seam allowance. Make sure to leave both ends open. If you’re sewing by hand, use small, even stitches to ensure durability. Once stitched, use scissors to trim any excess threads or uneven fabric.
Now it’s time to turn the fabric tube right side out. To do this, attach a safety pin to one end of the fabric and gently push it through the inside until it comes out the other side. This step can be a bit tricky with narrow fabrics, but take your time. Once the tube is right side out, smooth it out and iron it flat for a neat finish.
Next, attach your safety pin to one end of the elastic and carefully thread it through the fabric tube. Be sure to hold onto the other end of the elastic so it doesn’t slip inside. Once both ends meet, overlap them by about one inch and sew securely with several stitches to keep them together.
Now that the elastic is in place, it’s time to close the ends of your scrunchie. Fold one raw edge inward about ½ inch to hide the seam, then insert the other open end into it. Pin in place and sew straight across to close the circle. This will secure your elastic and complete the scrunchie’s circular shape.
Congratulations! You’ve completed the main steps of this Easy-to-make fabric scrunchies – Step by Step Tutorial. Now, you can experiment with different fabrics, sizes, and styles to create a full collection of custom hair accessories.
Creative Variations and Design Ideas
One of the most enjoyable parts of this Easy-to-make fabric scrunchies – Step by Step Tutorial is adding your own creative touch. Once you’ve learned the basic technique, you can explore endless variations to make each scrunchie special.
For instance, you can try using velvet fabric to make elegant scrunchies perfect for winter. The texture of velvet adds volume and richness, giving your hairstyle a sophisticated finish. Alternatively, for a summer look, use lightweight cotton or floral prints that bring a bright and cheerful vibe.
You can also decorate your scrunchies with small embellishments. Add beads, pearls, or lace trims around the outer edges for a unique and eye-catching design. Just make sure that the decorations are secure and don’t interfere with the scrunchie’s elasticity.
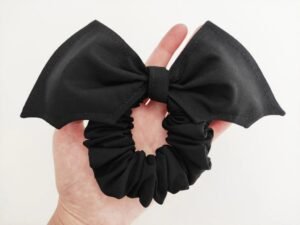
Another fun idea is to make bow scrunchies. Simply tie a small bow from the same fabric and sew it onto the seam after completing your scrunchie. This gives your accessory a cute, feminine flair that’s perfect for casual or festive looks.
Mixing fabrics can also create exciting designs. For example, combine satin and lace for a soft, romantic appearance, or use two contrasting fabrics for a bold, modern style. Color combinations like black and gold, red and white, or pink and gray always stand out beautifully.
Remember that your Easy-to-make fabric scrunchies don’t just have to be practical—they can also be fashionable. With a little creativity, you can transform a simple hair tie into a stylish statement piece that complements your personality and wardrobe.
Tips for Success and Scrunchie Care
To ensure that your Easy-to-make fabric scrunchies – Step by Step Tutorial results in perfect, long-lasting accessories, there are a few key tips to keep in mind. First, always use good-quality elastic. Cheaper types may lose their stretch quickly or snap after a few uses. Investing in sturdy elastic will make your scrunchies more durable and comfortable.
When choosing fabric, avoid materials that fray easily unless you’re willing to finish the edges carefully. Using pinking shears or a zigzag stitch can help prevent fraying and keep your scrunchies looking neat. If you want a fuller scrunchie, use wider fabric and longer strips; if you prefer something more delicate, go for narrower cuts.
Another important tip is to prewash your fabric before sewing. This removes any excess dye and prevents shrinkage after washing. It’s especially important for cotton fabrics that might shrink slightly when laundered.
For maintaining your finished scrunchies, gentle care is best. Hand wash them in cold water with mild soap and let them air dry. Avoid putting them in a dryer, as heat can damage the elastic and cause the fabric to fade.
If you’re planning to gift your scrunchies or sell them, consider packaging them neatly in small reusable bags or with personalized tags. This small effort makes them look professional and adds extra charm to your handmade creations.
By following these tips, you’ll not only master this Easy-to-make fabric scrunchies – Step by Step Tutorial but also create accessories that are both beautiful and long-lasting.
FAQ
1. What is the best fabric for making scrunchies?
Cotton is the easiest for beginners, while satin and velvet create elegant, professional-looking scrunchies.
2. Can I make scrunchies without sewing?
Yes, you can use fabric glue or a no-sew method, but sewing gives a stronger and cleaner finish.
3. How long does it take to make one scrunchie?
It usually takes about 15 to 25 minutes, depending on your experience and the materials used.
4. How can I make my scrunchie extra fluffy?
Use a wider strip of fabric—around 5 or 6 inches—and longer elastic for a fuller look.
5. Can I reuse old clothes to make scrunchies?
Absolutely! Upcycling old shirts, dresses, or pillowcases is an eco-friendly way to make unique scrunchies.
6. What size elastic should I use?
A ¼-inch wide elastic works best for most scrunchies. Make sure it stretches easily but is not too loose.
Conclusion
In this Easy-to-make fabric scrunchies – Step by Step Tutorial, you’ve learned how simple and enjoyable it can be to craft your own hair accessories.
From selecting fabric and measuring correctly to sewing and decorating, each step gives you the chance to express your creativity. These handmade scrunchies are stylish, practical, and sustainable—perfect for daily wear or thoughtful gifts.
Now that you’ve completed this tutorial, it’s time to experiment with colors, patterns, and textures to make scrunchies that match your personality. Don’t forget to share your results—leave your honest opinion and suggestions below. Your feedback helps improve future tutorials and inspires others to join the joy of DIY crafting!