
Starting an Easy-to-use sewing supplies organizer-Step by Step Tutorial is one of the most practical ways to bring order and beauty to your crafting routine. Many sewing enthusiasts know the challenge of keeping small tools, fabrics, and accessories neatly arranged, and creating your own organizer allows you to design a space that perfectly matches your needs. By using an Easy-to-use sewing supplies organizer-Step by Step Tutorial, you gain full control over materials, colors, sizes, and compartments, transforming a simple project into something functional and personal. This tutorial empowers both beginners and experienced sewists to craft a solution that keeps their tools accessible and protected.
When you follow an Easy-to-use sewing supplies organizer-Step by Step Tutorial, you learn how to build an item that simplifies your everyday sewing tasks. Whether you sew professionally or as a relaxing hobby, organization is essential for productivity. Searching through messy boxes or loose drawers slows you down and can even damage delicate materials. A handmade organizer, however, allows you to store scissors, needles, thread, markers, measuring tape, and small supplies in a safe and easily accessible way. With the right steps, you can create an organizer that keeps everything beautifully arranged, helping your creativity flow.
One of the best parts of working on this type of organizer is the ability to customize it completely. You can choose fabrics that match your sewing space, add pockets of various sizes, and incorporate closures like zippers, buttons, or Velcro for practicality. Throughout this Easy-to-use sewing supplies organizer-Step by Step Tutorial, you will learn how each component comes together to create a final piece that is as decorative as it is useful. Even better, it can become a thoughtful handmade gift for friends who enjoy crafting, ensuring that this project brings joy not only to you but also to others.
Choosing Materials and Preparing the Base
Before beginning your Easy-to-use sewing supplies organizer-Step by Step Tutorial, the first step is selecting materials that will give your organizer durability and structure. A medium-weight cotton fabric is usually ideal, as it is strong enough to support tools without being too rigid. You may also choose canvas or quilted fabric for extra stability. The lining fabric should complement the exterior while adding an additional layer of support. Interfacing or felt can be added between layers to help the organizer keep its shape.
Preparing the base involves cutting your main fabric panels to the desired size. Measurements depend on how large you want the organizer to be, but rectangular panels are the most common starting point. Once the pieces are cut, pressing them with an iron reduces wrinkles and makes sewing easier. Keeping edges crisp ensures smoother seams and a more polished final result. This preparation stage might seem simple, but careful work here sets the foundation for the entire project.
After preparing the main panels, you will need to cut and interface the lining. The lining plays an essential role in giving your organizer a clean interior and preventing the fabric from fraying or wearing down over time. Applying fusible interfacing strengthens the organizer, making it sturdy enough to hold items like scissors or rotary cutters. Taking the time to fuse the interfacing properly ensures longevity and helps the organizer keep its shape even after frequent use.
With the materials prepped, it is time to mark where your pockets and compartments will be placed. Using chalk or washable fabric markers makes this process simple and precise. Planning your layout helps avoid mistakes once you begin stitching the pockets in place. The benefit of following an Easy-to-use sewing supplies organizer-Step by Step Tutorial is that it guides you through these measurements clearly, ensuring that your organizer is functional and aesthetically pleasing.
Before moving on, double-check that your base and lining panels match in size. Consistency in measurements is essential for a smooth assembly process. If one panel is slightly larger, trim it before sewing to prevent shifting or uneven seams later. At this stage, you may also decide whether you want your organizer to fold, roll, or zip closed, as this will affect how the base is structured.
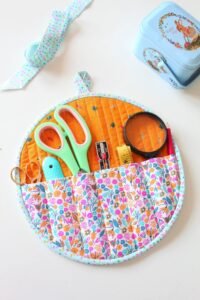
Once your base panels are ready, you can begin preparing the pockets. Pockets come in various shapes and sizes depending on the items you want to store. Small pockets are perfect for needles and clips, while larger pockets can hold fabric markers, thread spools, or small rulers. The versatility of this project is what makes the Easy-to-use sewing supplies organizer-Step by Step Tutorial such a valuable guide for sewists of any level.
Sewing the Pockets and Compartments
The pockets are the heart of your Easy-to-use sewing supplies organizer-Step by Step Tutorial, and sewing them neatly ensures your organizer stays practical and beautiful. Begin by preparing the pocket pieces, which can be made from the same fabric as the base or a contrasting design for visual interest. Press each piece with an iron and fold the top edge twice before stitching, creating a clean and reinforced finish.
Once the top edges are finished, place the pockets on the lining where you previously marked their positions. Pinning them in place keeps the fabric from shifting as you sew. When sewing pockets, always begin from the bottom edge and secure the sides last. This method prevents puckering and creates smooth pockets that sit flat against the organizer. For added durability, reinforce the seams with small backstitches at the beginning and end.
If you want multiple sections inside a single pocket, you can sew vertical lines to divide it. This is ideal for storing smaller supplies like pens, hooks, or measuring tape. The Easy-to-use sewing supplies organizer-Step by Step Tutorial encourages adjusting the spacing between divisions based on the size of your tools. Customization is one of the greatest advantages of making your own organizer, allowing you to tailor each feature to your needs.
Elastic-topped pockets can also be added for items that need more flexibility. Attaching a thin elastic band along the top edge allows the pocket to stretch and hold supplies securely. This is especially useful for items like thread spools or small containers. Properly installed elastic ensures the pockets remain snug and prevents items from falling out when the organizer is moved or rolled up.
Zippered pockets are an excellent addition for especially small pieces that need extra protection. To create a zippered pocket, attach the zipper to the fabric before sewing it onto the lining. This gives the organizer a professional look and adds functionality. Although it may seem challenging, adding a zipper is simple when following a clear step-by-step tutorial.
Before moving on to the assembly stage, test each pocket by placing a tool inside. This allows you to confirm that the pocket is the correct size and that the seams are secure. Adjust any pocket that feels too loose or too tight. Taking these small steps ensures the final organizer will be efficient, durable, and ready for everyday sewing tasks.
Assembling and Sewing the Organizer
With your pockets and compartments complete, it is time to assemble your Easy-to-use sewing supplies organizer-Step by Step Tutorial. Begin by placing the exterior fabric and lining fabric right sides together. Pin them carefully to prevent shifting. The smoother your fabrics lie, the cleaner your final seams will be. At this stage, you should also check that the pocket edges are aligned and not caught in the seam allowance.
Sew around the edges, leaving a small opening for turning the organizer right side out. This turning process reveals the neatly enclosed seams, giving your project a polished appearance. After turning it inside out, press the edges flat with an iron. Pressing helps define the edges and prepares the organizer for topstitching. A crisp, professional finish makes your handmade organizer look sturdy and well-crafted.
Topstitching around the entire perimeter adds durability and enhances the overall look. It reinforces the shape, prevents the layers from shifting, and gives the organizer a clean border. Using a matching or contrasting thread adds decorative appeal depending on your preference. The Easy-to-use sewing supplies organizer-Step by Step Tutorial highlights the importance of this step for both function and style.
If your organizer design includes a closure, attach it next. Closures can range from snap buttons to Velcro strips or even ties sewn onto the sides. Choosing the closure depends on how you plan to transport or store your organizer. A roll-up organizer works well with ribbons or ties, while a flat organizer might benefit from Velcro for quick access.
Once the closure is added, examine all seams to ensure everything is securely stitched. Look for any loose threads or areas where fabrics may not be fully aligned. Fixing any imperfections now guarantees that your organizer will last longer and perform better as a daily tool. Good craftsmanship makes all the difference in a project meant for frequent use.
Before considering the project complete, take time to test the organizer by filling it with your sewing supplies. This helps you understand how well the pockets hold up, whether the closure works smoothly, and how comfortable the organization layout feels. This final evaluation reinforces why the Easy-to-use sewing supplies organizer-Step by Step Tutorial is so valuable for both beginners and skilled sewists.
Adding Finishing Touches and Personalization
Your organizer is nearly complete, and now comes the most enjoyable part—adding personal details. Personalization makes your Easy-to-use sewing supplies organizer-Step by Step Tutorial truly unique. Decorative stitching, fabric labels, or small embroidered designs can transform a simple organizer into a meaningful handmade item. These touches also make it special if you plan to gift it to another sewing enthusiast.
Bias tape can be added along the edges for an extra pop of color. This technique is both decorative and functional, providing additional reinforcement. If you enjoy quilting, you can even quilt the exterior panel before assembling the organizer, giving it a padded appearance. This adds dimension and protects sharp tools inside the organizer.
You may also choose to add more pockets on the outside for extra storage. External pockets can hold quickly accessible items like rulers or markers. When sewing these pockets, reinforce the edges well so they can handle frequent use. The Easy-to-use sewing supplies organizer-Step by Step Tutorial encourages creativity in this stage, allowing you to modify the design as much as you like.
If you prefer a minimalist style, you can keep your organizer simple with clean lines and subtle stitching. A monochromatic color scheme or soft patterns can give the organizer a modern and elegant appearance. Even with minimal decoration, the organizer remains highly functional and pleasing to use.
Adding labels or tags can help identify which pockets contain which tools. This is especially useful for beginners who want to build good organization habits. Labels also add charm and personality without overwhelming the design. Fabric markers or heat-transfer labels are easy ways to customize your organizer further.
Finally, take a moment to admire your finished project. Creating something with your own hands is deeply rewarding. This Easy-to-use sewing supplies organizer-Step by Step Tutorial demonstrates how creativity and practicality can blend beautifully in a sewing project. The result is something useful, reliable, and tailored perfectly to your crafting style.
FAQ
What fabrics work best for a sewing supplies organizer?
Medium-weight cotton, canvas, and quilted fabrics are great options because they offer structure and durability while remaining easy to sew.
Can I add extra pockets to the organizer?
Yes. One of the advantages of this project is that you can customize the layout by adding as many pockets as you need for your tools.
Is this project suitable for beginners?
Absolutely. The steps are simple, and the organizer can be made with basic sewing skills, making it perfect for beginners who want to learn through practice.
Can I include a zipper in the organizer?
Yes, zippered pockets are an excellent addition for small or delicate items. They also give the organizer a more professional look.
How can I make the organizer sturdier?
Adding interfacing or felt between fabric layers helps the organizer maintain its structure and increases durability.
What closure works best?
It depends on your preferred style. Velcro, snap buttons, ribbons, or zippers are all effective options depending on the type of organizer you are making.
Conclusion
Creating an organizer through this Easy-to-use sewing supplies organizer-Step by Step Tutorial is a rewarding experience that blends creativity, practicality, and personal expression.
You learned how to choose materials, sew pockets, assemble the base, and add custom finishing touches to create a functional and beautiful piece.
This guide empowers you to stay organized and enjoy your sewing routine even more. If this tutorial was helpful, please leave your honest opinion and share suggestions for future projects.