
Creating a Fabric bag for carrying eggs- Step by Step Tutorial is a wonderful way to combine practicality with creativity. Whether you live on a farm, love collecting fresh eggs from a backyard coop, or simply want a unique reusable bag for kitchen storage, this project is both fun and functional. Making your own fabric egg bag ensures you have something eco-friendly, washable, and long-lasting while also adding a handmade touch to your home.
This Fabric bag for carrying eggs- Step by Step Tutorial is perfect for beginners who want to practice sewing techniques and for experienced crafters who enjoy creating useful items. The process is straightforward, the materials are easy to find, and the final result is something you will be proud to use or even give as a thoughtful gift to friends and family who keep chickens.
Throughout this tutorial, we will break down the steps into clear instructions, making it simple to follow along. By the end, you will have a sturdy, reusable, and attractive fabric bag designed specifically for safely carrying eggs without the risk of breaking them. Let’s begin this Fabric bag for carrying eggs- Step by Step Tutorial and bring this project to life!
Materials and Preparation
Before you start sewing your Fabric bag for carrying eggs- Step by Step Tutorial, gathering the right materials is essential for a smooth crafting experience. The type of fabric, thread, and tools you choose will affect both the durability and appearance of the final product.
Begin by selecting a strong but lightweight fabric. Cotton or linen are excellent choices because they are easy to sew, washable, and breathable, which is perfect for keeping eggs fresh. If you prefer a more rustic look, you can even use burlap or canvas, but keep in mind these fabrics may require sturdier needles.
You will also need matching or contrasting thread, depending on the design you want. A simple sewing kit with sharp scissors, pins, and a sewing machine will speed up the process, though hand sewing is an option if you prefer a slower, more relaxing approach.
For this Fabric bag for carrying eggs- Step by Step Tutorial, elastic bands or drawstrings are recommended for the bag’s closure. These prevent the eggs from slipping out while allowing you easy access when needed. You may also want to purchase bias tape to reinforce seams and add a professional finish.
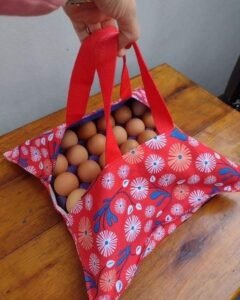
Another helpful item is a simple egg-shaped template or small fabric dividers to create compartments inside the bag. This keeps the eggs separated, reducing the chance of them knocking against each other.
Finally, make sure your workspace is well-lit and organized. Having everything ready before starting the Fabric bag for carrying eggs- Step by Step Tutorial ensures a smoother, more enjoyable sewing experience.
Cutting and Sewing the Fabric
Now that you have all the materials prepared, it’s time to begin the sewing portion of the Fabric bag for carrying eggs- Step by Step Tutorial. This step involves measuring, cutting, and assembling the pieces that will form your bag.
Start by measuring the size of the bag you want. A typical bag for carrying a dozen eggs can be around 12 inches wide and 14 inches tall, but you can adjust these dimensions depending on your needs. Add an extra inch around all sides for seam allowances to make sewing easier.
Cut two identical pieces of fabric for the front and back panels. If you plan to include internal dividers for each egg, cut additional strips of fabric that will be sewn inside the bag to form individual pockets. These pockets are optional but highly recommended for extra protection.
Pin the dividers onto the front panel first. Sew vertical lines to create small compartments where each egg will sit securely. This is a key step in the Fabric bag for carrying eggs- Step by Step Tutorial because it ensures the eggs stay separated during transport.
Next, place the front and back panels together with the right sides facing inward. Sew along the sides and bottom, leaving the top edge open. Use a straight stitch for durability, and then go over the seams again with a zigzag or overlock stitch to prevent fraying.
After the main body of the bag is complete, fold and hem the top edge to create a clean finish. This will prepare the opening for adding a drawstring or elastic closure later in the process.
Adding the Closure and Handles
The next stage of the Fabric bag for carrying eggs- Step by Step Tutorial involves making the bag functional with a secure closure and comfortable handles. This ensures your eggs stay safe while making the bag easy to carry.
For the closure, fold the top edge over about one inch to create a casing for the drawstring or elastic. Sew along the edge, leaving a small gap to thread the cord or elastic through. If you are using a drawstring, you can make it from fabric or use a sturdy cord for a rustic look.
Once the drawstring or elastic is inserted, tie the ends securely. When pulled, the top of the bag will cinch closed, keeping the eggs safely inside. This simple design is a key feature of the Fabric bag for carrying eggs- Step by Step Tutorial because it combines practicality with ease of use.
Next, cut two long fabric strips for handles. These can be as long or short as you like, depending on whether you want a hand-held bag or one you can carry over your shoulder. Fold the strips lengthwise, sew along the edges, and turn them inside out for a neat finish.
Attach the handles securely to the top of the bag using reinforced stitching. Double or triple-stitch this area since it will bear the weight of the eggs. Strong handles are essential for ensuring your bag lasts for many uses.
At this stage, your bag should be fully functional, with compartments, a secure closure, and sturdy handles. The Fabric bag for carrying eggs- Step by Step Tutorial is almost complete, with just a few finishing touches left to add.
Finishing Touches and Decoration
The final step in the Fabric bag for carrying eggs- Step by Step Tutorial is adding decorative elements and ensuring the bag looks as good as it functions. Personalizing your bag makes it unique and enjoyable to use or gift.
You can add decorative stitching around the edges or use contrasting thread for a more eye-catching design. Simple embroidery patterns like flowers, chickens, or egg shapes can give your bag a charming, handmade look.
Another idea is to use patterned fabrics or mix and match different colors for the panels, dividers, and handles. This is a fun way to get creative while following the Fabric bag for carrying eggs- Step by Step Tutorial.
If you want the bag to be washable and long-lasting, consider using fabric protector sprays after finishing. These help repel stains and make cleaning easier, especially if you use the bag frequently for fresh eggs.
You can also make multiple bags in different sizes. Smaller versions are perfect for half a dozen eggs, while larger ones can carry more or even hold other groceries.
Finally, test the bag by placing some eggs inside, tightening the closure, and carrying it around. If everything feels sturdy and secure, congratulations—you have successfully completed the Fabric bag for carrying eggs- Step by Step Tutorial!
FAQ – Fabric bag for carrying eggs
1. Can I make this bag without a sewing machine?
Yes, you can hand-sew the entire bag, but it will take more time. Use strong stitches to ensure durability.
2. What fabric works best for carrying eggs?
Cotton, linen, or canvas are ideal because they are sturdy, washable, and easy to sew.
3. How many eggs can this bag carry?
A standard size can carry around a dozen eggs, but you can adjust the dimensions to fit more or fewer.
4. Do I need to add internal dividers?
While optional, dividers help prevent the eggs from hitting each other and breaking during transport.
5. Can I wash the fabric egg bag?
Yes, most fabrics used in this Fabric bag for carrying eggs- Step by Step Tutorial are machine washable. Use gentle cycles for best results.
6. Is this bag suitable for gifting?
Absolutely! Handmade fabric egg bags make thoughtful and practical gifts, especially for those who raise chickens.
Conclusion
This Fabric bag for carrying eggs- Step by Step Tutorial has shown you how to create a functional, eco-friendly, and beautiful bag from start to finish. We covered everything from choosing materials and sewing the base to adding closures, handles, and decorative touches.
By following this guide, you now have a reusable bag that keeps eggs safe while adding a handmade charm to your kitchen or gifts. Try experimenting with different fabrics, colors, and sizes to make each bag unique.
We would love to hear your thoughts! Leave your honest opinions, suggestions, or share your experience making the Fabric bag for carrying eggs- Step by Step Tutorial so others can learn and be inspired too.