
Starting a fabric basket tutorial-Step by Step Tutorial is a wonderful way to learn how to transform simple fabric into a practical and decorative storage solution. Fabric baskets are not only functional but also stylish, making them perfect for organizing craft supplies, toys, laundry, or even as gift containers. With just a few materials and some creativity, you can create baskets in different shapes and sizes that match your home decor. Many beginners believe that basket-making is complicated, but this guide will break it down into easy steps that anyone can follow.
One of the best things about making a fabric basket is the freedom of customization. You can choose fabrics with bright colors for children’s rooms, minimalist tones for modern homes, or seasonal patterns for holidays. Each basket becomes unique and personal because it reflects your own style. The process itself is also relaxing, combining the joy of sewing with the satisfaction of creating something useful. By following this fabric basket tutorial-Step by Step Tutorial, you will gain confidence in working with fabric and basic sewing techniques.
Beyond functionality, fabric baskets also represent sustainable crafting. Instead of buying plastic storage containers, you can reuse fabric scraps or repurpose old clothes, reducing waste while creating something beautiful. This project encourages creativity, sustainability, and craftsmanship all in one. Whether you are new to sewing or already experienced, this fabric basket tutorial-Step by Step Tutorial will guide you through every detail, ensuring a fun and rewarding experience.
Materials Needed for Fabric Basket Making
To start any fabric basket tutorial-Step by Step Tutorial, having the right materials at hand is crucial. The good news is that most of the supplies are affordable and easy to find, and many can even be repurposed from items you already own. A strong outer fabric, such as canvas or cotton, is often the best choice because it gives the basket structure and durability. For the lining, you can choose a softer material that complements the design while keeping the inside neat and tidy.
In addition to fabric, you will need stabilizers or interfacing. These are important because they give the basket its shape and sturdiness. Without them, your basket may collapse or look more like a bag than a container. If you want a stiff basket, choose a heavy interfacing; if you prefer a softer one, use a medium-weight option. This flexibility allows you to decide how rigid or foldable you want your basket to be.
You will also need basic sewing supplies: scissors or a rotary cutter, measuring tape, sewing pins, clips, and a sewing machine. While hand-sewing is possible, it is much more time-consuming and may not provide the same durability. For beginners, using a sewing machine makes the process smoother and ensures stronger seams. A strong thread is also essential to prevent unraveling.
Handles are optional but highly recommended for larger baskets. They can be made from fabric, webbing, or even rope, depending on the look you want. Adding handles makes the basket easier to carry and adds a professional touch to your finished piece. Remember, part of the charm of a handmade basket is the ability to customize every detail.
Ironing tools are also important. Pressing fabric at different stages helps ensure clean lines and crisp edges, which make the basket look polished. Many beginners overlook this step, but ironing can make the difference between a homemade item and a professional-looking creation.
Finally, prepare a safe and comfortable workspace. Having a large flat surface for cutting and sewing will save you time and prevent mistakes. With all materials ready, you will be well-prepared to dive into this fabric basket tutorial-Step by Step Tutorial with confidence.
Step by Step Tutorial for Sewing the Basket
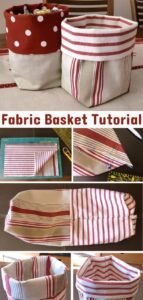
The first step in this fabric basket tutorial-Step by Step Tutorial is cutting the fabric. You will need two main pieces: one for the outer layer and one for the lining. Make sure both are the same size. For a medium basket, a rectangle measuring 16×20 inches works well. Adjust the measurements according to the basket size you want to create. Precision in cutting ensures that the final basket looks symmetrical and balanced.
Next, attach the interfacing to the outer fabric. Follow the manufacturer’s instructions, as some interfacing needs to be fused with an iron, while others are sewn in place. This step is crucial because it defines how structured your basket will be. Take your time to smooth out any wrinkles and ensure that the interfacing is firmly attached.
Once the interfacing is secured, fold each fabric piece in half, right sides together, and sew along the sides, leaving the top open. Repeat this process for both the outer fabric and the lining. After sewing, you will have two separate pouch-like shapes. At this point, you are already halfway to forming your basket.
The next step is creating boxed corners. To do this, pinch each corner of the fabric so that the side seam aligns with the bottom fold, forming a triangle. Sew across the corner about 3 inches from the tip and cut off the excess. This technique gives depth and structure to the basket, transforming it from a flat pouch into a three-dimensional container.
After boxing the corners, insert the lining into the outer fabric, making sure the right sides are facing each other. Align the seams carefully to ensure the basket looks neat. Pin or clip the edges together at the top. Sew around the top edge, leaving a small gap to turn the basket right side out.
Finally, turn the basket right side out through the gap and press the edges neatly. Sew a topstitch around the upper edge to close the gap and secure the lining in place. If desired, add handles at this stage by sewing them firmly into the side seams. Congratulations, you have completed a beautiful and functional fabric basket using this fabric basket tutorial-Step by Step Tutorial.
Creative Variations and Design Ideas
One of the most exciting parts of following a fabric basket tutorial-Step by Step Tutorial is experimenting with creative variations. You can easily change the basket size by adjusting the fabric measurements. Small baskets are perfect for organizing keys, jewelry, or makeup, while larger ones work well for storing blankets, toys, or laundry. Each size serves a different purpose and can make your home more organized.
Fabric choice is another area for creativity. Mixing different patterns, such as stripes with florals or solids with polka dots, can give the basket a unique look. You can even make reversible baskets by choosing complementary fabrics for the outer layer and lining. This adds versatility because you can flip the basket inside out depending on your mood or seasonal decor.
Handles offer another design opportunity. Fabric handles can be sewn from the same material as the basket, creating a uniform appearance, while leather or rope handles add a rustic or modern touch. Decorative stitching on the handles or around the top edge can also elevate the overall design, making the basket look more professional.
You can personalize baskets with appliqués, embroidery, or fabric paint. Adding initials, shapes, or themed decorations makes them great for gifts. For example, a basket decorated with stars or hearts can be a thoughtful handmade present for birthdays or holidays. The possibilities for personalization are endless.
Another creative idea is to add pockets inside or outside the basket. Pockets make the basket even more functional by providing space for smaller items. This is especially useful for sewing baskets, craft organizers, or baby baskets, where keeping tiny items separated is important.
Lastly, consider using recycled fabrics for an eco-friendly approach. Old jeans, tablecloths, or curtains can be transformed into durable and stylish baskets. This not only saves money but also contributes to sustainable living. Adding unique fabrics gives your basket character and a story behind its creation.
Tips for Success and Common Mistakes to Avoid
While this fabric basket tutorial-Step by Step Tutorial is simple, a few tips can make the process smoother. First, always measure and cut your fabric carefully. Even small mistakes in cutting can lead to uneven edges or a lopsided basket. Use a ruler and rotary cutter for precise results.
Second, never skip interfacing. Many beginners think they can do without it, but interfacing gives the basket its shape and strength. Without it, your basket may look floppy and unfinished. Always match the weight of the interfacing to the type of basket you want to create.
Third, press your fabric at every stage. Ironing helps keep seams flat and corners sharp, improving the overall look. Skipping this step often results in a basket that looks messy or wrinkled, even if the sewing is correct. A good iron is just as important as a sewing machine in this project.
Fourth, pay attention to seam allowances. Consistency is key to ensuring that the basket’s pieces fit together properly. Using a standard ½ inch seam allowance is a safe choice for this kind of project. Beginners often struggle with uneven seams, but practice and careful sewing can solve this issue.
Fifth, always test the basket size before finishing. After sewing the outer fabric and lining, check if the basket fits your intended use. If it is too small or too large, you can adjust the dimensions before final assembly. This step saves time and prevents disappointment later.
Finally, avoid rushing through the tutorial. While a fabric basket is a relatively simple project, taking your time ensures accuracy and quality. Remember, the goal is not just to finish but to enjoy the process and create something beautiful.
FAQ About Fabric Basket Tutorial-Step by Step Tutorial
1. Can I make a fabric basket without a sewing machine?
Yes, but it will take longer. Hand-sewing is possible, though a sewing machine provides stronger seams and faster results.
2. What type of fabric works best for a fabric basket?
Canvas, denim, and cotton are excellent choices. They provide durability and can handle the weight of stored items.
3. How can I make my basket stand up better?
Use heavy interfacing or stabilizers. This will give your basket a sturdy structure and prevent it from collapsing.
4. Can I wash fabric baskets?
Yes, but it depends on the fabric and interfacing used. Machine washing is possible for some, while others should be spot-cleaned to maintain shape.
5. Are fabric baskets eco-friendly?
Absolutely. By reusing fabric scraps or old clothing, you reduce waste and create sustainable storage options.
6. How long does it take to make a fabric basket?
For beginners, it can take 2–3 hours. With practice, you can complete one in under an hour.
Conclusion
This fabric basket tutorial-Step by Step Tutorial has shown you how to turn simple fabric into a practical, stylish, and sustainable storage solution. From gathering materials and sewing the basket to adding creative designs and avoiding common mistakes, each step is simple enough for beginners yet flexible enough for experienced crafters to experiment with.
Now that you have learned the process, it’s your turn to create fabric baskets that suit your home and lifestyle.
Whether you use them for organizing, decorating, or gifting, these handmade baskets will always carry a special personal touch. I’d love to hear your sincere opinions and suggestions—share your thoughts about this tutorial and let me know how your own baskets turned out!