
Creating a handmade cable holder can be both practical and enjoyable, and this Fabric cable organizer-Step by Step Tutorial will guide you through every stage of the process. Whether you struggle with tangled chargers, loose earbuds, or messy electronic cables in your drawers, a fabric organizer is a simple and sustainable solution. In this article, you will learn how to make an organizer that is durable, beautiful, and easy to customize. From choosing the fabric to sewing the finishing details, this guide offers everything you need with clarity and accessibility.
With modern homes filled with phones, tablets, speakers, and other devices, keeping cables neatly stored has become essential. The Fabric cable organizer-Step by Step Tutorial presented here is ideal for anyone who values organization and appreciates handmade items. A fabric organizer is a smart alternative to plastic or metal storage options, providing flexibility, softness, and the opportunity to express your personal style through fabric choices and design. By creating your own organizer, you not only solve an everyday problem but also enjoy a relaxing sewing experience.
This project is also perfect for beginners, as it does not require complex techniques or professional sewing tools. The Fabric cable organizer-Step by Step Tutorial has been designed to help you learn progressively while completing a useful item for yourself or as a thoughtful gift. Throughout the article, you will find helpful explanations, practical tips, and a structure optimized for readers seeking clear guidance. If you enjoy sewing, organization, and handmade crafts, you are in the right place.
Choosing the Right Materials for Your Fabric Cable Organizer
Before starting this Fabric cable organizer-Step by Step Tutorial, selecting the right materials is crucial for ensuring durability and functionality. Cotton fabric is one of the best choices because it is resistant, easy to sew, and available in countless patterns. You may choose a thicker cotton or combine two layers for extra firmness, especially if you want an organizer that holds its shape well over time. Prints such as geometric patterns or neutral colors work very well for everyday use.
You will also need a medium-weight lining, such as felt or fusible interfacing. This lining gives the organizer stability and prevents it from bending or wrinkling too easily. In addition, having lining helps protect the cables stored inside by adding a soft internal layer. Many crafters choose interfacing because it is lightweight yet strong enough for small accessories like cable organizers.
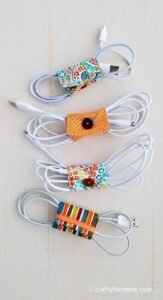
Velcro or snap fasteners are essential elements for the closure of your organizer. They allow you to secure the folded fabric neatly, preventing the cables from slipping out. Velcro is ideal for beginners because it is easy to sew and adjust, while snap buttons offer a more elegant and professional finish. The choice depends on your preference and the style you want to achieve.
Basic sewing tools are also necessary to follow this Fabric cable organizer-Step by Step Tutorial effectively. Scissors, pins, fabric markers, sewing thread, and a sewing machine or needle for hand-sewing are all part of the process. Although a sewing machine speeds up the project, you can absolutely complete this organizer by hand if you prefer a slower, more mindful crafting experience.
When choosing thread, select a high-quality type that matches your fabric. A strong thread ensures the seams remain intact even with frequent use. Since cable organizers are often opened and closed many times, sturdy stitching is essential for long-term durability.
Finally, consider the size you want for your organizer. You may customize dimensions based on your needs—larger for long charging cables, smaller for earbuds, or medium-sized for daily carry-on items. Being able to personalize the measurements is one of the advantages of following a Fabric cable organizer-Step by Step Tutorial like this one.
Cutting and Preparing the Pieces
To begin this part of the Fabric cable organizer-Step by Step Tutorial, start by measuring and cutting your fabric according to the desired size. A common and practical dimension is approximately 20 cm by 12 cm, but you may adapt it based on your personal usage. Use a ruler or cutting mat to ensure straight lines and symmetrical pieces.
Once you have cut the main fabric, repeat the process with the lining. Both pieces must be exactly the same size to create a clean and professional finish. Aligning the fabric and lining properly is an important step, as it directly impacts how your organizer will fold and close later on.
Pin the two pieces together with the right sides facing inward, leaving the edges aligned. This preparation step helps maintain stability while sewing. Pins should be placed around the perimeter of the fabric, ensuring that nothing shifts during stitching. Taking the time to properly pin your fabric will make the final union much smoother.
Next, mark a small opening of about 5 cm on one side of the rectangle. This opening will allow you to turn the organizer right side out after sewing around the edges. Leaving this gap is essential, and skipping it would make it impossible to continue the project correctly.
After marking the opening, use a fabric marker to outline your seam allowance. A seam allowance of around 0.7 cm to 1 cm is ideal for beginners and offers enough space to maintain even stitching. Clear markings help guide you as you sew, ensuring the edges are consistent and clean.
Preparing the pieces with care before moving on to sewing ensures a smoother process later. With this phase complete, you are ready to join the fabric layers and bring your organizer to life through the next steps of this Fabric cable organizer-Step by Step Tutorial.
Sewing and Assembling the Cable Organizer
Now that your pieces are prepared, it’s time to start stitching them together as guided in this Fabric cable organizer-Step by Step Tutorial. Begin by sewing around the edges of the pinned fabric, following the seam allowance you previously marked. Remember to leave the opening untouched so that you can turn the fabric later. Slow and steady stitching helps maintain straight lines and clean corners.
When approaching each corner, stop with your needle down before lifting the presser foot and turning the fabric. This technique ensures crisp corners and prevents distortion. Neat corners are especially important for organizers, as they contribute to a polished appearance and a better folding structure.
Once all edges except the opening are sewn, carefully trim the excess fabric from the corners. This step reduces bulk and allows the corners to lay flat once the fabric is turned right side out. Be careful not to cut through the stitching line. Corner trimming is a small action, but it makes a significant difference in the final look.
Turn the fabric right side out through the small opening you left earlier. Use a blunt tool, such as a chopstick or the back of a crochet hook, to gently push out the corners from the inside. This helps them form neatly and gives your organizer a precise rectangular shape. Taking your time here ensures a neat finish.
After turning the piece completely, fold in the raw edges of the opening and press the fabric with an iron. Pressing helps flatten the seams and prepares the piece for topstitching, which is an optional but highly recommended step. Topstitching around the entire perimeter not only closes the opening but also reinforces the structure of your organizer.
With this, the structure is complete, and you’re ready to continue adding functional details that transform a simple rectangle into an efficient, stylish piece as shown in this Fabric cable organizer-Step by Step Tutorial.
Adding Closures and Finishing Touches
The final steps in this Fabric cable organizer-Step by Step Tutorial involve attaching closures and decorating your piece according to your taste. To create a functional closure system, start by folding the fabric in thirds to visualize how your organizer will close. Mark the spot where the Velcro or snap buttons should be attached.
If using Velcro, cut two small pieces—one for the inside flap and one for the outer section. Sew them securely in place, ensuring they align perfectly when the organizer is folded. Velcro is forgiving and easy to reposition, making it a beginner-friendly option for this project.
For snap fasteners, follow the instructions of the snap tool you are using. Snap buttons bring a clean and modern look and are especially useful if you want your organizer to be compact and elegant. Ensure the snaps are aligned properly to avoid misplacement or difficulty when closing the organizer.
Once the closure is attached, consider adding decorative stitching. This can be done using a contrasting thread color for a bold look or a matching shade for subtle elegance. Decorative stitching not only enhances the visual appeal but also adds reinforcement to the fabric edges.
You can also personalize your organizer with fabric labels, appliqués, or small embroidered details. Personal touches elevate the final product and make each organizer unique. This is especially meaningful if you intend to gift the item to someone special during holidays or birthdays.
After all finishing touches are complete, fold and test your organizer several times to ensure everything is aligned and functional. With that, you have successfully completed every step of the Fabric cable organizer-Step by Step Tutorial.
Fabric Cable Organizer Sewing
1. Is this project suitable for sewing beginners?
Yes, this tutorial uses simple techniques, making it excellent for beginners.
2. What type of fabric works best?
Cotton fabric is ideal due to its strength, versatility, and ease of sewing.
3. Can the organizer be washed?
Yes, most organizers can be gently washed by hand or machine, depending on fabric choice.
4. Do I need a sewing machine?
No, this project can be sewn by hand, although a machine makes it faster.
5. Can I change the size?
Absolutely. You may adjust the dimensions to accommodate different cable lengths or accessories.
6. What closures work best?
Velcro is beginner-friendly, while snap buttons offer a more professional finish.
Conclusion
This Fabric cable organizer-Step by Step Tutorial has shown how simple it is to create a functional and stylish solution for everyday cable storage.
You learned how to choose materials, prepare fabric pieces, sew the structure, and add closures for practical use.
With these steps, you can customize your organizer in endless ways and enjoy a handmade item that brings organization and charm to your daily routine. If you found this guide helpful, please leave your sincere opinion and share suggestions for future tutorials. Your feedback is always welcome!