
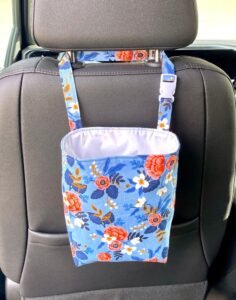
Creating a Fabric car organizer-Step by Step Tutorial is a wonderful way to add functionality, beauty, and convenience to your vehicle. Whether you often travel with kids, carry craft supplies, or simply prefer a clutter-free car, making your own organizer ensures you have something uniquely tailored to your needs. In this article, you will learn how to design and sew a practical organizer that fits perfectly behind a car seat, inside the trunk, or anywhere you need extra storage. This tutorial is beginner-friendly yet provides enough detail to satisfy more experienced crafters.
A Fabric car organizer-Step by Step Tutorial is not only a fun sewing project, but also a great way to combine creativity and utility. Handmade organizers are affordable compared to store-bought alternatives, and they allow you to choose your preferred fabrics, colors, and pocket sizes. This guide will walk you through every stage—from selecting materials to assembling and finishing the organizer—so you can complete it with confidence. All instructions in this article follow good crafting practices and align with safe, family-friendly content.
By following this Fabric car organizer-Step by Step Tutorial, you will create a durable and practical item that helps keep your car neat and organized. This project teaches useful sewing skills such as measuring, cutting, assembling panels, and attaching pockets with precision. You will also learn how to make your organizer strong enough to withstand daily use. Before diving into the steps, take your time reading each section carefully, especially if you are new to sewing. Now, let’s begin creating this functional and beautiful organizer for your car.
Choosing Fabric and Materials for Your Organizer
Selecting the right materials is one of the most important steps in this Fabric car organizer-Step by Step Tutorial. The durability, appearance, and longevity of your organizer depend greatly on the quality and type of fabrics you choose. For the main structure, canvas, denim, or thick cotton are excellent options because they resist wear and provide solid support. Avoid fabrics that are too thin, as they may tear or lose shape over time.
For the pockets, you may choose lightweight cotton or polyester, depending on your preference. Using contrasting colors or patterns can make your organizer visually appealing while making it easier to locate items quickly. Make sure your fabric choices match the interior style of your car, ensuring a cohesive and attractive look. Having consistent tones or complementary patterns can elevate the final appearance.
Another essential material for this Fabric car organizer-Step by Step Tutorial is interfacing, which provides structure and strength. Heavy interfacing helps the organizer remain upright and functional even when filled with items. You will also need bias tape or strong thread to reinforce edges and seams. These small finishing touches contribute to long-lasting results.
Gathering the right tools beforehand is equally important. A sewing machine, fabric scissors, pins, measuring tape, and marking chalk are essential items for this project. A rotary cutter can also be helpful, especially when cutting straight lines. Having everything ready before you start sewing will make the process smoother and more enjoyable.
Don’t forget to include accessories such as adjustable straps, Velcro, snaps, or elastic, depending on the design you want. These components help secure the organizer to the car seat or create expandable pockets for additional functionality. Choosing quality accessories ensures that your organizer remains stable during use.
Finally, before cutting your fabric, wash and iron it to prevent shrinkage or distortion later. This step is especially recommended if the fabric is 100% cotton. Prewashing ensures that your Fabric car organizer-Step by Step Tutorial produces a professional and polished result.
Cutting and Preparing the Fabric Pieces
The cutting stage is one of the most crucial parts of the Fabric car organizer-Step by Step Tutorial, as accuracy determines how neatly your organizer will come together. Start by measuring the area where the organizer will hang, typically the back of a car seat. Common dimensions are around 45 cm by 60 cm, but feel free to adjust based on your needs. Always measure twice to avoid errors.
After determining the measurements, mark your fabric using a ruler and chalk. The main panel should be cut first, followed by the pockets. Remember to leave seam allowances—typically 1 to 1.5 cm—on each side. Keeping track of these allowances ensures your organizer maintains the correct final size once sewn. Creating a simple paper template for each part can greatly simplify the cutting process.
Next, cut the pockets in various sizes depending on what you plan to store. For example, a large pocket can hold books or tablets, medium pockets can carry snacks or wipes, and smaller pockets are perfect for pens or cables. A variety of pocket shapes makes your organizer versatile and functional.
Once all pieces are cut, apply interfacing to the back of the main panel and, if desired, to the pockets. This step will give your organizer more structure and help prevent sagging. Press the interfacing carefully with an iron to ensure strong adhesion. Avoid rushing through this step, as it greatly impacts the quality of the final product.
Preparing the pockets includes folding the top edge twice and sewing a clean hem. This prevents fraying and gives a neat, professional finish. Press the seams flat with an iron before sewing them onto the main panel. Pressing helps maintain accuracy, especially for evenly aligned pockets.
Finally, lay out all the pieces on a flat surface to visualize the organizer before sewing. This step allows you to reorganize the pockets, ensuring everything is positioned logically and attractively. Planning ahead helps you complete your Fabric car organizer-Step by Step Tutorial with ease and precision.
Sewing the Organizer Structure
Now that your pieces are prepared, you can start assembling the structure of your Fabric car organizer-Step by Step Tutorial. Begin by placing the main panel on your workspace and arranging the pockets where you want them. Pin each pocket securely to prevent slipping while sewing.
Start sewing the pockets one by one. For larger pockets, consider adding a center seam to create compartments. This helps prevent items from shifting during car rides. Reinforce the top edges of pockets with a backstitch at the beginning and end for added durability. These small reinforcements make the organizer stronger and longer-lasting.
After sewing the pockets, add bias tape or binding around the entire perimeter of the organizer. This not only gives the project a clean finish but also protects the edges from fraying. Choose a bias tape color that complements your fabric selection. Neatly sewn edges enhance both appearance and structural integrity.
Now, attach straps, elastic loops, Velcro, or snap buttons depending on how you want your organizer to hang. Straps with adjustable lengths are ideal for attaching to car seat headrests. Be sure to double-stitch the straps for maximum durability, as they will bear the weight of the organizer and its contents.
If you want additional features such as a clear pocket for a smartphone or tablet, now is the time to add it. Transparent vinyl can be used for these pockets, allowing passengers—especially children—to watch videos hands-free. This extra option makes your Fabric car organizer-Step by Step Tutorial even more practical.
Once all pieces are assembled, give the organizer a final press with the iron. This helps smooth seams and gives your project a polished, professional look. At this point, the main structure of your organizer is complete, and you can move on to the final touches.
Final Touches and Assembly Tips
In this stage of the Fabric car organizer-Step by Step Tutorial, you will ensure that your organizer looks neat and functions properly. Begin by checking all seams and edges carefully. Trim any loose threads and verify that all pockets are securely attached. Quality control is crucial to ensuring your organizer withstands daily use.
If your organizer includes elastic pockets, test the elasticity by placing an item inside. The pocket should stretch but still hold the item firmly. Proper tension ensures the organizer remains practical and safe. Adjust elastic lengths if needed.
Next, reinforce high-stress points. Areas such as strap attachments and pocket corners should be double-stitched. This prevents tearing, especially when the organizer carries heavier items like books or bottles. Strong reinforcements significantly extend the lifespan of your project.
Consider adding decorative elements to personalize the organizer. Options include embroidery, fabric patches, appliqués, or simple ribbon trims. These touches make your organizer unique and add charm without affecting functionality. This is an enjoyable part of the creative process.
Once all finishing touches are complete, test the organizer inside your car. Ensure it hangs evenly and fits properly in the intended space. Adjust strap lengths or attachment points as necessary for comfort and convenience. Testing also allows you to assess pocket accessibility.
After final adjustments, your Fabric car organizer-Step by Step Tutorial is officially complete. You now have a functional, handmade accessory that keeps your car tidy and enhances your daily routine.
Fabric Car Organizer
1. What is the best fabric for a car organizer?
Sturdy fabrics such as canvas, denim, or thick cotton are ideal because they provide structure and resist daily wear.
2. Can beginners follow this tutorial?
Yes. This Fabric car organizer-Step by Step Tutorial is designed to be accessible for beginners while providing detailed instructions.
3. Do I need a sewing machine?
While you can sew by hand, a sewing machine makes the process faster and more durable.
4. How do I clean the organizer?
Most organizers made with cotton or canvas can be gently hand-washed. Avoid machine washing if it contains interfacing or vinyl.
5. Can I customize the pocket sizes?
Absolutely. Customizing pockets is one of the main advantages of making your own organizer.
6. How do I attach the organizer to the car seat?
Straps, Velcro, or snaps can secure the organizer to headrests or seat backs.
7. Can I add extra compartments?
Yes. This tutorial allows for full customization, including additional sections or special pockets.
Conclusion
This Fabric car organizer-Step by Step Tutorial has guided you through selecting fabrics, cutting materials, sewing pockets, and assembling a functional organizer for your vehicle.
You learned essential techniques to create a durable, attractive, and completely customizable organizer that fits your personal needs.
I hope this tutorial inspires your creativity and helps you enjoy a cleaner, more organized car. Please leave your honest opinion and share suggestions about how this tutorial worked for you!