
If you have been searching for a fabric cat keychain- Step by Step Tutorial, you are in the right place. In this guide, we will walk you through the entire process of creating an adorable keychain shaped like a cute cat using simple materials and easy sewing techniques. Learning how to make a fabric cat keychain- Step by Step Tutorial is a wonderful craft project for both beginners and experienced crafters who want to create a fun and practical accessory.
Making your own fabric cat keychain- Step by Step Tutorial not only gives you a chance to create something unique but also allows you to explore your creativity. You can personalize each keychain with different fabrics, patterns, and colors to make them truly one of a kind. This project can be a lovely handmade gift for cat lovers or a way to add a personal touch to your everyday accessories.
The best part about this fabric cat keychain- Step by Step Tutorial is that you do not need advanced sewing skills or expensive tools. With a few basic materials, some patience, and a bit of imagination, you can make a keychain that is both cute and functional. Follow along as we break down each step clearly so you can create your own fabric cat keychain with confidence.
Materials and Preparation for the Fabric Cat Keychain
Before starting the fabric cat keychain- Step by Step Tutorial, you will need to gather all the necessary supplies. The basic materials include fabric scraps, keychain rings, stuffing material, scissors, sewing thread, and a needle or sewing machine. Cotton fabric works well for this project because it is easy to sew and comes in countless colors and patterns.
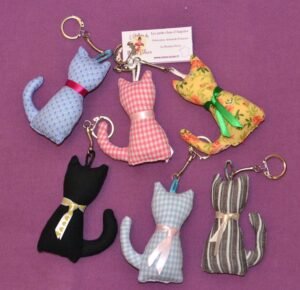
Choosing the right fabric is an important part of the fabric cat keychain- Step by Step Tutorial. You can go for plain colors if you prefer a simple look or choose fabrics with prints such as flowers, stripes, or even cat-themed designs for a playful effect. Mixing and matching fabrics can also make the keychain more interesting and unique.
Next, prepare a simple template for the cat shape. You can draw a basic outline of a cat’s head or body on paper and cut it out to use as a pattern. Having a template helps keep the size and shape consistent, especially if you plan to make multiple keychains using the fabric cat keychain- Step by Step Tutorial.
You will also need some soft stuffing material to give the keychain a slightly puffy look. Polyester fiberfill works perfectly for this purpose. It is lightweight and easy to use, making it ideal for small sewing projects like the fabric cat keychain- Step by Step Tutorial.
In addition to fabric and stuffing, gather basic sewing tools like pins to hold the fabric pieces together, a pair of sharp scissors for cutting, and matching sewing thread to give your keychain a neat finish. These simple tools will make the fabric cat keychain- Step by Step Tutorial easier to follow and complete successfully.
Finally, choose a sturdy keychain ring or clasp. This will attach your handmade fabric cat to your keys, bags, or backpacks, making it both decorative and functional. Now that everything is ready, you can begin crafting your adorable cat keychain.
Cutting and Sewing the Fabric Pieces
The first step in the fabric cat keychain- Step by Step Tutorial is to cut out the fabric pieces using your prepared template. Place the paper template on the fabric and trace around it with a fabric marker or pencil. You will need two identical pieces for the front and back of the keychain.
Once the pieces are traced, cut them out carefully. Make sure the edges are smooth and the shapes match perfectly. This will make sewing easier and give the final product a neat appearance. Precision at this stage of the fabric cat keychain- Step by Step Tutorial ensures a professional-looking keychain.
Next, place the two fabric pieces together with the right sides facing inward. Pin them in place so they do not shift while sewing. This is especially helpful for beginners following the fabric cat keychain- Step by Step Tutorial, as it keeps everything aligned properly.
Begin sewing around the edges of the fabric, leaving a small opening at the bottom. This opening will be used later to turn the fabric right side out and add the stuffing. Use small, even stitches for durability. A sewing machine can make the process faster, but hand sewing works just as well for this fabric cat keychain- Step by Step Tutorial.
After sewing most of the way around, carefully turn the fabric right side out through the opening. Use a pencil or a blunt stick to gently push out the corners and curves so the cat shape looks nice and even. This step brings your project to life as part of the fabric cat keychain- Step by Step Tutorial.
Finally, fill the inside with a small amount of stuffing until it reaches your desired thickness. Do not overfill, as the keychain should remain lightweight and easy to carry.
Adding Details and Assembling the Keychain
Now that the basic shape is done, it is time to add the fun details to your fabric cat keychain- Step by Step Tutorial. Using embroidery thread or a fine-tip fabric marker, you can create a cute face for your cat. Simple eyes, a little nose, and whiskers will give it personality and charm.
If you want to add more decoration, consider sewing on tiny fabric bows, buttons, or even small beads. These little touches can make each fabric cat keychain- Step by Step Tutorial project unique and more personal.
After adding the details, sew the opening closed using small, neat stitches. This will keep the stuffing inside and give the keychain a finished look. Taking your time here will ensure the fabric cat keychain- Step by Step Tutorial results in a clean and polished product.
Next, attach the keychain ring or clasp. You can sew a small fabric loop at the top of the cat’s head or use a piece of ribbon. Slide the ring through the loop securely so it can hold your keys without coming apart.
Check all the seams and attachments to make sure everything is tight and secure. A well-made fabric cat keychain- Step by Step Tutorial project should be durable enough for daily use.
Once complete, step back and admire your work. Each keychain you make will be slightly different, reflecting your creativity and personal style.
Tips, Variations, and Gift Ideas
One of the best things about the fabric cat keychain- Step by Step Tutorial is how versatile it can be. You can experiment with different shapes, sizes, and fabrics to create an entire collection of keychains. Try making cats in various colors to match different seasons or themes.
For a more eco-friendly approach, use recycled fabric scraps from old clothes or leftover sewing projects. This not only saves money but also adds a meaningful, sustainable touch to your fabric cat keychain- Step by Step Tutorial creations.
You can also make the keychains slightly larger and turn them into bag charms or small ornaments. Adding lavender or scented stuffing can transform them into mini sachets for drawers or closets, giving the fabric cat keychain- Step by Step Tutorial even more uses.
If you enjoy hand embroidery, consider stitching decorative patterns onto the fabric before assembling the keychain. Flowers, hearts, or geometric shapes can make the fabric cat keychain- Step by Step Tutorial more artistic and personalized.
These keychains also make wonderful handmade gifts. Create sets of matching keychains for friends and family, or design themed ones for special occasions like birthdays or holidays. People love receiving thoughtful, handmade items created with care and love.
Finally, do not be afraid to experiment. The fabric cat keychain- Step by Step Tutorial is simple enough to allow plenty of room for creativity, so each project can be unique and fun to make.
FAQ – Fabric Cat Keychain
1. Do I need a sewing machine for this fabric cat keychain- Step by Step Tutorial?
No, you can complete the entire project by hand sewing if you prefer.
2. What type of fabric works best for the keychain?
Cotton fabric is ideal because it is easy to sew and available in many patterns.
3. Can children help with this project?
Yes, with supervision. Older children can help with cutting, stuffing, and decorating.
4. How long does it take to make one keychain?
It usually takes about 30–45 minutes depending on your sewing speed.
5. Can I wash the keychain if it gets dirty?
Yes, but hand washing is recommended to keep the shape and details intact.
6. Can I make other animal shapes using the same tutorial?
Absolutely! The same steps can be adapted for dogs, bears, or any other animals.
Conclusion
In this article, we explored the complete fabric cat keychain- Step by Step Tutorial, from gathering materials to sewing, decorating, and assembling the final product.
We also shared tips for creative variations, gift ideas, and answered common questions to help you succeed with this fun and simple sewing project.
Now it’s your turn to try making your own fabric cat keychain. Follow the steps, add your personal touches, and enjoy the satisfaction of creating something handmade. We would love to hear your honest opinions and suggestions, so feel free to share your experiences after completing your project!