
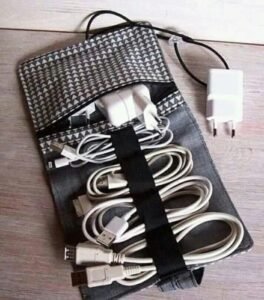
Creating a Fabric charger organizer- Step by Step Tutorial is a fun, practical, and creative way to keep all your chargers, cables, and electronic accessories neatly stored in one place. With the growing number of devices in our daily lives, keeping everything organized can be a challenge. That is where a handmade fabric organizer becomes so useful. It’s not only functional but also stylish, as you can personalize it with fabrics and patterns you love.
This Fabric charger organizer- Step by Step Tutorial will guide you through the entire process, even if you are a beginner at sewing or crafting. You do not need advanced skills to make one; a basic understanding of sewing techniques is enough. The tutorial includes all the details, from the materials you need to the final touches, so you will have a practical and beautiful organizer ready in no time.
The great thing about this project is its versatility. Whether you need it for travel, work, or just to keep your home tidy, a fabric charger organizer helps prevent tangled cords and keeps your accessories easy to find. Let’s start this Fabric charger organizer- Step by Step Tutorial and create a personalized solution for your electronic gadgets.
Materials and Tools for Your Fabric Charger Organizer
The first step in this Fabric charger organizer- Step by Step Tutorial is gathering the right materials and tools. Having everything ready will make the process smoother and faster.
Start with fabric. Choose a durable fabric like cotton or canvas for the outer layer. For the inside pockets, you can use lighter fabric, but make sure it is still strong enough to hold your chargers securely.
You will also need interfacing to give the organizer structure and stability. Interfacing prevents the fabric from being too floppy and helps the organizer keep its shape even after multiple uses.
Next, prepare a sewing machine or a needle if you prefer to sew by hand. A sewing machine will make the process quicker, but hand sewing can work if you are patient and precise.
Other essential items include thread in a matching or contrasting color, scissors, pins or clips to hold the fabric in place, and a measuring tape to ensure accuracy.
Velcro or snap buttons are recommended for closures, keeping the organizer neatly folded when not in use. Elastic bands can also be added inside to hold cables securely.
Finally, consider decorative elements like ribbons, lace, or appliqués if you want to give your organizer a personalized touch.
Cutting and Preparing the Fabric Pieces
Now that you have your materials, this Fabric charger organizer- Step by Step Tutorial moves on to cutting and preparing the pieces. Accuracy is key here to ensure everything fits perfectly when assembling the organizer.
Begin by deciding on the size of your organizer. A common size is around 12 inches by 18 inches when open, but you can adjust it based on your needs and the number of items you want to store.
Cut the main outer fabric according to your measurements. Then, cut the same size for the inner lining fabric. Don’t forget to cut interfacing pieces of the same size to give your organizer structure.
Next, cut smaller pieces of fabric for the inner pockets. These pockets can be different sizes depending on whether you want to store small chargers, large cables, or earphones.
If you plan to add elastic bands, cut small strips and pin them across the fabric where you want to secure cables. Elastic bands are great for keeping cords from moving around inside the organizer.
Mark the positions for pockets and closures using fabric chalk or pins. This step ensures everything stays organized during sewing.
Finally, iron all fabric pieces and interfacing to remove wrinkles. Neat fabric pieces will make sewing easier and give your final product a professional finish.
Sewing the Fabric Charger Organizer
With all pieces ready, this part of the Fabric charger organizer- Step by Step Tutorial focuses on sewing everything together.
Start by attaching the interfacing to the wrong side of the outer and inner fabrics. Follow the instructions on your interfacing for the best results; some require ironing, while others need stitching.
Next, sew the pockets onto the lining fabric. Fold the top edges of the pockets inward before sewing to create clean edges. Then, stitch along the sides and bottom of each pocket, leaving the top open.
If you are using elastic bands, sew them onto the lining fabric before assembling the entire organizer. Stretch the elastic slightly while sewing to ensure it holds items firmly.
Once all pockets and elastic bands are attached, place the outer fabric and lining fabric right sides together, with the pockets on the inside. Pin or clip them together to prevent shifting during sewing.
Sew around the edges, leaving a small opening to turn the organizer right side out. After sewing, trim the corners to reduce bulk and carefully turn the fabric right side out through the opening.
Finally, press the edges with an iron and topstitch around the entire organizer for a clean, finished look.
Adding Closures and Final Touches
The last part of the Fabric charger organizer- Step by Step Tutorial involves adding closures and decorative details to make your organizer functional and attractive.
Decide whether you want to use Velcro, snap buttons, or ties for the closure. Velcro is quick and easy, while snap buttons give a polished finish. Sew them onto the appropriate spots on the outer fabric.
If you prefer ties, cut long fabric strips or use ribbons. Attach them to the sides so you can wrap and tie the organizer closed when folded.
For an extra personal touch, you can add decorative stitching along the edges or pockets. This not only looks pretty but also strengthens the seams.
Consider adding a small handle or loop on one side so the organizer is easy to carry or hang when not in use.
If you want extra padding, you can insert a thin layer of batting between the outer fabric and lining before sewing them together. This protects delicate chargers or earphones from damage.
Once everything is complete, give your organizer a final press with an iron, and it’s ready to use or gift to someone who loves organized accessories.
FAQ About Fabric Charger Organizers
Q1: Can beginners follow this Fabric charger organizer- Step by Step Tutorial?
Yes, this tutorial is beginner-friendly. It uses basic sewing techniques that anyone can learn with practice.
Q2: What is the best fabric for a charger organizer?
Cotton or canvas fabrics are recommended because they are sturdy and easy to sew.
Q3: Do I need a sewing machine to make this organizer?
A sewing machine makes the process faster, but hand sewing is possible if you take your time.
Q4: How can I make the organizer more durable?
Use interfacing, sturdy fabric, and double-stitch areas that will carry more weight, such as pockets and closures.
Q5: Can I wash the fabric charger organizer?
Yes, if you use washable fabrics and avoid delicate decorations, the organizer can be washed like any fabric item.
Q6: Can I customize the organizer for travel purposes?
Absolutely! You can add more pockets or make it foldable to fit into a suitcase easily.
Conclusion
This Fabric charger organizer- Step by Step Tutorial has shown you how to create a practical, beautiful, and customizable solution for keeping your chargers and cables neatly stored.
From choosing the right materials to sewing pockets, adding closures, and finishing details, every step helps you build a durable and stylish accessory.
Now it’s your turn to try making one at home. Once you complete your fabric charger organizer, share your honest opinion and suggestions. Your feedback helps improve future tutorials and inspires more creative ideas for everyone to enjoy.