
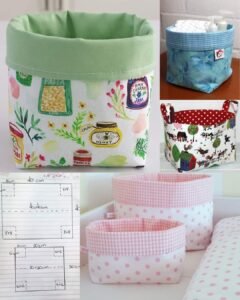
Creating a Fabric Organizing Basket – Step by Step Tutorial is a perfect project for those who enjoy sewing while also adding a practical and decorative touch to their home. These baskets are versatile, stylish, and functional, serving as a storage solution for toys, yarn, sewing supplies, or household items. By learning how to make your own fabric basket, you not only get a unique handmade product but also the satisfaction of customizing it to your taste and needs.
The great advantage of a fabric organizing basket is that it is both eco-friendly and cost-effective. Instead of spending money on store-bought organizers, you can recycle fabrics you already own or purchase inexpensive textiles in colors and prints that match your home décor. This makes the project not only practical but also sustainable. Handmade baskets can last a long time when constructed properly, giving you a reliable storage option that doubles as home decoration.
Throughout this step by step tutorial, you will learn how to cut, sew, and assemble your basket, even if you are a beginner at sewing. We will cover the tools and materials you need, simple techniques for neat seams, and creative ways to personalize your basket. By the end of this guide, you will have a complete understanding of how to make a sturdy and attractive organizing basket for your home.
Materials and Tools for a Fabric Organizing Basket
To start this Fabric Organizing Basket – Step by Step Tutorial, the first thing you need is a list of essential tools and materials. Having everything prepared in advance will make your sewing experience smoother and more enjoyable.
Begin by choosing your fabric. Cotton or canvas is highly recommended because it provides structure and durability. You will also need lining fabric, which can be something lighter, like cotton or muslin. This inner layer will give the basket a clean and professional look.
Next, consider adding interfacing or stabilizer. This material helps your basket maintain its shape and prevents it from collapsing when empty. Depending on how firm you want the basket to be, you can use fusible interfacing or quilt batting for a softer structure.
You will also need basic sewing tools: scissors or rotary cutter, pins or clips, a sewing machine, and strong thread. Measuring tape and fabric chalk are important for precise cutting. If you want to add handles to your basket, you can use fabric strips or even cotton webbing for extra strength.
Another useful material is bias tape or decorative trim. This can be used to finish raw edges neatly and add a beautiful detail to your finished basket. Optional items include buttons, ribbons, or labels to personalize your project.
Having these materials ready will save time during the sewing process and help you stay focused on creating your fabric organizing basket without interruptions. Once everything is prepared, you can confidently move on to the cutting and sewing steps.
Cutting and Preparing Your Fabric
The cutting process is an essential part of the Fabric Organizing Basket – Step by Step Tutorial, as accuracy here will determine the final shape and neatness of your project. Take your main fabric and cut two identical rectangles for the outside layer. Then, cut two matching rectangles for the lining fabric. The size depends on how big you want your basket, but a common beginner size is 12 inches by 14 inches.
Once you have the main pieces, cut interfacing or stabilizer of the same size. Fuse or attach this to the wrong side of the outer fabric using your iron if it is fusible. This will immediately give the fabric more stability and make sewing easier later.
If you plan to include handles, cut two strips of fabric about 12 inches long and 3 inches wide. Fold them lengthwise, sew the edges, and press flat. Alternatively, use cotton webbing or sturdy ribbon for a faster option. Handles are optional but highly recommended for practical use.
To create boxed corners for your basket, mark small squares in each bottom corner of the outer fabric and lining, usually about 2 inches by 2 inches. Cutting and sewing these squares will give your basket depth and allow it to stand upright.
Be careful to mark all pieces with fabric chalk so that your corners align properly. Consistency is key here to ensure that both the lining and outer fabric fit together neatly.
With all your fabric cut and prepared, you are ready to begin sewing the main parts of your fabric organizing basket and assembling it into shape.
Sewing and Assembling the Basket
This section of the Fabric Organizing Basket – Step by Step Tutorial explains how to sew and put all the pieces together. Start by taking the outer fabric rectangles, place them right sides together, and sew along the sides and bottom using a ½ inch seam allowance. Do the same with the lining pieces but leave a 3-inch gap at the bottom for turning later.
Next, create the boxed corners by pulling apart the cut-out square corners so the seams align. Pin them in place and sew straight across. Repeat this step for both the lining and the outer fabric. This simple step transforms flat rectangles into a three-dimensional basket shape.
Now, if you are adding handles, pin them to the top edge of the outer basket, making sure they are evenly spaced and facing downward inside the basket. Secure them with clips or pins before moving to the next step.
With the handles in place, insert the outer basket into the lining basket, right sides facing each other. Align the top edges and side seams carefully. Pin or clip all around the top edge and sew with a ½ inch seam allowance.
Once sewn, turn the basket right side out by pulling the fabric through the gap left in the lining. Push the lining inside the basket, press the edges neatly with an iron, and topstitch around the opening to give it a polished look.
Finally, close the gap in the lining by stitching it closed. Your fabric organizing basket is now fully assembled and ready for use.
Customizing and Decorating Your Basket
The beauty of following a Fabric Organizing Basket – Step by Step Tutorial is that you can easily personalize your creation. After completing the basic basket, you can get creative with fabric choices, trims, and decorative elements.
One way to customize your basket is to mix and match fabrics. For example, use a bold print for the outside and a solid color for the lining. This contrast makes the basket more visually interesting and unique.
You can also add embellishments such as buttons, bows, or embroidery. Personal touches make your basket stand out and can even turn it into a thoughtful handmade gift. Monogramming the fabric is another great way to personalize it.
Another option is to play with sizes. Once you master the standard size, you can create smaller baskets for organizing stationery, or larger ones for blankets or laundry. The same step by step tutorial works for different measurements.
If you enjoy quilting, you can use quilted panels instead of plain fabric. This adds texture and a padded look to your basket, making it even more charming. Quilted baskets are especially cozy for storing soft items like baby clothes or toys.
Lastly, don’t forget functionality. Adding pockets to the inside lining can make the basket more useful for storing smaller items. Reinforcing the handles with extra stitching ensures durability if you plan to carry heavier objects.
FAQ – Fabric Organizing Basket
1. Can I make a fabric organizing basket without a sewing machine?
Yes, it is possible to sew by hand, but it will take more time. A sewing machine ensures stronger seams and a neater finish.
2. What fabric is best for a sturdy basket?
Canvas, denim, or home décor fabric works well. Pairing them with interfacing or stabilizer helps the basket hold its shape.
3. How do I wash a fabric basket?
Most baskets can be machine washed on a gentle cycle, but if you used heavy interfacing, spot cleaning is recommended to maintain shape.
4. Can I resize the pattern?
Absolutely. The same sewing technique applies whether you want a small, medium, or large basket. Simply adjust the fabric measurements.
5. How can I make my basket stand more upright?
Use heavier stabilizers or double layers of interfacing. You can also add cardboard inserts for baskets meant only for light items.
6. Is this project beginner-friendly?
Yes, this Fabric Organizing Basket – Step by Step Tutorial is simple enough for beginners while still enjoyable for more experienced sewers.
Conclusion
In this article, we explored a complete Fabric Organizing Basket – Step by Step Tutorial, guiding you through materials, cutting, sewing, and creative customization.
With a few simple tools and fabrics, you can create a durable and stylish storage solution that enhances your home while showcasing your sewing skills.
Now it’s your turn to give this project a try! Making a fabric organizing basket is not only practical but also a fun way to add a personal touch to your home décor. If you try this tutorial, share your experience in the comments, leave your sincere opinion, and suggest what kind of sewing projects you’d love to see next.