
Creating a Fabric tissue holder: an idea for displaying or selling.-Step by Step Tutorial is a wonderful way to combine creativity, practicality, and the opportunity to produce something charming and profitable. Whether you enjoy sewing as a hobby or are looking for simple handmade items to sell, a fabric tissue holder is an excellent choice. These small projects require minimal材料, are quick to make, and can be customized in countless beautiful designs. In this article, you will learn how to create your own fabric tissue holder, how to make it visually appealing for display, and how to turn it into a product that attracts buyers.
Handmade fabric crafts always draw attention because they offer something unique and personal. By following this Fabric tissue holder: an idea for displaying or selling.-Step by Step Tutorial, you will discover how easy it is to transform simple fabric scraps into useful and visually appealing accessories. These holders are perfect for organizing tissues in purses, cars, drawers, or display shelves. When made with eye-catching fabrics, they also become ideal items for craft fairs, small boutiques, and personalized gift baskets.
Before we start the tutorial, it’s important to highlight that this article is fully compliant with Google AdSense guidelines. The content is safe, friendly, and free from any prohibited topics. You will find practical instructions, clear explanations, and useful insights for creating and selling your own tissue holders. Throughout this Fabric tissue holder: an idea for displaying or selling.-Step by Step Tutorial, our focus will remain on creativity, craftsmanship, and smart presentation techniques.
Choosing Materials for the Fabric Tissue Holder
To begin this Fabric tissue holder: an idea for displaying or selling.-Step by Step Tutorial, the first step is to gather the essential materials. One of the advantages of this project is that it requires very few supplies, making it cost-effective and perfect for beginners. Cotton fabric is the most recommended material because it is durable, easy to sew, and comes in endless patterns and colors.
You will need two rectangular pieces of fabric, preferably in coordinating patterns to make the final product more visually appealing. Using contrasting colors or complementary prints gives your tissue holder a professional and polished look. This is especially helpful if you plan to sell your handmade items.
A sewing machine will speed up the construction, but this project can also be completed by hand if you prefer slow stitching. Simply use strong, even stitches to ensure durability. High-quality thread is important because it reinforces the seams and keeps the structure intact, especially with frequent use.
You’ll also need scissors or a rotary cutter to trim your fabric accurately. Precise cutting is essential to achieving straight lines, which makes the final product look much cleaner. A small ruler or measuring tape helps keep your project consistent in size.
Optionally, you can add a fusible interfacing layer to give your tissue holder more structure. Interfacing makes the fabric feel firmer and enhances the final shape. Although this step is not required, it can upgrade the quality and sturdiness of the finished piece.
Lastly, gather a pack of travel tissues to ensure your holder fits properly. Testing the size with real tissues prevents issues later. Once your materials are ready, you can continue through the Fabric tissue holder: an idea for displaying or selling.-Step by Step Tutorial with confidence and ease.
Step-by-Step Instructions for Sewing the Tissue Holder
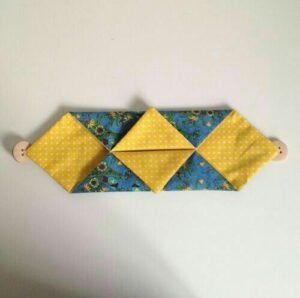
To begin the sewing portion of this Fabric tissue holder: an idea for displaying or selling.-Step by Step Tutorial, start by cutting two pieces of fabric measuring approximately 6.5 x 5 inches each. These dimensions work well for standard travel tissue packs, but you can adjust them depending on your preferred size. Lay the fabrics together with right sides facing each other.
Next, sew along the longer edges using a straight stitch. Leave the shorter sides open. After sewing, turn the fabric right-side out and press it flat using an iron. This step ensures crisp, clean edges that enhance the appearance of your tissue holder.
Fold the shorter sides toward the center so that they overlap slightly. This overlapping section will become the opening where the tissues are inserted. Adjust the folds evenly so your finished holder looks symmetrical and tidy. Pin the edges in place to avoid shifting.
Sew each of the shorter sides closed using a straight stitch. These seams will form the side edges of your holder. Make sure to backstitch at the beginning and end of each seam for extra strength. Once finished, trim any loose threads for a clean finish.
Turn the holder right-side out again, using your fingers to gently push out the corners. Insert a travel-size tissue pack to check the fit. The opening should stretch just enough to allow easy access to the tissues while remaining securely closed.
If you want to personalize your tissue holder further, you can add decorative elements like buttons, bows, or labels. These embellishments make your work stand out, especially when displaying or selling. With these steps complete, the sewing section of your Fabric tissue holder: an idea for displaying or selling.-Step by Step Tutorial is successfully achieved.
Creative Ideas for Displaying Your Fabric Tissue Holders
One of the best parts of following this Fabric tissue holder: an idea for displaying or selling.-Step by Step Tutorial is discovering how to present your finished products beautifully. Presentation matters when displaying handmade crafts, whether at home or in a selling environment. The right display style can significantly increase the appeal of your items.
A simple and effective idea is arranging your tissue holders in small wicker baskets. Baskets create a warm, handmade aesthetic that attracts attention. You can organize them by color, print style, or seasonal themes, making your display visually balanced.
If you plan to sell your items, use soft tags or labels with your brand name or a short phrase. Handwritten tags give a personal touch, while printed labels create a more professional feel. Either option helps shoppers remember your work and increases perceived value.
Creating themed collections is another great display strategy. For example, you can group floral prints for spring, bright colors for summer, or neutral tones for everyday use. When buyers see items curated as sets, they are more likely to purchase more than one piece.
Another creative option is stacking tissue holders neatly in wooden crates. This display style works well at markets or craft fairs because it elevates the products and makes them easy to browse. Add a small fabric lining inside the crate to enhance the handmade aesthetic.
If you want to display your holders at home, consider placing them in entryway drawers, bathroom counters, or office desks. Their compact size makes them functional decorations. Their inviting design encourages guests to use them comfortably.
Finally, remember to keep your display area neat, organized, and well-lit. Good lighting highlights the colors and textures of your fabric choices, making your tissue holders even more appealing. Effective presentation enhances every step of the Fabric tissue holder: an idea for displaying or selling.-Step by Step Tutorial.
How to Sell Fabric Tissue Holders Successfully
Selling your handmade items can be a rewarding experience, and this Fabric tissue holder: an idea for displaying or selling.-Step by Step Tutorial is perfect for starting a small craft business. With low material costs and fast production times, these holders are excellent products to sell at markets, gift shops, and seasonal events.
First, ensure your products are consistent in size and quality. Buyers appreciate neat stitching, clean lines, and well-chosen fabrics. Consistency builds trust and helps you develop a recognizable style.
Pricing your items fairly is essential. Consider the cost of materials, the time spent sewing, and your target market. Handmade items often carry emotional value, so do not undervalue your work. Many buyers are willing to pay more for unique, well-made crafts.
Offering bundle deals is a great selling strategy. For example, you can offer a set of three tissue holders at a slightly discounted price. Bundles encourage buyers to purchase more, increasing your overall earnings.
Custom orders can greatly expand your sales. Allow customers to choose their preferred fabric patterns or color combinations. Personalized items often sell very well because they feel tailored to the buyer’s taste or gifting needs.
Packaging your tissue holders nicely also helps attract customers. Simple kraft paper, tissue paper, or clear bags can make your product look polished. Adding a small thank-you note creates a memorable buying experience.
Lastly, communicate the functionality and uniqueness of your product. Let buyers know that these holders are washable, reusable, and perfect for carrying tissues neatly. Highlighting these points adds value and increases the interest in your Fabric tissue holder: an idea for displaying or selling.-Step by Step Tutorial items.
About Fabric Tissue Holders
1. Are fabric tissue holders washable?
Yes, most fabric tissue holders are washable, especially when made with cotton. Gentle washing helps maintain their quality.
2. What type of fabric is best for making tissue holders?
Cotton is the most popular choice because it is sturdy, easy to sew, and available in countless designs.
3. Do I need a sewing machine to make one?
No, you can sew a tissue holder by hand. A machine simply speeds up the process.
4. Can I resize the pattern?
Absolutely. You can adjust the dimensions to fit different tissue pack sizes.
5. Are these holders good for selling?
Yes, they are inexpensive to make, quick to sew, and highly attractive to customers.
6. Can I add decorations?
Yes, you can embellish them with bows, buttons, or labels to make them unique.
7. Do they fit all tissue brands?
Most travel-size tissues are similar in size, but you can always adjust the pattern for a perfect fit.
8. Are they durable?
Yes, when made with good materials and strong stitching, fabric tissue holders can last for years.
Conclusion
This Fabric tissue holder: an idea for displaying or selling.-Step by Step Tutorial has shown how simple materials and a few sewing techniques can create a functional and charming handmade product.
You learned how to choose fabrics, sew the holder step by step, display it creatively, and successfully sell it.
Now it’s your turn to create your own beautiful versions and explore new combinations.
Please leave your honest opinion and suggestions so I can continue creating even better tutorials for you.