
Creating a fabric toilet paper holder – Step by Step Tutorial is an exciting and functional sewing project that can enhance both the style and practicality of your bathroom. Many people struggle with bathroom organization, and a handmade solution is often more personal and attractive than buying a ready-made accessory. With just a few pieces of fabric and some basic sewing tools, you can design a holder that fits your décor while also saving space. This tutorial focuses on easy-to-follow instructions, ensuring that even beginners can complete it successfully.
The idea of making a fabric toilet paper holder is not only practical but also eco-friendly. By using leftover fabric scraps or repurposed textiles, you contribute to sustainability while creating something unique. It also offers a chance to customize your bathroom accessory, making it match your towels, curtains, or overall color scheme. A homemade version adds a personal touch that can make your space feel more welcoming.
This guide will take you through a Step by Step Tutorial for crafting a functional and stylish fabric toilet paper holder. We will cover everything from choosing the right fabric, cutting and sewing techniques, to assembling the final piece. Each step is designed to be clear and easy to follow, whether you are a beginner or an experienced crafter. By the end, you will have a beautiful and durable accessory for your home that you can be proud of.
Materials and Preparation
The first step in this fabric toilet paper holder – Step by Step Tutorial is gathering the right materials. You will need fabric, thread, a sewing machine, scissors, pins, and an iron. Cotton or canvas fabric works best because it is durable and easy to clean, but you can also use decorative fabrics for a more stylish finish. The lining fabric is optional but recommended to provide structure and strength to your holder.
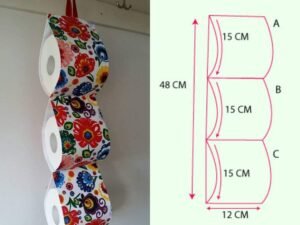
Next, you will need to measure your toilet paper rolls. Most standard rolls are similar in size, but if you use larger rolls, adjusting the dimensions will be necessary. Measuring helps you cut your fabric correctly, ensuring the holder can comfortably fit two or more rolls. A good average size for each roll pocket is about 6 to 7 inches wide.
After measuring, cut your fabric pieces according to the required size. You will need one long strip for the main body of the holder and additional pieces for pockets that will hold the toilet paper. Make sure to leave extra fabric for seam allowances. It is also a good idea to iron your fabric before sewing, as smooth fabric is easier to handle and gives a more professional finish.
Pins or fabric clips will help you keep the fabric in place while sewing. Marking tools like fabric chalk or washable pens are also useful to guide your cutting and stitching lines. Proper preparation ensures that your sewing process goes smoothly and that the final product looks neat.
Choosing complementary fabrics for the outer layer and the lining can make your holder more attractive. For example, you might choose a patterned fabric for the outside and a solid color for the inside. This combination adds charm and elegance to a simple bathroom accessory.
Finally, prepare your sewing machine by threading it with matching or contrasting thread, depending on your design choice. Using a quality thread ensures strong seams that will last through daily use. Once all the materials are ready, you can move on to the construction process.
Sewing the Pockets
The next part of the fabric toilet paper holder – Step by Step Tutorial involves making the pockets that will hold the rolls. Start by folding the top edge of each fabric piece for the pocket. Fold it twice to hide the raw edge, then sew a straight stitch across. This creates a clean finish that prevents fraying.
Place the pocket pieces on the long strip of fabric that forms the main body of the holder. Position them evenly so that the rolls will fit comfortably. Mark the placement with pins or chalk before sewing. Ensuring accurate positioning is important so the rolls stay balanced once inside the holder.
Sew along the bottom edge of each pocket, securing them to the main strip. Reinforce the stitching by sewing twice if needed. This strengthens the pocket and prevents it from tearing when supporting the weight of toilet paper rolls.
Next, sew the side edges of each pocket to the main fabric. Leave the top edge open, as this is where the rolls will be inserted. It is helpful to backstitch at the beginning and end of each seam for extra durability.
After attaching all the pockets, press the seams with an iron. Pressing helps flatten the stitches and gives the holder a neater look. Even small details like this can make a big difference in the overall quality of your handmade piece.
At this stage, your project will begin to take shape. You should be able to see the fabric toilet paper holder with its main body and pockets attached. Once this is complete, you can move on to creating the strap or hanger.
Adding the Strap and Finishing Touches
For this part of the fabric toilet paper holder – Step by Step Tutorial, you will create a strap or loop so the holder can hang on a wall or hook. Cut a strip of fabric about 2 inches wide and 8 inches long. Fold it in half lengthwise, right sides together, then sew along the edge. Turn it right side out and press flat.
Attach the strap to the top of the main holder piece. Position it in the center and sew securely, making sure it can support the weight of several toilet paper rolls. Reinforce this area with additional stitches to ensure durability.
To finish the edges of the main body, fold the raw edges inward and sew a straight stitch along all sides. This creates a clean border and keeps the fabric from fraying. Another option is to use bias tape to bind the edges for a decorative touch.
If you want to add extra style, consider using embellishments such as lace, buttons, or embroidery. These small details make your fabric toilet paper holder more unique and personalized. Choose decorations that complement your bathroom’s theme for a cohesive look.
After sewing and decorating, give the entire holder a final press with an iron. This not only smooths out wrinkles but also sets the stitches in place. The result is a professional-looking finish that makes your handmade project stand out.
Now your fabric toilet paper holder is ready to hang. Test it by placing a few rolls inside to ensure the pockets hold them securely. Adjustments can be made if necessary, but with careful measuring and stitching, it should fit perfectly.
Practical Uses and Benefits
Beyond the crafting process, the fabric toilet paper holder – Step by Step Tutorial also highlights the practical benefits of having this accessory. First, it helps keep your bathroom organized by providing a designated place for spare rolls. Instead of storing them in cabinets or on countertops, they are neatly displayed and easily accessible.
Second, a fabric holder saves space. Bathrooms are often small, and traditional storage can be limited. By hanging toilet paper on a wall or door, you free up shelf space for other essentials. This makes it an ideal solution for both small and large bathrooms.
Third, a handmade holder is reusable and eco-friendly. Unlike plastic storage containers, fabric holders are washable and long-lasting. You can simply toss it in the washing machine when needed, making it a hygienic and sustainable option.
Fourth, it offers customization. Whether you prefer a minimalist design or bold patterns, you can choose fabrics that reflect your personal style. It also makes a thoughtful handmade gift for friends or family who enjoy practical yet decorative home items.
Fifth, creating this project can be a fun and relaxing hobby. Sewing is a skill that not only results in useful products but also provides a sense of achievement. Working on small projects like this improves your sewing techniques and boosts creativity.
Lastly, this type of project is cost-effective. Using leftover fabric or inexpensive materials allows you to make a stylish bathroom accessory without spending much money. It proves that handmade items can be both budget-friendly and beautiful.
FAQ about Fabric Toilet Paper Holder
1. What type of fabric is best for making a fabric toilet paper holder?
Cotton and canvas are the most recommended because they are durable, easy to clean, and hold their shape well. You can also use decorative fabrics for a unique look.
2. Can beginners follow this Step by Step Tutorial?
Yes, this tutorial is beginner-friendly. It involves basic cutting, stitching, and assembling, which are easy to learn and practice.
3. How many rolls can a fabric toilet paper holder carry?
This depends on the size you make. Most holders can comfortably fit two to three rolls, but you can adjust the length of the main body to carry more.
4. Is the holder washable?
Yes, if you use washable fabrics like cotton, the holder can be cleaned in the washing machine whenever necessary.
5. Do I need a sewing machine to make it?
A sewing machine makes the process faster and neater, but it can also be sewn by hand if you are patient and careful.
6. Can I add extra features like pockets for other items?
Absolutely. You can add small pockets for items like tissues or air fresheners, making the holder even more functional.
Conclusion
In this article, we explored a fabric toilet paper holder – Step by Step Tutorial that guides you through every stage of creating this practical and stylish bathroom accessory. From choosing materials, sewing pockets, and adding straps, to finishing touches and exploring its benefits, this guide provided a complete overview.
Making your own fabric toilet paper holder is a rewarding project that improves bathroom organization, saves space, and reflects your personal style. It is cost-effective, eco-friendly, and a great way to practice sewing skills.
Now it’s your turn to try this project and enjoy the satisfaction of creating something both useful and decorative. If you enjoyed this tutorial, please leave your sincere opinion and suggestions. Your feedback helps improve future guides and inspires new creative projects.