
If you’ve been looking for a fun, functional, and beginner-friendly quilting project, this Glasses Holder Quilt Pattern – Step by Step Tutorial is exactly what you need. In this guide, we will walk you through the process of creating a charming and protective quilted glasses case, perfect for keeping your glasses safe while adding a personal handmade touch. Whether you’re a quilting enthusiast or just starting your sewing journey, this tutorial offers simple instructions with beautiful results.
The glasses holder quilt pattern is a perfect weekend project. It doesn’t require a lot of fabric, and it’s a great way to use up fabric scraps you might have lying around. You can personalize each glasses holder with different fabrics, quilting designs, and even monogram initials, making them ideal gifts for friends and family. This small yet practical project allows you to enjoy the creativity of quilting without committing to a large quilt.
In this step-by-step tutorial, we’ll cover everything from selecting the right fabric and batting to assembling and finishing your glasses holder. By the end, you’ll have a quilted pouch that not only protects your glasses from scratches but also looks stylish in your bag or on your desk. Let’s dive into this enjoyable and practical quilting adventure.
Materials Needed for Your Glasses Holder Quilt Pattern
Before you start quilting, it’s essential to gather all the materials for your glasses holder quilt pattern – step by step tutorial. Having everything on hand makes the process much smoother and ensures you can stay focused on the creative aspects of your work.
First, choose high-quality cotton fabric. Cotton is breathable, easy to sew, and comes in an endless variety of prints. For this project, you’ll need two pieces of cotton fabric: one for the outer part and one for the lining. You can coordinate or contrast them depending on your style.
Next, you’ll need batting to give the glasses holder a padded, quilted feel. A thin cotton or polyester batting works well, offering just enough protection without making the case too bulky. If you’re using fusible fleece, it will make the process even easier by reducing shifting during sewing.
You’ll also need basic sewing supplies such as thread, scissors or a rotary cutter, pins or clips, a sewing machine, and optionally, a walking foot for more precise stitching over thick layers. If you want to close your glasses holder with a flap, magnetic snap, or button, keep those materials nearby as well.
For quilting enthusiasts who love extra flair, consider adding decorative stitching or embroidery. A personalized touch like a monogram or small motif can turn a simple glasses case into a cherished gift. Play with textures and embellishments if you want to go beyond basic functionality.
Lastly, having a good iron and ironing board is crucial. Pressing at each stage makes your finished product look more professional and ensures all the seams and layers are crisp and aligned. Don’t skip this step—pressing is as important as stitching in quilting!
Cutting and Assembling the Fabric Pieces
Once your materials are ready, it’s time to begin the cutting and assembling process for your glasses holder quilt pattern – step by step tutorial. This stage sets the foundation for the rest of the project, so accuracy is key.
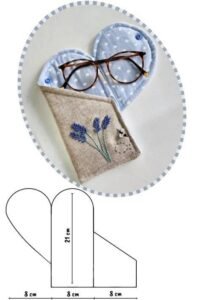
Start by cutting two rectangles of fabric, about 4.5 x 8.5 inches each. This size fits most glasses but feel free to adjust it depending on your needs. Cut one rectangle from the outer fabric, one from the lining fabric, and one piece of batting to the same size.
If you’re using fusible batting, follow the manufacturer’s instructions to fuse it to the wrong side of the outer fabric. This gives your glasses case structure and helps it maintain its shape. Make sure it’s well-adhered and free of wrinkles.
Next, layer the three pieces together: batting on the bottom, then the outer fabric (right side up), and finally the lining fabric (right side down). Clip or pin them together carefully so the edges align and the layers stay in place during sewing.
Sew around the perimeter using a 1/4-inch seam allowance, leaving a 2-inch gap on one side for turning. Be sure to backstitch at the beginning and end. Trim the corners slightly to reduce bulk when turning the piece right-side out.
Turn the holder right-side out through the gap. Use a blunt tool to gently push out the corners, then press the case flat. Tuck in the raw edges of the gap and topstitch around the entire edge to close it and add a decorative finish.
Now fold the quilted rectangle in half (short sides together) with the lining side inside. Pin the two sides and sew along the edge, leaving the top open. Finish the seam with a zigzag stitch or pinking shears to prevent fraying. Your glasses holder is now taking shape!
Quilting Techniques and Decorative Ideas
The beauty of the glasses holder quilt pattern – step by step tutorial is that it allows room for creative expression through quilting techniques and embellishments. Let’s explore some options to elevate your finished piece.
Quilting the outer fabric before assembling the holder is a great way to add dimension. Try straight-line quilting, diagonal grids, or even free-motion quilting if you’re feeling adventurous. This adds texture and strengthens the fabric.
Another option is to incorporate patchwork into your glasses holder. Sew small fabric squares together to create a mini quilt top before constructing the holder. This is perfect for using up scraps and experimenting with color combinations.
Consider using contrasting thread for topstitching. A bold color can add visual interest and make your holder stand out. Alternatively, match the thread to your fabric for a seamless, classic look.
You can also add a flap closure to your glasses holder. Cut an extra fabric piece in a rounded or triangular shape and sew it into the back seam before folding and stitching the sides. Add a magnetic snap or button for secure closure.
If you’re making multiple cases as gifts, personalize them! Embroider names or initials, or sew on fabric labels. These small touches make your handmade gifts feel even more special and thoughtful.
Lastly, don’t be afraid to play with themes. Floral prints for spring, plaid for fall, or even novelty fabrics like cats or glasses motifs make your holders seasonally appropriate and fun to create.
Tips for Perfecting Your Quilted Glasses Holder
Even the simplest quilting projects benefit from a few tips and tricks. As you follow this glasses holder quilt pattern – step by step tutorial, keep these ideas in mind to ensure professional results.
Always measure twice and cut once. Precise cuts mean accurate seams and a polished finish. Use a rotary cutter and cutting mat for best results, especially when making multiple holders.
Use clips instead of pins if your fabric is thick or layered. Clips are easier to remove and don’t distort the fabric like pins sometimes can, especially near the seams.
Press your seams as you go. A well-pressed seam lies flat, which helps when topstitching and assembling the holder. Take the time to iron at each stage—you’ll notice the difference in the final product.
If your machine struggles with thick layers, switch to a walking foot. This foot evenly feeds all layers through the machine and is especially helpful when quilting or sewing through batting.
When turning your glasses holder right-side out, gently push out the corners using a turning tool, chopstick, or even a blunt pencil. This gives your case crisp edges and a clean finish.
And finally, don’t be afraid to experiment! Try different sizes, add pockets for lens cloths, or adjust the shape for sunglasses. The pattern is simple and adaptable, so let your creativity guide you.
FAQ – Glasses Holder Quilt Pattern
1. What size should I cut the fabric for a standard glasses holder?
A good size for most eyeglasses is 4.5 x 8.5 inches, but you can adjust this based on the dimensions of your glasses or sunglasses.
2. Do I need to use batting in a quilted glasses holder?
Yes, batting gives the case a cushioned feel that protects your glasses from scratches and impacts. It also adds the quilted texture that defines this pattern.
3. Can I hand-sew this glasses holder if I don’t have a sewing machine?
Absolutely! While it may take longer, hand-sewing works well for this small project. Just be sure your stitches are tight and even for durability.
4. Is this project suitable for beginners?
Yes, this glasses holder quilt pattern – step by step tutorial is ideal for beginners. It teaches basic quilting and sewing skills in a manageable, rewarding project.
5. How can I customize my quilted glasses holder?
You can use decorative stitches, patchwork designs, embroidery, themed fabrics, or closure variations like buttons, snaps, or flaps to make each holder unique.
6. Can I wash the quilted glasses case?
Yes, but it’s best to hand wash or use a gentle machine cycle. Let it air dry to maintain the structure and shape of the quilting.
Conclusion
Creating a Glasses Holder Quilt Pattern – Step by Step Tutorial is not only a fun and satisfying sewing project, but also a great way to make something functional and personalized. We’ve covered how to choose your fabric, assemble the layers, add quilting details, and finish with a clean, professional look.
This project is perfect for beginners looking to practice their quilting skills or experienced crafters who want a quick, creative break from larger projects. Plus, it’s a thoughtful handmade gift that anyone can appreciate.
If you followed along and made your own quilted glasses holder, we’d love to hear about it! Leave your honest feedback in the comments below and let us know if you have any suggestions, creative ideas, or questions for future tutorials. Happy quilting!