
If you have been searching for How to make a backpack- Step by Step Tutorial, you have come to the right place. Making your own backpack from scratch can be a rewarding and creative experience. Not only does it allow you to personalize the style, size, and materials according to your taste, but it can also save you money while giving you a practical, handmade accessory. In this guide, we will walk you through the entire process step by step, ensuring you can easily follow along whether you are a beginner or someone with some sewing experience. Throughout this article, we will repeat the phrase How to make a backpack- Step by Step Tutorial to ensure clarity and help with SEO optimization.
Creating your own backpack provides a sense of accomplishment that store-bought bags simply cannot match. By learning How to make a backpack- Step by Step Tutorial, you gain the freedom to choose your favorite fabrics, colors, and design details. Whether you prefer a minimalist style or a colorful pattern, this tutorial will guide you in designing a backpack that suits your personality and needs. You will also learn valuable sewing techniques that you can use for other projects in the future.
Before diving into the actual instructions, we will cover the materials you will need, the preparation process, the sewing steps, and finally some customization ideas. By following this How to make a backpack- Step by Step Tutorial, you will be able to create a sturdy, stylish, and functional backpack for everyday use, school, travel, or as a thoughtful handmade gift for someone special.
Materials and Preparation for Making a Backpack
Before you begin How to make a backpack- Step by Step Tutorial, it is important to gather all the materials in advance. Having everything ready makes the process smoother and prevents interruptions while sewing. For this project, you will need fabric for the backpack’s body, lining fabric, straps, zippers, thread, scissors, pins, a sewing machine, and measuring tape. Choosing good-quality materials will ensure your backpack is both durable and stylish.
The main fabric is the star of the show. For everyday use, canvas or denim works wonderfully because they are sturdy and long-lasting. If you want something lighter, cotton fabric can also be used, especially if you plan to carry light items. Selecting the right fabric is the first step in How to make a backpack- Step by Step Tutorial, so take time to choose one that matches your style and purpose.
Next comes the lining fabric. Lining makes the backpack look professional on the inside while adding strength and structure. You can use cotton, polyester, or even waterproof fabric if you want extra protection for your belongings. A bright lining can also give your backpack a fun and unique touch.
Zippers and straps are essential components. Strong zippers ensure the backpack closes securely, while adjustable straps provide comfort and flexibility. In How to make a backpack- Step by Step Tutorial, using quality hardware makes a big difference in the final product’s durability and usability.
Having the right tools is equally important. A sewing machine speeds up the process and ensures neat stitches, but you can also sew by hand if you have patience and skill. Sharp scissors, pins, and a measuring tape help you cut and assemble everything accurately.
Finally, make sure you have a clean, organized workspace. A flat surface for cutting and sewing helps keep things tidy and prevents mistakes. With all materials ready, you can now begin following How to make a backpack- Step by Step Tutorial with confidence.
Cutting and Preparing the Fabric Pieces
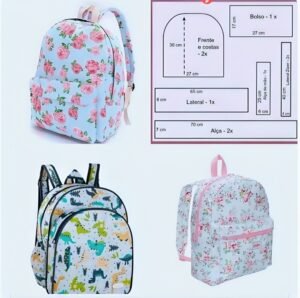
The first practical step in How to make a backpack- Step by Step Tutorial is cutting the fabric. Accurate cutting ensures the pieces fit together perfectly, resulting in a neat and professional-looking backpack. Begin by measuring and marking the main body pieces on your chosen fabric. Standard backpacks usually require two large rectangular pieces for the front and back, two narrower pieces for the sides, one for the bottom, and one for the top flap if desired.
Once you have marked the pieces, carefully cut them using sharp fabric scissors. Clean edges make sewing easier and prevent fraying. If you want extra durability, consider adding a layer of interfacing to the main fabric pieces. Interfacing provides stiffness and helps the backpack hold its shape, an important tip in How to make a backpack- Step by Step Tutorial.
Next, cut the lining fabric pieces using the same dimensions as the outer fabric. Lining adds strength and hides the internal seams, giving your backpack a polished interior. If you plan to include internal pockets, cut those pieces now as well. Pockets are a useful addition, and this tutorial will guide you on how to incorporate them seamlessly.
Mark the zipper placement before sewing. If you want a front pocket with a zipper, measure and cut the opening carefully so it aligns neatly. Adding a zipper pocket might seem intimidating, but following How to make a backpack- Step by Step Tutorial step by step makes it much easier.
Don’t forget to cut the straps. You can use fabric strips, nylon webbing, or pre-made straps. Adjustable straps are more versatile and comfortable, so consider adding buckles or sliders for length adjustment. Proper strap preparation is essential for both functionality and comfort.
Finally, double-check all the cut pieces before sewing. Make sure you have the main body panels, lining, pockets, zippers, straps, and any additional decorative pieces ready. Preparation ensures a smoother sewing process as we continue with How to make a backpack- Step by Step Tutorial.
Sewing the Backpack Together
Now comes the most exciting part of How to make a backpack- Step by Step Tutorial—sewing the pieces together. Begin with the front pocket if you have one. Sew the zipper in place carefully, making sure it opens and closes smoothly. A neat zipper gives your backpack a professional finish and makes it more practical.
After the front pocket, sew the main body pieces together. Start with the sides and bottom, then attach the back panel. Use strong, straight stitches to ensure the backpack holds weight without tearing. Reinforcing the seams with a second line of stitching adds extra strength, an important tip in How to make a backpack- Step by Step Tutorial.
Once the outer shell is assembled, work on the lining. Sew the lining pieces in the same way as the outer fabric but leave a small opening at the bottom. This opening will be used later to turn the backpack right side out after attaching the lining to the outer shell.
Next, place the lining inside the outer shell with right sides facing each other. Pin them together along the top edge and sew all the way around. After sewing, use the opening in the lining to turn the backpack right side out. Close the opening neatly with a small stitch, a standard step in How to make a backpack- Step by Step Tutorial.
Attach the straps securely before finishing the top edge. Make sure they are evenly placed and reinforced with multiple stitches for durability. Adjustable straps make the backpack more comfortable for different users, so double-check their positioning before sewing.
Finally, give the backpack a good press with an iron to smooth out any wrinkles. A well-pressed backpack looks neat and professionally made, completing the sewing part of How to make a backpack- Step by Step Tutorial.
Customization and Final Touches
One of the best parts about learning How to make a backpack- Step by Step Tutorial is the ability to customize it. You can add decorative elements like fabric patches, embroidery, or even fabric paint to make your backpack unique. Personal touches turn a simple backpack into a one-of-a-kind accessory.
Consider adding extra pockets for better organization. Side pockets for water bottles, interior zippered compartments for valuables, or even a padded laptop sleeve can make your handmade backpack more functional. These additions are easy to include once you master the basic How to make a backpack- Step by Step Tutorial steps.
Changing the closure style is another way to personalize your backpack. While zippers are common, you can also use drawstrings, magnetic snaps, or buckles for a different look. Each closure type gives the backpack its own character and level of security.
Experiment with color combinations to create a backpack that stands out. Contrasting straps, colorful zippers, or patterned linings can add personality and charm. Handmade items reflect your creativity, and this tutorial gives you the freedom to explore different design ideas.
Adding keychains or decorative tassels to the zipper pulls can also make the backpack more stylish. Small details often make the biggest difference in transforming a simple bag into a fashionable accessory.
Lastly, don’t forget to label your creation if you plan to gift or sell it. A small fabric tag with your name or brand adds a professional touch and shows pride in your handmade work using How to make a backpack- Step by Step Tutorial.
FAQ about How to Make a Backpack- Step by Step Tutorial
1. Is this backpack tutorial suitable for beginners?
Yes, How to make a backpack- Step by Step Tutorial is designed for beginners with simple, clear instructions.
2. How long does it take to make a backpack?
It usually takes 4–6 hours, depending on your sewing speed and the complexity of your design.
3. What type of fabric is best for a sturdy backpack?
Canvas, denim, or upholstery fabric works best for durability and strength.
4. Can I make a waterproof backpack with this tutorial?
Yes, by using waterproof fabric or adding a waterproof lining, you can make the backpack water-resistant.
5. Do I need a sewing machine?
A sewing machine makes the process faster and neater, but hand sewing is also possible with patience.
6. Can I sell backpacks made with this tutorial?
Absolutely! Handmade backpacks are popular, and this tutorial teaches you all the basic skills needed.
Conclusion
In this article, we explored How to make a backpack- Step by Step Tutorial in detail, from materials and preparation to sewing and customization.
You learned how to cut fabric, assemble the pieces, add zippers and straps, and personalize your backpack to suit your needs.
Now it’s your turn to try it out and create a backpack that reflects your style. We would love to hear your honest opinions and suggestions for future tutorials, so please share your thoughts after trying this project.