
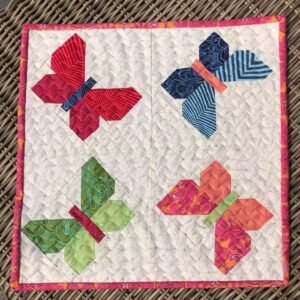
If you’ve ever admired the beauty of quilt blocks that look like fluttering wings, this how to make a butterfly patchwork block – step by step tutorial is exactly what you need. Patchwork quilting allows us to combine creativity, precision, and color in a way that tells a story through fabric. A butterfly block is one of the most beloved designs because it represents transformation, grace, and freedom — perfect themes for a quilt that brightens any space. Whether you’re a beginner learning your first patchwork techniques or an experienced quilter looking for a new project, this butterfly block pattern is a delightful choice.
In this detailed guide, we’ll walk through every part of the process — from fabric selection and cutting to sewing and pressing your finished butterfly block. The butterfly patchwork block is simple enough for beginners but still offers opportunities to experiment with color placement and symmetry for more advanced quilters. By following these easy steps, you’ll end up with a stunning quilt block that looks as though a butterfly has landed right on your quilt top.
The best part about this step-by-step butterfly patchwork block tutorial is that it’s highly customizable. You can mix and match your favorite fabrics to create a realistic butterfly look or go completely abstract with bold, contrasting patterns. With this project, you’ll learn fundamental quilting techniques while also developing your color coordination and piecing accuracy. So, gather your supplies and get ready to sew a beautiful butterfly that will add elegance and charm to your quilt collection!
Materials and Tools Needed
Before you begin sewing, it’s essential to prepare all the materials and tools required for this how to make a butterfly patchwork block – step by step tutorial. Having everything organized ensures a smooth process and helps you focus on the creative part of quilting.
First, choose fabric in at least three colors: one for the butterfly wings, one for the background, and one for the butterfly body. Cotton quilting fabric is ideal because it’s durable, easy to handle, and presses nicely. If you want your butterfly to stand out, select bright and patterned fabrics for the wings and a solid, light background to create contrast.
Next, you’ll need cutting tools. A rotary cutter, a self-healing cutting mat, and a quilting ruler are essential for cutting precise shapes. Accurate cutting ensures your pieces fit together perfectly, which is crucial for achieving a clean patchwork block.
You’ll also need a sewing machine with a straight stitch setting, thread that matches or complements your fabric, and pins or clips to hold pieces together as you sew. Don’t forget an iron and ironing board for pressing seams — this step is key to getting a professional finish on your block.
In addition, make sure you have a butterfly patchwork template or sketch for reference. If you prefer, you can draw your own pattern on graph paper, dividing it into simple geometric shapes like triangles and rectangles that form the butterfly wings and body.
Finally, prepare a measuring tape and fabric pencil for marking your cuts. Once everything is ready, you can move on to the fun part — cutting and sewing your butterfly block!
Step-by-Step Instructions for Making the Butterfly Patchwork Block
Now that you’ve gathered your materials, let’s move on to the most exciting part of this how to make a butterfly patchwork block – step by step tutorial. Follow each step carefully to ensure that your block turns out beautifully balanced and accurate.
Start by cutting your fabric pieces. Most butterfly blocks are made using half-square triangles (HSTs), rectangles, and small squares. Cut four large squares for the wings, two small rectangles for the body, and four triangles for the corners. Be sure to measure and cut precisely — accuracy is the key to a neat patchwork.
Next, create your half-square triangles (HSTs) by pairing two fabric squares right sides together. Draw a diagonal line across one square, sew a quarter-inch seam on both sides of the line, and cut along the center. When opened and pressed, you’ll have two perfect triangles joined together — the foundation of your butterfly wings.
Once you have your wing pieces, arrange them on your work surface in the shape of a butterfly. Place two triangles on each side for the wings and the rectangles vertically in the center for the body. Adjust the arrangement until you’re satisfied with the design and symmetry.
Now, sew the pieces together row by row. Start by joining the small pieces first, then move on to assembling the larger sections. Always use a consistent quarter-inch seam allowance for all your stitching. This consistency ensures the block will come together evenly and align perfectly with other quilt blocks.
After sewing, press all your seams flat using your iron. Press toward the darker fabric to prevent shadows from showing through. Proper pressing not only improves the look of the finished block but also helps it lie flat when you add it to your quilt top.
Finally, trim your butterfly patchwork block to the desired size, making sure all edges are square and the design is centered. Your beautiful butterfly block is now ready to be used in a quilt, pillow cover, or wall hanging!
Helpful Tips for a Perfect Butterfly Block
Even though the butterfly patchwork block is beginner-friendly, a few expert tips can make your sewing experience smoother and your finished block more precise. These small techniques can make a big difference in the quality of your work.
First, always pre-wash and press your fabric before cutting. This prevents shrinkage later and ensures your fabric pieces stay flat while sewing. It also removes any manufacturer’s residue that could affect stitching.
Second, use high-quality quilting cotton for clean cuts and strong seams. Avoid slippery or stretchy fabrics, as they can distort your patchwork and make it harder to align your seams accurately.
Third, when creating your HSTs, press the seams open instead of to one side if you want to reduce bulk. This helps your butterfly wings look crisp and professional.
Fourth, lay out all your pieces before sewing to double-check the placement. Sometimes, switching the position of two fabrics can completely change the look of your butterfly, so take your time to plan the design.
Fifth, use a neutral-colored thread, like beige or light gray, which blends well with most fabrics. This helps hide minor stitching imperfections and gives your block a more polished appearance.
Lastly, if you’re making multiple butterfly blocks for a quilt, chain piece them together — this means sewing similar seams continuously without cutting the thread between pieces. It saves time and keeps your workflow efficient.
Creative Ideas and Variations for Your Butterfly Patchwork Block
The beauty of this how to make a butterfly patchwork block – step by step tutorial is that you can easily personalize it to reflect your own style. There’s no single way to make a butterfly block — the possibilities are endless!
For a more realistic look, use gradient fabrics that mimic natural butterfly wings. Fabrics with ombre tones or subtle patterns can create the illusion of movement and texture.
If you prefer a more modern touch, experiment with geometric or abstract fabrics. Bright solids or bold prints can turn your butterfly into a contemporary art-inspired block.
You can also add embroidery details like tiny antennae or decorative stitching along the wings for extra dimension. A few hand-stitched accents can make your butterfly appear to flutter right off the fabric.
For a larger project, create a butterfly quilt using multiple blocks in different colors. Each butterfly can represent a different season or emotion, creating a story across your quilt.
Another idea is to turn your butterfly block into a pillow cover, tote bag, or table runner. Patchwork isn’t limited to quilts — it’s a versatile art form that fits into many creative projects.
Lastly, don’t hesitate to mix textures. Combine cotton with linen or use metallic thread for a shimmering outline. These small variations will make your butterfly truly one of a kind.
Frequently Asked Questions
1. Is the butterfly patchwork block suitable for beginners?
Yes, this how to make a butterfly patchwork block – step by step tutorial is perfect for beginners. The block uses basic shapes like triangles and rectangles, which are easy to cut and sew.
2. What size should my butterfly block be?
You can adjust the size according to your project. Most quilters make blocks between 8 and 12 inches square, but you can scale the pieces up or down as needed.
3. What’s the best fabric to use?
Cotton quilting fabric is the best choice. It’s easy to work with, holds its shape, and blends beautifully when pressed and sewn.
4. How do I make sure my seams line up perfectly?
Always use a consistent quarter-inch seam allowance and press your seams carefully after each step. Using pins or clips also helps maintain alignment.
5. Can I make the butterfly block by hand?
Yes! If you prefer hand sewing, simply use small, even stitches and take your time. The result will be just as charming and precise.
6. How can I make the butterfly look more detailed?
You can add embroidered patterns, applique accents, or fabric paint to give texture and depth to the wings. These creative additions make your block unique.
7. What can I do with my finished butterfly block?
You can use it in quilts, pillows, table runners, or even as framed wall art. The versatility of the butterfly patchwork block makes it a perfect project for any home decor style.
Conclusion
Now that you’ve learned how to make a butterfly patchwork block – step by step tutorial, you have all the skills to create a beautiful and meaningful design that brings color and life to your quilting projects. This pattern combines creativity, precision, and artistry — the essence of what makes patchwork quilting so fulfilling.
With your new knowledge, you can experiment with different fabrics, layouts, and details to craft butterflies that reflect your personality and imagination. Each block you make will be a small masterpiece that adds beauty to any quilt or decorative item.
We hope this tutorial has inspired you to pick up your sewing tools and start creating today. Please share your sincere opinion and suggestions about this project — your feedback helps us make future tutorials even better. Happy quilting!