
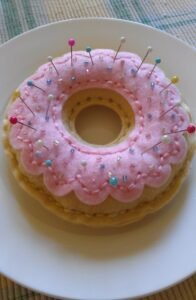
How to make a donut-shaped pincushion using fabric.-Step by Step Tutorial is a charming and useful project for anyone who enjoys sewing, quilting, or crafting. Not only is this pincushion functional for keeping needles and pins organized, but it also brings a cute and decorative touch to your creative space. Throughout this tutorial, we will explore how to create this adorable pincushion using simple materials and easy-to-follow techniques. Using the main keyword naturally is essential for clarity and also helps optimize the content so readers searching for this exact topic can find it more easily.
Before diving into the actual tutorial, it is important to understand why a donut-shaped pincushion is such a popular choice among crafters. The round and soft form is comfortable to work with, while the center hole resembles a donut, giving it a fun and friendly appearance. By learning How to make a donut-shaped pincushion using fabric.-Step by Step Tutorial, you will also get familiar with basic sewing skills that can be applied to various handmade projects. These techniques include cutting fabric, stitching by hand or machine, stuffing, and adding finishing details.
This project also allows you to express creativity through fabric choices, colors, and embellishments. You can choose pastel tones for a delicate look, bold prints for a playful design, or even patterned fabrics that match your sewing room. Understanding How to make a donut-shaped pincushion using fabric.-Step by Step Tutorial also encourages the reusing of small fabric scraps, making this a budget-friendly and eco-conscious craft. Now, let’s begin learning how to make this delightful pincushion from start to finish.
Materials and Preparation
The first step in learning How to make a donut-shaped pincushion using fabric.-Step by Step Tutorial is gathering your materials. You will need two pieces of fabric, preferably cotton or another soft and easy-to-sew material. Each piece should be cut into a circular shape, approximately the size you want for your pincushion. The size can vary depending on your preference, but a common diameter ranges from eight to ten centimeters.
Next, you will need stuffing material. Polyester fiberfill is commonly used, but you can also use leftover fabric scraps or even wool roving. The stuffing helps the pincushion hold its shape and provides enough cushioning to easily hold pins and needles. Make sure you have enough filling so your pincushion does not turn out too flat or too firm.
You will also need a needle and thread or a sewing machine. If you are sewing by hand, choose strong thread to ensure the seams are secure. Sewing machines give a cleaner finish, but hand stitching can work just as well with patience and care. It is completely up to your comfort level and the tools available to you.
A small piece of felt or contrasting fabric may also be used for the donut hole center. Although the pincushion remains functional without this detail, adding it enhances the donut appearance and gives your project a more polished look. It also helps reinforce the center so it retains shape over time.
Pins, scissors, and optional embellishments like ribbon or buttons are also useful. These items help hold the fabric in place while sewing and allow you to personalize the final product. If you are making multiple pincushions, you can experiment with different decorative accents for variety.
Finally, make sure your workspace is clean and organized. Having everything easily accessible will make the How to make a donut-shaped pincushion using fabric.-Step by Step Tutorial experience more enjoyable and smooth from start to finish.
Sewing the Donut Shape
To begin sewing the donut-shaped pincushion, place the two circular fabric pieces together with the right sides facing inward. This ensures that once you turn the fabric right side out, the seams will be hidden for a neat and tidy finish. Align the edges carefully before starting to sew.
Start stitching around the outer circle, leaving a small gap so you can turn the fabric inside out later. The stitch should be firm and even to prevent any stuffing from escaping. If you are using a sewing machine, a straight stitch works perfectly. If sewing by hand, use a backstitch for durability.
After sewing the outer edge, carefully clip small notches around the seam allowance. This helps the fabric lay flat and reduces bulk when turned right side out. Be careful not to cut into the seam itself. Once the notches are made, gently turn the fabric inside out by pulling it through the gap you left open.
Now, fill the donut with stuffing through the opening. Add the stuffing gradually to ensure the pincushion becomes evenly filled. The goal is to create a firm but squeezable cushion. Pay special attention to the edges to avoid uneven lumps or empty spaces.
After the pincushion is stuffed to your liking, stitch the opening closed using a slip stitch or ladder stitch. This will give the finish an invisible seam. Once sealed, shape the cushion gently with your hands to even out the filling and enhance the donut form.
To create the center hole of the donut, sew a running stitch around the middle and gently pull to tighten. This draws in the fabric and forms the donut hole effect, giving your pincushion its recognizable shape.
Adding Details and Personal Touches
Now that your pincushion has taken shape, you can add decorative touches to make it more unique and visually pleasing. This part is where creativity truly comes to life. You can add a piece of felt to the center of the donut hole, resembling icing or decorative topping.
Use embroidery thread to add small stitched details. For example, you can add sprinkles, tiny flowers, or dots around the top of the donut. These delicate touches make the pincushion more personal and appealing while enhancing the playful donut theme.
If you want to add even more flair, consider sewing a small ribbon bow on the side or attaching a button to the center. Buttons can also help reinforce the shape of the donut hole, adding both decorative and structural benefits.
Another fun variation is to use patterned fabric that resembles frosting or colorful icing. Floral, polka dot, and pastel fabrics are particularly charming. Choose fabrics that bring you joy, and do not hesitate to experiment with bold combinations.
You can also make multiple donut pincushions in different sizes and colors. They look adorable arranged together on a table or shelf and make wonderful handmade gifts for friends who enjoy crafting. Personalized gifts are always meaningful and heartfelt.
Once completed, your pincushion is ready for use. Place it on your sewing desk and enjoy the convenience and charm it brings to your everyday crafting routine.
Care and Practical Use
Taking care of your pincushion ensures it lasts a long time and continues to function well. Keep the cushion in a clean area and avoid crushing it under heavy objects. Handle with care to maintain its round shape and decorative elements.
It is normal for pincushions to compress over time with frequent use. If necessary, you can open a small seam and add more stuffing to refresh the shape. This makes the pincushion a long-lasting and sustainable crafting tool.
Remember to avoid placing wet or sharp objects that may damage the fabric or stuffing. Needles and pins are safe, but avoid sticking scissors or blades into it, as that could cause tearing.
If the fabric becomes dusty, lightly brush the surface or use a gentle fabric-safe cleaner. Avoid soaking, as moisture can deform the stuffing. Keeping your pincushion clean ensures it remains both functional and decorative.
This project is not only practical but also a delightful way to express creativity. After learning How to make a donut-shaped pincushion using fabric.-Step by Step Tutorial, you can apply the same principles to different shapes and styles.
Enjoy your handmade pincushion and celebrate your crafting achievements with pride.
FAQ
1. Can I sew this pincushion entirely by hand?
Yes, you can complete every step by hand. Just make sure to use strong stitches to secure the seams and stuffing.
2. What kind of fabric is best for the pincushion?
Cotton is an ideal choice because it is easy to sew and holds shape well. However, felt and linen also work beautifully.
3. What should I use for stuffing?
Polyester fiberfill is recommended, but leftover fabric scraps, wool, or cotton batting can also be used.
4. Can I make this pincushion bigger or smaller?
Absolutely. Simply adjust the size of your fabric circles to create larger or smaller donut shapes.
5. How do I keep my pincushion clean?
Avoid soaking it in water. Instead, spot-clean gently with a cloth and keep it stored in a clean, dry place.
Conclusion
This guide has walked you through How to make a donut-shaped pincushion using fabric.-Step by Step Tutorial, helping you create a charming, functional, and personal craft accessory.
From choosing fabrics and sewing the donut shape to adding decorative touches, each step offers an opportunity for creativity and skill-building.
If you enjoyed this tutorial, feel free to leave your sincere opinion and suggestions so we can continue sharing inspiring and helpful crafting ideas.