
If you’re looking for a practical yet stylish storage solution, this how to make a fabric basket-Step by Step Tutorial is perfect for you. Fabric baskets are versatile, easy to create, and can add a handmade charm to any room. With this step-by-step guide, you’ll learn how to transform simple fabric into a beautiful and functional basket that can hold toys, craft supplies, or household items. The tutorial emphasizes clear instructions and tips to ensure that even beginners can follow along confidently.
Creating a fabric basket is not only about utility but also about expressing your creativity. Choosing fabrics that complement your home decor can instantly brighten up a room. This how to make a fabric basket-Step by Step Tutorial provides the techniques necessary to construct a durable basket while allowing for personal customization. From selecting fabrics to stitching techniques, every detail is covered to make the project enjoyable and rewarding.
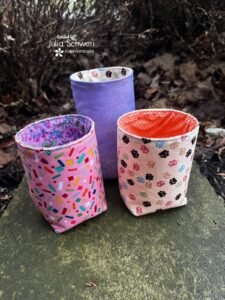
In addition to being decorative, a handmade fabric basket is eco-friendly and cost-effective. You can use scrap fabrics, old clothes, or any materials you have at hand to make unique baskets. Following this how to make a fabric basket-Step by Step Tutorial will give you the confidence to create multiple baskets in different sizes and designs, making them perfect gifts or home storage solutions.
Materials and Tools Needed
Before starting your how to make a fabric basket-Step by Step Tutorial, gathering the proper materials is crucial. Choosing the right fabrics, thread, and tools will make the process smoother and ensure a professional-looking finish.
You will need two types of fabric: a sturdy outer fabric to give your basket structure and a softer inner lining for a polished appearance. Cotton, canvas, or denim works well for the outer layer, while lightweight cotton is ideal for lining.
Thread should match or complement your fabric colors and be strong enough for sewing through thick layers. A quality sewing machine is recommended, but you can hand-stitch if necessary. Use sharp scissors to cut the fabric accurately and pins or clips to hold pieces together during sewing.
Additional tools include a measuring tape for accurate dimensions, a fabric marker for marking folds and sewing lines, and optional interfacing for added stability. Interfacing can make the basket more rigid and durable, especially for larger sizes.
Finally, decide on the basket dimensions. Small baskets are perfect for holding keys or small items, while larger baskets can store laundry or toys. Measuring and cutting accurately is essential for a neat final product in this how to make a fabric basket-Step by Step Tutorial.
Having all materials and tools ready before starting ensures a smooth workflow and helps you focus on creativity and precision throughout the project.
Step by Step Instructions
Start your how to make a fabric basket-Step by Step Tutorial by cutting the outer fabric, lining fabric, and interfacing to the desired size. Typically, a 12×12 inch square works for a medium-sized basket. Adjust dimensions for larger or smaller baskets.
Place the interfacing on the wrong side of the outer fabric and press it with an iron to adhere. This gives the basket strength and helps it maintain its shape. For additional stability, you can also add interfacing to the lining fabric.
Sew the outer fabric pieces together to form the basket body. Typically, this involves stitching the sides to the base. Ensure your stitches are even and backstitch at the beginning and end to secure the seams.
Next, assemble the lining in the same manner, leaving a small gap at the base to turn the basket inside out. Matching seams of the lining and outer fabric is important for a polished finish.
Once the body and lining are complete, place the lining inside the outer basket, wrong sides together. Fold the top edge of the lining inward and pin it neatly. Then, topstitch around the top edge to secure both fabrics together, hiding raw edges.
Finally, shape the basket and press the top edge lightly with an iron. Your fabric basket is now complete and ready to use. You can experiment with different fabrics, sizes, and embellishments to make each basket unique.
Customization Ideas
One of the best aspects of this how to make a fabric basket-Step by Step Tutorial is the ability to personalize it. Fabric choice alone can dramatically change the look of your basket. Bright patterns create a fun vibe, while neutral tones suit a minimalist aesthetic.
You can add pockets on the outside for extra storage. Small sewn pockets are perfect for holding small items like pens, remote controls, or cosmetics. They also add visual interest to your basket.
Handles are another customization. You can sew fabric handles or use rope, leather, or ribbon to make your basket more functional and decorative. Ensure handles are securely attached to support weight.
Decorative embellishments like buttons, ribbons, or patches can add charm. You can also embroider initials or simple designs on the outer fabric to personalize your basket further.
For a more rigid structure, experiment with adding additional layers of interfacing or cardboard between the outer fabric and lining. This works especially well for baskets that need to hold heavier items.
Finally, consider size variations. Making a set of small, medium, and large baskets can create a coordinated storage solution for different areas of your home. These personalized touches make your fabric basket both functional and visually appealing.
Care and Maintenance
To ensure your fabric basket lasts, follow proper care instructions. Most fabric baskets can be spot cleaned with a damp cloth. For deeper cleaning, gently hand wash using mild detergent and cold water.
Avoid machine washing unless your basket is made of durable fabrics that can withstand agitation. Excessive washing can weaken seams and distort shape.
For baskets with interfacing, air drying is best to maintain structure. Reshape the basket while damp if necessary.
Keep heavy items away from smaller baskets to prevent stretching or collapsing. This maintains both appearance and function over time.
Check for loose threads or seams regularly and repair them promptly. This prevents minor issues from becoming major problems.
Proper care ensures your fabric basket remains an attractive and functional home accessory for years.
FAQ – how to make a fabric basket
1. Can beginners make this fabric basket?
Yes, this tutorial is beginner-friendly with clear step-by-step instructions and simple sewing techniques.
2. What fabrics work best for baskets?
Sturdy cotton, canvas, denim, or any medium-weight fabric works well for durability and structure.
3. Can I make baskets in different sizes?
Absolutely. Adjust the cut dimensions and sewing accordingly to create small, medium, or large baskets.
4. Is interfacing necessary?
Interfacing is optional but recommended for added stability and shape retention.
5. How do I clean a fabric basket?
Spot clean with a damp cloth or hand wash gently in cold water. Air dry and reshape while damp.
6. Can I add pockets or handles?
Yes, adding pockets and handles is an excellent customization option for practicality and style.
Conclusion
This how to make a fabric basket-Step by Step Tutorial has shown you how to transform simple fabrics into a beautiful, functional, and customizable storage solution. You’ve learned about materials, step-by-step assembly, customization ideas, and care tips.
Now it’s your turn to create your own fabric baskets, experiment with colors, patterns, and sizes, and enjoy the satisfaction of handmade organization.
Share your experiences, suggestions, and feedback to inspire others and celebrate the joy of crafting.