
If you want to create a unique and practical kitchen accessory, this How to make a heart oven mitt – Step by Step Tutorial is the perfect project for you. Oven mitts are essential tools in every kitchen, protecting your hands from burns while handling hot pans, pots, and trays. But why settle for a plain design when you can make a heart-shaped one that adds a touch of love and personality to your cooking space?
The beauty of this How to make a heart oven mitt – Step by Step Tutorial is that it’s easy enough for beginners yet customizable enough for experienced crafters to enjoy. Whether you want to make it as a thoughtful gift or for personal use, this tutorial walks you through each step clearly and simply. You will learn how to cut, sew, and assemble your oven mitt, ensuring a professional and durable finish.
Before diving into the detailed steps, we will first cover the materials you need and some essential tips to help you achieve the best results. This ensures that by the time you start the How to make a heart oven mitt – Step by Step Tutorial, you have everything ready and can follow along smoothly.
Materials Needed for How to Make a Heart Oven Mitt – Step by Step Tutorial
To begin the How to make a heart oven mitt – Step by Step Tutorial, you will first need to gather all the necessary materials. Fabric is, of course, the star of the project. Choose a cotton fabric for the outside layer because it is easy to work with, washable, and available in many colors and patterns. A fun print can make your oven mitt not only practical but also decorative.
You will also need heat-resistant batting or thermal lining to protect your hands from heat. This is an essential part of the How to make a heart oven mitt – Step by Step Tutorial because it provides insulation and safety. Regular batting alone will not be enough to withstand the high temperatures from ovens and hot pans.
For the inner lining, you can use plain cotton or any soft, breathable fabric. This makes the mitt comfortable to wear while maintaining functionality. Choosing a color that matches or complements the outer fabric can make the final product more attractive, a tip that many people overlook when following the How to make a heart oven mitt – Step by Step Tutorial.
Basic sewing tools like fabric scissors, pins, sewing needles, and a sewing machine will make the process much faster and more precise. While hand sewing is possible, a machine will ensure even stitches and a sturdier oven mitt, especially if you plan to make several as gifts or for sale.
A heat-resistant thread is recommended because it holds up better under high temperatures. This ensures that your How to make a heart oven mitt – Step by Step Tutorial results in a product that is not only beautiful but also safe and long-lasting.
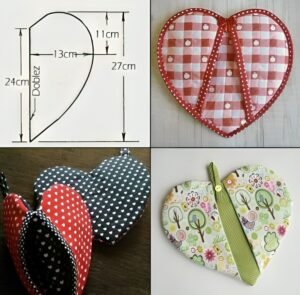
Finally, you will need a simple heart-shaped template or pattern. You can easily draw this yourself on paper or find one online to print. Having a clear shape makes cutting the fabric and assembling the oven mitt much easier and keeps the proportions balanced.
Cutting and Preparing the Fabric Pieces
Once all the materials are ready, the next step in the How to make a heart oven mitt – Step by Step Tutorial is cutting out the fabric pieces. Start by folding your fabric in half so you can cut two identical heart shapes for the front and back of the mitt. Place the paper template on the fabric, pin it securely, and cut carefully along the edges.
Repeat the same process for the thermal batting and the inner lining fabric. You should have two pieces of each material: outer fabric, inner lining, and thermal batting. In total, there will be six layers for the oven mitt. This step in the How to make a heart oven mitt – Step by Step Tutorial ensures proper thickness for heat protection and durability.
Labeling each layer with a small pin or piece of tape can help keep things organized, especially if you are making multiple mitts at once. This prevents confusion and speeds up the sewing process later on in the How to make a heart oven mitt – Step by Step Tutorial.
If you want to add a decorative trim, now is the time to cut it as well. Many crafters like to include a small loop at the top of the heart so the oven mitt can be hung on a hook when not in use. This is a simple addition that makes the How to make a heart oven mitt – Step by Step Tutorial even more functional.
At this stage, you can also quilt the layers together if you like a textured look. Quilting involves stitching through all layers in a pattern, such as diagonal lines or hearts, to hold the batting in place. This is optional in the How to make a heart oven mitt – Step by Step Tutorial, but it adds durability and style.
After preparing all the pieces, double-check that everything matches in size and shape. Trimming any uneven edges now will make sewing the layers together much easier and neater as you continue with the How to make a heart oven mitt – Step by Step Tutorial.
Sewing the Heart Oven Mitt Together
With the pieces cut and prepared, it is time to sew them together following the How to make a heart oven mitt – Step by Step Tutorial. Begin by placing the outer fabric right sides together, followed by the thermal batting and then the lining. Pin all the layers securely so they do not shift while sewing.
Using a sewing machine, stitch around the edges of the heart shape, leaving a small opening at the bottom for turning the mitt inside out. This is a crucial part of the How to make a heart oven mitt – Step by Step Tutorial because it keeps the seams hidden and gives the mitt a professional finish.
Once stitched, carefully trim any excess fabric around the edges, especially at the curves of the heart. This prevents bulkiness when you turn the mitt right side out. It is a small but important detail in the How to make a heart oven mitt – Step by Step Tutorial for achieving smooth, even seams.
Turn the oven mitt right side out through the opening you left earlier. Use a blunt tool, like the end of a pencil, to push out the curves and points of the heart neatly. This step makes the shape come to life and is always satisfying in the How to make a heart oven mitt – Step by Step Tutorial process.
After turning it right side out, press the mitt with an iron to flatten the seams and prepare it for the final stitching. This helps everything look clean and crisp as you finish the How to make a heart oven mitt – Step by Step Tutorial.
Finally, sew the opening closed using either a sewing machine or a slip stitch by hand. The result should be a fully enclosed, heart-shaped oven mitt ready for the last decorative touches in the How to make a heart oven mitt – Step by Step Tutorial.
Adding Finishing Touches and Personalization
The final stage of the How to make a heart oven mitt – Step by Step Tutorial is all about personalization and adding functional details. A small fabric loop can be attached to the top corner of the heart so the mitt can be hung conveniently in the kitchen. This simple addition is both practical and attractive.
You can also add decorative stitching along the edges in a contrasting thread color. This not only reinforces the seams but also makes the oven mitt visually appealing. Many people love this step of the How to make a heart oven mitt – Step by Step Tutorial because it lets them show off their creativity.
Appliqué designs, embroidery, or even fabric paint can be used to add names, initials, or small patterns to the mitt. This makes each oven mitt unique and personal, a lovely idea if you are following the How to make a heart oven mitt – Step by Step Tutorial to make gifts for friends or family.
If you made the mitt as part of a set, such as matching pot holders or kitchen towels, use the same fabrics and trims to create a cohesive look. This small touch turns a simple project into a complete kitchen ensemble through the How to make a heart oven mitt – Step by Step Tutorial.
Another idea is to create themed oven mitts for holidays or special occasions. For example, red and white fabrics for Valentine’s Day or festive prints for Christmas make the How to make a heart oven mitt – Step by Step Tutorial versatile for year-round crafting.
Once everything is finished, give the oven mitt a final press with the iron to set all the seams and details in place. Your project from the How to make a heart oven mitt – Step by Step Tutorial is now complete and ready to use or gift.
FAQ about How to Make a Heart Oven Mitt – Step by Step Tutorial
Q1: Is the How to make a heart oven mitt – Step by Step Tutorial suitable for beginners?
Yes, it is simple enough for beginners with basic sewing skills to follow successfully.
Q2: Can I hand sew the oven mitt instead of using a sewing machine?
Yes, hand sewing works, but it will take longer and may not be as durable as machine stitching.
Q3: What fabrics are best for the How to make a heart oven mitt – Step by Step Tutorial?
Cotton for the outer layer and lining, with thermal batting inside for heat protection, works best.
Q4: Can I make the oven mitt in different sizes?
Yes, simply adjust the paper template to create smaller or larger mitts as desired.
Q5: How do I wash the finished oven mitt?
Machine wash on a gentle cycle and air dry to maintain its shape and durability.
Q6: Can I sell oven mitts made using this tutorial?
Yes, handmade oven mitts are popular craft fair and online shop items.
Conclusion
This How to make a heart oven mitt – Step by Step Tutorial has shown you how to gather materials, cut and sew the layers, assemble the mitt, and personalize it with finishing touches.
The result is a practical, beautiful kitchen accessory that reflects your creativity and effort.
We hope you enjoyed this tutorial and found it easy to follow. Please share your honest opinion and suggestions for future projects—we would love to hear from you and keep improving our crafting guides!