
Learning How to Make a Manicure Kit- Step by Step Tutorial is an excellent way to personalize your nail care routine and ensure you always have the right tools at your fingertips. A well-prepared manicure kit helps you keep your nails neat, healthy, and stylish without spending money at salons. By creating your own kit, you can choose high-quality tools, customize the contents according to your needs, and even save money in the long run.
The great thing about learning How to Make a Manicure Kit- Step by Step Tutorial is that it works for everyone. Whether you are a beginner who wants to start taking better care of your nails or someone who loves DIY beauty projects, this guide will walk you through every step clearly and effectively. It will also help you choose the best tools, explain how to organize them, and provide tips on maintaining a professional nail care routine at home.
Another advantage of following this How to Make a Manicure Kit- Step by Step Tutorial is that you can create multiple kits for different purposes. For example, you can have one kit for everyday nail care, one for travel, and even one for gifting. With the right tools and organization, you will always be prepared to give yourself a quick, neat manicure anytime you need it.
Choosing the Right Tools for Your Manicure Kit
The first step in How to Make a Manicure Kit- Step by Step Tutorial is selecting the essential tools that will form the base of your kit. Having the right tools makes all the difference in achieving salon-quality results at home.
Begin with a good pair of nail clippers. Clippers are essential for trimming your nails to the desired length. Choose stainless steel clippers because they last longer and are easy to clean, ensuring hygiene and precision.
Next, add a nail file or emery board to your kit. Files help shape your nails smoothly after trimming, preventing rough edges and reducing the chance of breakage. Consider keeping both a fine and coarse file for different nail types.
A cuticle pusher and cuticle trimmer are also essential. The pusher helps gently move back cuticles, creating a neat nail bed, while the trimmer removes any excess skin safely. Keeping cuticles healthy prevents hangnails and gives a polished look to your manicure.
Don’t forget a buffer block. Buffers help smooth nail surfaces, remove ridges, and add a natural shine even without nail polish. They are perfect for quick touch-ups and for keeping nails looking healthy.
Finally, include small accessories like nail scissors, tweezers, and a nail brush. These tools make it easier to maintain clean and well-shaped nails, rounding out the basics of your How to Make a Manicure Kit- Step by Step Tutorial setup.
Organizing and Storing Your Manicure Kit
Once you have all the tools, the next step in How to Make a Manicure Kit- Step by Step Tutorial is organizing and storing them properly. A well-organized kit makes it easy to find everything quickly and keeps your tools clean and safe.
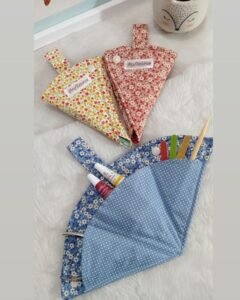
Start by selecting a sturdy storage case or pouch. Look for one with compartments or elastic bands to hold each tool securely. This prevents tools from scratching each other and makes the kit easy to carry if you travel.
If you prefer a DIY approach, you can use small cosmetic bags, pencil cases, or even a repurposed jewelry box to organize your tools. The important thing is to keep everything in one place and ensure it stays clean.
For larger items like buffers or nail polish bottles, consider using small plastic containers or zip-lock bags inside the kit to prevent spills or damage. This keeps your kit tidy and practical.
Labeling sections of your kit can also be helpful, especially if you include multiple nail polishes, nail art tools, or special treatments. It saves time when you need to find specific items quickly.
Lastly, make sure your storage solution is easy to clean. Wipe the case regularly and disinfect your tools after each use to maintain a hygienic manicure kit ready for use at any time.
Step-by-Step Guide to Assembling Your Kit
Now let’s dive into the heart of How to Make a Manicure Kit- Step by Step Tutorial by assembling the kit step by step. Following this process ensures you do not miss any important tool or accessory.
Step one: Gather all the essential tools mentioned earlier. Lay them out on a clean surface to check that nothing is missing before placing them into your kit.
Step two: Arrange tools by category, such as trimming tools, shaping tools, cuticle care, and polishing accessories. This organization helps you access everything easily during your manicure sessions.
Step three: Place the heaviest tools, like nail clippers and scissors, at the bottom or in dedicated compartments to avoid damaging delicate items like nail files or buffers.
Step four: Add optional items such as nail polish remover pads, cotton balls, and small bottles of hand cream. These items elevate your manicure kit from basic to complete, giving you everything you need in one place.
Step five: Close the kit securely and test its portability. A good manicure kit should be easy to carry, lightweight, and durable enough to protect your tools during travel or storage.
Step six: Once assembled, your How to Make a Manicure Kit- Step by Step Tutorial project is ready for use. You now have a personal, customized kit for salon-quality nail care anytime you want.
Tips for Maintaining Your Manicure Kit
After completing the How to Make a Manicure Kit- Step by Step Tutorial, it’s important to keep your tools clean and in good condition. Proper maintenance ensures your kit lasts longer and keeps your nails healthy.
Always disinfect tools after each use. Rubbing alcohol or specialized disinfectant sprays help kill germs and prevent infections. This is especially important for cuticle trimmers and nail clippers.
Sharpen or replace dull tools as needed. A sharp nail clipper or cuticle trimmer works more effectively and reduces the risk of accidents or uneven cuts.
Store your kit in a cool, dry place. Avoid leaving it in humid areas like bathrooms where moisture can cause rust or damage to your tools.
Regularly check the contents of your kit to replace used items like nail polish remover pads, cotton balls, or broken tools. Keeping everything up to date ensures your kit is always ready for use.
Consider adding seasonal nail care products, like moisturizing cuticle oils in winter or sunscreen for hands in summer, to make your kit even more versatile.
Finally, take a few minutes each month to reorganize your kit. This simple habit keeps everything neat, clean, and ready for your next manicure session.
FAQ About How to Make a Manicure Kit
Q1: What are the must-have tools for a basic manicure kit?
A basic kit should include nail clippers, nail files, cuticle pushers, buffers, and small accessories like tweezers or scissors.
Q2: Can I travel with my manicure kit?
Yes, but if flying, check airline regulations to ensure sharp tools like scissors comply with carry-on rules.
Q3: How often should I disinfect my manicure tools?
You should disinfect tools after every use to maintain hygiene and prevent bacterial growth.
Q4: Do I need professional tools for a personal manicure kit?
Not necessarily. High-quality home-use tools are affordable and work well for personal care.
Q5: Can I add nail polish to my manicure kit?
Absolutely! Including a few favorite nail polish colors makes your kit complete for stylish manicures anytime.
Q6: How do I prevent my tools from rusting?
Keep them dry, store them properly, and avoid leaving them in damp environments.
Conclusion
In this guide on How to Make a Manicure Kit- Step by Step Tutorial, we explored everything from choosing the right tools and organizing them to assembling and maintaining your kit effectively.
By following these steps, you can create a customized manicure kit that suits your personal needs, saves time, and keeps your nails healthy and beautiful.
We hope this tutorial has inspired you to create your own manicure kit. Share your honest opinion and suggestions—we would love to hear how your project turned out and what tips you might have for fellow readers!