
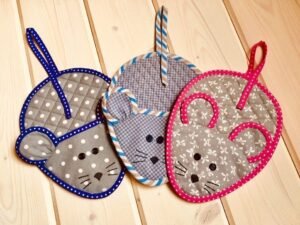
If you love creative and functional crochet projects, this How to Make a Mouse-Designed Pot Holder – Step by Step Tutorial will be a delightful addition to your crafting journey. A mouse-shaped pot holder is both practical and adorable, perfect for bringing a playful touch to your kitchen. Whether you’re an experienced crocheter or just starting out, this project is fun, easy to follow, and produces a beautiful handmade piece that’s sure to impress.
In this tutorial, we’ll guide you through each stage of making your mouse-designed pot holder, from choosing the right yarn and hook to shaping the mouse’s body, ears, and tail. You’ll learn how to blend utility with charm, resulting in a pot holder that not only protects your hands but also adds personality to your kitchen décor. Using a few basic stitches and some creativity, you’ll soon have your own crochet mouse ready to use or gift.
Before diving into the step-by-step process, take a moment to imagine your finished creation — a soft, heat-resistant mouse pot holder sitting on your counter or hanging by its tail. This project is also perfect for gifting to friends or family who love handmade kitchen accessories. With this How to Make a Mouse-Designed Pot Holder – Step by Step Tutorial, you’ll discover how enjoyable it is to combine artistic expression with practical crafting.
Materials and Preparation
To start this How to Make a Mouse-Designed Pot Holder – Step by Step Tutorial, you’ll need a few basic crochet materials. For durability and heat resistance, 100% cotton yarn is highly recommended. Acrylic yarns tend to melt under heat, so cotton is safer and more functional for pot holders. Choose colors like gray, beige, or brown for the mouse’s body, and add pink or white accents for the ears and nose to make it more charming.
Next, select a crochet hook that matches your yarn’s weight — usually a 4mm or 4.5mm hook works well for medium-weight cotton. You’ll also need scissors, a yarn needle for weaving in ends, and optionally a stitch marker to keep track of rounds if you’re working in continuous circles.
Before starting, make sure to have a heatproof lining in mind. Some crafters prefer to double the thickness of the pot holder or insert a layer of felt or quilt batting for extra insulation. This will help protect your hands and surfaces from hot pans or dishes.
It’s a good idea to make a small gauge swatch before beginning. This helps ensure your stitches are the right size and that your finished pot holder won’t turn out too small or too loose. Proper tension keeps your work firm and functional.
Finally, set up a comfortable workspace with good lighting and all your tools close at hand. Having a calm, organized environment makes the process much more enjoyable and efficient. With everything ready, you can begin crocheting your adorable mouse-shaped pot holder.
Step-by-Step Instructions
Now that you’re prepared, it’s time to begin the main part of this How to Make a Mouse-Designed Pot Holder – Step by Step Tutorial. Start by making the mouse’s body, which forms the circular base of your pot holder. Begin with a magic ring, chain two, and make 12 double crochets into the ring. Pull it tight to close and join with a slip stitch.
In the next round, increase evenly by making two double crochets in each stitch around. This will form a smooth circle. For the third round, make one double crochet in the first stitch, then two in the next, and repeat this pattern all the way around. Continue increasing in each round until your circle reaches about 6 to 8 inches in diameter, depending on your desired size.
Once the base is complete, switch to a contrasting yarn to create a border. Use single crochet stitches around the edge for a clean finish. This will also make your pot holder sturdier and more heat-resistant. You can use the same color as the ears or tail to tie the design together.
Next, create the ears. Make two small circles by starting with a magic ring, chaining two, and making 10 double crochets into the ring. Add a second round of single crochet to make them slightly larger. You can use pink yarn for the inner ear and gray for the outer layer. Sew the ears to the top of the body, ensuring they are evenly spaced.
For the tail, chain about 25 to 30 stitches using the main color yarn. You can leave it as a simple chain or go back along it with slip stitches for a thicker, sturdier tail. Attach it securely to the back of the pot holder. The tail can also serve as a convenient hanging loop.
Finally, add small details like eyes and a nose using embroidery or small crochet pieces. For safety, especially if the pot holder will be used often, avoid using plastic buttons. Instead, use yarn embroidery to keep the design functional and safe for kitchen use.
Customizing and Adding Personality
A wonderful part of this How to Make a Mouse-Designed Pot Holder – Step by Step Tutorial is the freedom to customize your project. The mouse design can be playful or realistic, depending on your color choices and finishing touches. Try adding a little bow, a patch of color on the back, or even whiskers for an extra-cute look.
You can experiment with different yarn colors. Instead of traditional gray, why not make a white mouse with pink accents or even a multicolored one for a fun, whimsical touch? Each color variation gives your creation a unique personality.
For a more decorative piece, consider crocheting two mouse pot holders and stitching them together, leaving a small opening to insert padding. This gives your piece a three-dimensional effect and makes it thicker and safer to handle hot cookware.
Another idea is to turn your mouse design into a matching kitchen set. You could crochet coordinating items like a dishcloth, coaster, or oven mitts using the same color scheme. This creates a cohesive handmade look for your kitchen.
If you’re making the mouse pot holder as a gift, adding a small tag with your name or a handmade label can make it more personal. People love receiving handmade items, especially when they show creativity and attention to detail.
Lastly, always remember that the joy of crochet comes from creativity. The How to Make a Mouse-Designed Pot Holder – Step by Step Tutorial is just a guide — feel free to adjust shapes, sizes, and colors to suit your taste. What matters most is enjoying the process and expressing your unique artistic style.
Care Tips and Creative Uses
Now that your project is complete, the How to Make a Mouse-Designed Pot Holder – Step by Step Tutorial wouldn’t be complete without a few care and usage tips. To ensure your pot holder lasts, it’s essential to maintain it properly. Since it’s made from cotton yarn, you can hand wash it or use a gentle machine cycle with mild detergent. Always let it air dry flat to maintain its shape.
Avoid exposing your crochet pot holder directly to open flames or extremely high temperatures. While cotton is heat-resistant, it’s not fireproof. Use your pot holder to handle hot pans or protect your countertops, but keep it away from burners.
If you used light-colored yarn, be mindful that stains can appear over time. To prevent this, consider using darker shades for the center portion and lighter accents for the decorative parts. This keeps your pot holder looking fresh even with frequent use.
Beyond its practical use, your crochet mouse pot holder can also serve as kitchen décor. Hang it on a hook or display it with your other crochet items. Its cute design brings warmth and personality to any kitchen space.
You can also adapt this tutorial for children’s rooms or play kitchens by using soft pastel colors and smaller hooks. These versions can be purely decorative and make lovely handmade gifts.
With proper care, your handmade pot holder will remain a durable and beautiful item for years. The How to Make a Mouse-Designed Pot Holder – Step by Step Tutorial proves that functional crochet can also be full of creativity and charm.
Frequently Asked Questions
1. What type of yarn is best for pot holders?
Cotton yarn is best because it’s heat-resistant and durable. Avoid acrylic yarns since they can melt when exposed to high heat.
2. Can beginners follow this tutorial?
Yes! The How to Make a Mouse-Designed Pot Holder – Step by Step Tutorial uses simple stitches like chain, single crochet, and double crochet, making it perfect for beginners.
3. How big should a crochet pot holder be?
A standard size is about 7–8 inches in diameter, but you can adjust based on your needs. Just make sure it’s thick enough to protect your hands.
4. Can I make other animal-themed pot holders using this method?
Absolutely! Once you master the mouse design, you can use similar techniques to create other animals like cats, bears, or bunnies.
5. How do I keep my crochet pot holder clean?
Hand wash or use a gentle machine wash with mild soap, and let it air dry. Avoid harsh chemicals or high heat drying.
6. Can I sell the mouse-designed pot holders I make?
Yes, handmade items like these are great for selling at craft fairs or online, as long as they’re your original creations.
Conclusion
Through this How to Make a Mouse-Designed Pot Holder – Step by Step Tutorial, you’ve learned how to combine functionality and creativity in one delightful project. From crafting the circular base to shaping the ears and adding the finishing touches, every step teaches essential crochet techniques while letting you express your imagination.
This mouse pot holder is not only a practical kitchen accessory but also a symbol of care and creativity. It makes a thoughtful handmade gift or a lovely addition to your home décor. Remember, crochet is as much about the journey as the finished piece — take your time, enjoy the process, and be proud of what you create.
We hope this How to Make a Mouse-Designed Pot Holder – Step by Step Tutorial has inspired you to pick up your hook and start crafting today. Please share your honest opinion and suggestions in the comments — your feedback helps inspire more creative crochet projects for everyone to enjoy!