
Learning how to make a quilt eyeglass case – Step by Step Tutorial is a creative and rewarding project for anyone who enjoys quilting or sewing handmade gifts. A quilted eyeglass case is not only practical but also a stylish accessory that protects your glasses from scratches, dust, or accidental damage. With this easy-to-follow guide, you can create a custom case that reflects your personal taste, whether you love bright colors, floral prints, or a minimalist design.
Quilting has long been celebrated as an art form that combines functionality with creativity, and making smaller projects like an eyeglass case is perfect for beginners who want to practice sewing techniques without feeling overwhelmed. At the same time, more experienced quilters can use this project to showcase their fabric scraps, test new designs, or craft thoughtful handmade gifts for loved ones. The beauty of this project is that it requires only basic quilting skills, yet the end result looks polished and professional.
This quilt eyeglass case tutorial will walk you through everything you need to know, from choosing your fabrics and batting to sewing the layers together and adding finishing touches. Each step is explained in detail, so even if you are new to quilting, you will feel confident in creating your first eyeglass case. By the end of this guide, you will not only have a practical accessory but also the satisfaction of making something unique with your own hands.
Choosing Materials and Preparing the Fabric
When starting the process of how to make a quilt eyeglass case – Step by Step Tutorial, the first step is to select the right materials. You will need cotton fabric for the outer layer, lining fabric for the inside, and a piece of batting to provide softness and protection for your glasses. Cotton fabric is recommended because it is easy to sew, breathable, and available in countless patterns and colors.
To give your eyeglass case a professional look, it is best to choose fabrics that complement each other. You can opt for matching tones or go bold with contrasting patterns. Quilting scraps are perfect for this project since it requires only small amounts of fabric. This is also an excellent opportunity to recycle leftover pieces from larger quilt projects.
Once you have chosen your fabrics, make sure to wash and press them before cutting. Pre-washing is important because it prevents shrinkage and ensures the colors remain vibrant after multiple washes. Pressing the fabric will make it easier to cut and align your pieces accurately. Clean edges and smooth surfaces will lead to a neat and polished eyeglass case.
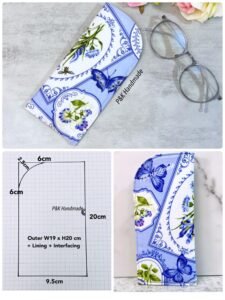
Next, cut two pieces of outer fabric and two pieces of lining fabric in a rectangular shape, around 8 inches by 4 inches. This size can be adjusted depending on the dimensions of your glasses. Also, cut two pieces of batting in the same size. Keeping all the layers even is essential to achieve balanced quilting results.
It is also recommended to use quilting clips or pins to hold the layers in place before stitching. This small detail can make a huge difference in maintaining symmetry while sewing. With your materials prepared, you are ready to move on to the next step of this quilt eyeglass case tutorial.
Quilting the Layers Together
The next stage in how to make a quilt eyeglass case – Step by Step Tutorial is quilting the fabric and batting together. Begin by layering one piece of outer fabric on top of a batting piece, with the right side facing up. Secure them with pins or clips. This will become the front and back panels of your eyeglass case.
Quilting can be as simple or as decorative as you like. For beginners, straight-line quilting is an excellent choice. You can sew horizontal, vertical, or diagonal lines across the fabric to hold the batting in place. If you are more confident, try free-motion quilting to add swirls, flowers, or geometric designs for a personalized touch.
Remember to use a walking foot if you have one, as it helps feed the fabric layers evenly. Choose a thread color that complements or contrasts with your fabric depending on the look you want to achieve. A neutral thread gives a subtle effect, while a bold thread can highlight the quilting design.
Repeat the process with the second outer fabric and batting piece. When finished, trim any excess batting from the edges so that the quilted fabric matches the exact size of the lining pieces. Keeping all the pieces the same size is essential for smooth assembly later.
Quilting not only adds decorative texture but also strengthens the eyeglass case. It ensures the batting stays in place and prevents shifting inside the layers. This step transforms your simple fabric into a sturdy, stylish, and protective case for your glasses.
By the end of this step, you will have two quilted panels ready to be assembled with the lining fabric. The quilted texture will already make the project look more professional, even before finishing the construction of the case.
Assembling and Sewing the Case
The most exciting step in how to make a quilt eyeglass case – Step by Step Tutorial is assembling the quilted pieces into a functional case. Take one quilted panel and place it right side up, then position one lining piece on top with the right side facing down. Pin or clip along one of the shorter edges. Sew across this edge with a ¼-inch seam allowance. Repeat the same process for the other quilted panel and lining piece.
Once both panels are joined with their linings, open the fabric and press the seams flat. At this point, you will have two separate units, each with a quilted exterior and a lining attached. Place the two units together, right sides facing each other, making sure the linings are aligned with each other and the quilted fabrics are also aligned. Pin or clip around the edges, leaving a small opening at the bottom of the lining.
Now sew around the entire perimeter with a ¼-inch seam allowance, remembering to leave the opening in the lining for turning. Trim the corners slightly to reduce bulk, but be careful not to cut into the stitches. Turn the case inside out through the opening in the lining. Use a pointed tool, like a knitting needle or chopstick, to gently push out the corners for a clean shape.
After turning, press the case flat, and sew the opening in the lining closed with a small topstitch or hand-stitch. Finally, tuck the lining into the case and give it one last press to achieve a neat and professional finish. At this stage, your quilted eyeglass case will be ready to use.
You can also add extra details, such as a button and loop closure or a magnetic snap for more security. Decorative trims, lace, or embroidery can further personalize your project. This flexibility allows you to create unique cases for different occasions or as thoughtful handmade gifts.
Completing this step gives you the joy of seeing your fabric pieces transformed into a practical and stylish accessory. It is the moment when the hard work of cutting, quilting, and sewing comes together beautifully.
Creative Variations and Customization
One of the best aspects of how to make a quilt eyeglass case – Step by Step Tutorial is the ability to customize it to fit your style. Quilting allows endless possibilities for colors, fabrics, and designs, which means no two cases need to look the same.
For a minimalist look, choose solid fabrics with subtle quilting lines. For a bold statement, use vibrant prints, patchwork designs, or applique details. Mixing different fabric textures, such as cotton with linen or velvet, can add extra charm. This project is also a great way to practice using decorative stitches on your sewing machine.
If you want to make your eyeglass case more functional, consider adding a pocket on the back for storing cleaning cloths or small items. Another variation is to add a wrist strap, making it easy to carry your case on the go. These simple adjustments can turn your basic case into a versatile accessory.
You can also experiment with shapes. While a simple rectangle works perfectly, you might want to try rounded edges, triangular flaps, or even envelope-style cases. Creativity in quilting projects is limitless, and experimenting with different styles can be fun and rewarding.
Handmade quilted eyeglass cases also make excellent gifts. Whether for birthdays, holidays, or as a thoughtful thank-you present, these cases show care and effort. Since they are small and quick to make, you can create several in different designs to suit each recipient’s taste.
By customizing your case, you ensure it is not only functional but also a true reflection of your personality. Every detail, from the choice of fabric to the quilting design, contributes to making your project one-of-a-kind.
FAQ about How to Make a Quilt Eyeglass Case
1. Do I need advanced quilting skills to make a quilt eyeglass case?
No, this project is beginner-friendly. Straight-line quilting and basic sewing techniques are enough to complete the case successfully.
2. What type of fabric is best for making a quilted eyeglass case?
Cotton is the most recommended fabric because it is durable, easy to work with, and available in endless patterns.
3. Can I use leftover fabric scraps for this project?
Yes, this project is perfect for using up fabric scraps from larger quilting projects. It helps reduce waste and adds charm.
4. How do I ensure the case fits my glasses?
Measure your glasses before cutting the fabric. Adjust the length and width of the rectangles to make sure they fit comfortably.
5. Can I wash a quilted eyeglass case?
Yes, most quilted eyeglass cases can be gently hand-washed or machine-washed on a delicate cycle, depending on the fabric used.
6. How long does it take to make a quilted eyeglass case?
On average, it can take about one to two hours, depending on your sewing speed and the level of customization you add.
Conclusion
In this guide on how to make a quilt eyeglass case – Step by Step Tutorial, we explored everything from choosing fabrics and quilting the layers to sewing and customizing your case. This project is ideal for both beginners and experienced quilters who want to create something practical, beautiful, and personal.
By following each step carefully, you can craft a durable and stylish accessory that protects your glasses while showcasing your creativity. The flexibility of quilting allows endless customization, making each case unique. Whether for yourself or as a thoughtful handmade gift, this project is worth trying.
I hope this tutorial inspires you to start quilting your own eyeglass case today. If you try it, please leave your honest opinion and share any suggestions or creative ideas you have. Your feedback helps improve future guides and encourages others to explore the joy of quilting.