
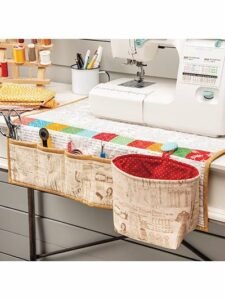
If you have ever wanted to add more organization to your sewing space, learning how to make a sewing machine organizer pad for beginners- step by step tutorial is the perfect project for you. This type of organizer is designed to sit under your sewing machine and includes pockets and compartments to hold scissors, rulers, spools, seam rippers, and other essential tools. It not only helps you keep everything within reach but also protects your table surface from scratches and vibrations.
The beauty of creating your own sewing machine organizer pad is that it can be customized according to your style, fabric preferences, and the tools you use most often. Many beginners are surprised at how simple the process is, and once you learn the basics, you can adjust the size, add more pockets, or even include decorative stitching to make it uniquely yours. It is also an excellent project for using leftover fabric scraps, making it both functional and budget-friendly.
In this guide, we will take you through a step by step tutorial tailored especially for beginners. You do not need advanced sewing skills to complete this project successfully. With basic sewing techniques and a little patience, you will end up with a practical and attractive accessory that enhances your sewing experience. By following along, you will not only practice essential sewing skills but also create something you will use every time you sew.
Materials and Preparation
To begin this how to make a sewing machine organizer pad for beginners- step by step tutorial, you first need to gather all your materials. For the base of the pad, you will want a sturdy fabric such as cotton canvas or quilting cotton, paired with batting or interfacing to give it extra stability. This base ensures that the organizer can hold up under the weight of your sewing machine without shifting or folding.
You will also need coordinating fabrics for the pockets. Choose fabrics that are slightly contrasting so the pockets are easy to see, which helps you quickly grab your tools when needed. Small scraps are perfect for this part, especially if you enjoy mixing prints and colors. This not only makes the organizer functional but also fun and stylish.
Other supplies include thread, scissors, pins, a rotary cutter, and a ruler. Having these items ready before starting will make the process smoother and more enjoyable. A sewing machine with a straight stitch is enough for this project, though using additional stitches for decoration is always an option if you wish to get creative.
It’s important to measure the area where your sewing machine will sit. The pad should be large enough to cover the base of your machine and extend several inches on each side, providing room for the pockets. Write down these measurements and cut your base fabric accordingly, remembering to leave extra seam allowance.
Once your materials are prepared, press all the fabrics with an iron to remove wrinkles. Pressed fabric not only looks better but also ensures accurate sewing and measurements. This small step is often overlooked, but it makes a significant difference in the final result.
With everything organized and ready, you are now set to move forward with the actual construction. Preparing thoroughly helps beginners avoid mistakes and keeps the sewing experience positive and stress-free.
Cutting and Assembling the Base
The first real step in this step by step tutorial is cutting your base fabric. Use your machine’s dimensions plus a few inches extra on all sides. This ensures that the organizer pad will not slip when you are sewing and gives enough space for adding pockets. Cut two pieces of base fabric and one piece of batting or interfacing in the same size.
Once the pieces are cut, layer them together like a quilt sandwich: one piece of fabric face down, the batting in the middle, and the second piece of fabric face up. Pin or clip them around the edges to hold everything in place. This method provides stability and creates a cushioned effect for the sewing machine.
At this stage, you may also decide to quilt the layers together. Quilting can be as simple as sewing straight lines across the pad, either vertically or horizontally. For beginners, straight-line quilting is highly recommended as it strengthens the pad and keeps the layers from shifting over time.
After quilting, trim the edges so that everything lines up perfectly. Uneven edges can make attaching the binding later more difficult, so taking a few extra minutes to square the fabric is worth the effort. Remember, precision is the key to creating a neat and professional-looking project.
This step sets the foundation for the entire sewing machine organizer pad. If your base is not stable, the pockets may sag or the pad may slide around when sewing. By making sure the base is secure, you guarantee long-term durability.
Once you are satisfied with the base, it’s time to focus on the most exciting part: designing and attaching the pockets.
Adding Pockets and Details
One of the highlights of this how to make a sewing machine organizer pad for beginners- step by step tutorial is customizing the pockets. Start by cutting rectangles or squares from your contrasting fabric. Vary the sizes so that you can accommodate tools of different dimensions, such as scissors, pens, or measuring tapes.
Press the top edge of each pocket piece under twice and stitch it to create a neat hem. This prevents fraying and gives a polished look. Then, place each pocket piece on the base fabric where you want it to be. Pin them in place and sew along the sides and bottom, leaving the top open.
You can divide larger pockets into smaller sections by sewing vertical lines through the pocket fabric. This is especially useful for items like pens, seam rippers, or crochet hooks that need narrower slots. Customizing pocket widths ensures your tools won’t shift around or fall out.
For additional stability, consider reinforcing the pocket seams by backstitching at the top edges. This prevents wear and tear from frequent use, especially in pockets that will hold heavier tools. Reinforcement is a small but essential detail in ensuring long-lasting durability.
Adding decorative stitching is another way to personalize your project. You might use contrasting thread or a fun stitch pattern along the pocket edges. These small touches make your sewing machine organizer pad not only practical but also visually pleasing.
By the time you finish the pockets, your organizer will already look functional and professional. This step brings your design to life and transforms simple fabric into a purposeful sewing accessory.
Finishing Touches and Assembly
The final stage in this step by step tutorial is finishing the pad neatly. Start by creating a binding to cover the raw edges. You can use store-bought binding or make your own from strips of fabric. Fold the binding over the edges of the pad and sew it securely in place. Binding not only adds strength but also frames your project beautifully.
If you wish, you can add extra features such as a small loop or handle. This makes it easy to carry the organizer or hang it when not in use. For some sewers, this extra detail is particularly helpful when moving between different sewing spaces.
Double-check all seams and edges to ensure that everything is secure. If you find loose threads or uneven stitches, take the time to fix them now. This will improve both the durability and the overall look of your project.
Press the entire organizer pad one last time with your iron. A good press at the end helps flatten seams and gives your creation a clean, professional finish. It’s a step that elevates the quality of any handmade project.
Place your sewing machine on top of the organizer pad to test the fit. You should notice that it sits securely and that your tools are easily accessible in the pockets. Adjustments can always be made if you feel you need more space or additional compartments.
Completing this project not only gives you a functional organizer but also a sense of accomplishment. It proves that even as a beginner, you can make something highly useful and tailored to your needs.
FAQ About Sewing Machine Organizer Pads
1. Do I need advanced sewing skills to make this organizer pad?
No, this project is designed for beginners. If you can sew a straight line, you can complete this tutorial successfully.
2. What is the best fabric for a sewing machine organizer pad?
Sturdy fabrics like cotton canvas or quilting cotton work best. They hold up well under the weight of the machine and tools.
3. Can I wash the organizer pad?
Yes, most pads can be washed if made with washable fabrics. Always pre-wash fabrics before starting to prevent shrinkage later.
4. How do I know what size to make my pad?
Measure the base of your sewing machine and add a few inches on each side for extra space. Adjust the size based on your personal needs.
5. Can I add more pockets than the tutorial shows?
Absolutely! The beauty of this project is its flexibility. Add as many or as few pockets as you need.
6. Do I need batting or interfacing?
Yes, adding batting or interfacing gives the pad structure and prevents it from sliding around while sewing.
Conclusion
Making a sewing machine organizer pad is a rewarding project, especially for beginners. Throughout this how to make a sewing machine organizer pad for beginners- step by step tutorial, you learned how to prepare materials, assemble the base, add functional pockets, and finish with binding.
The result is a stylish and practical sewing accessory that makes your creative process more enjoyable and organized.
I hope this tutorial has inspired you to try making your own. If you do, please share your experience, leave a sincere opinion, and suggest improvements for future projects. Your feedback helps make every tutorial more helpful and enjoyable for the sewing community.