
Creating handmade kitchen accessories is always rewarding, and this How To Make an Owl Oven Glove-Step by Step Tutorial will guide you through an adorable project that blends creativity, practicality, and fun. Starting a project centered around an owl-themed glove adds charm to your kitchen décor while helping you learn essential sewing techniques. Throughout this guide, we will use the keyword How To Make an Owl Oven Glove-Step by Step Tutorial strategically to ensure better SEO performance while delivering clear instructions.
Whether you enjoy sewing as a hobby or are just beginning, making your own owl oven glove is both simple and satisfying. This design is ideal for gifting, selling at craft fairs, or adding a personal touch to your home. The project focuses on fabric selection, shaping, layering, and assembling—all clearly explained in this How To Make an Owl Oven Glove-Step by Step Tutorial. With patience and creativity, you will complete a professional-quality accessory.
Before diving into the stitching process, it is important to gather your materials, prepare your template, and understand the structure of the glove. This How To Make an Owl Oven Glove-Step by Step Tutorial is created for beginners and experienced crafters alike, offering a clear path to success. Each step is broken into manageable parts so that you can follow along confidently. Now let’s begin the journey of transforming simple fabrics into a charming owl oven glove.
Choosing Materials and Preparing the Owl Template
Selecting the right materials is the foundation of this project, and this How To Make an Owl Oven Glove-Step by Step Tutorial emphasizes the importance of choosing fabrics carefully. Cotton fabrics work wonderfully for the outer layer because they are durable and easy to sew. Consider mixing prints and solid colors to give your owl more personality. Quilted cotton or thick cotton also helps create a sturdier structure for heat protection.
You will also need heat-resistant batting or insulated lining for safety. This step cannot be skipped because the glove must be thick enough to protect your hands. As you gather your materials, think about the color theme of your owl oven glove. A classic combination includes brown or beige tones, but bright colors can make your design more cheerful. Your choice of materials will influence the final look and feel of your oven glove.
The next important step is preparing your owl-shaped template. You can sketch your design or trace a pre-made shape if you prefer symmetry. This How To Make an Owl Oven Glove-Step by Step Tutorial suggests creating separate templates for the wings, eyes, beak, and body outline. Using cardboard for these templates helps you trace clean lines on the fabric repeatedly without losing accuracy.
Once your template is ready, lay your chosen fabrics on a flat surface and trace each part. Be sure to mark not only the main glove shape but also the owl details you will later stitch onto the glove. This preparation step makes the assembly process much easier and more organized. It also ensures consistency if you plan to create more than one glove.
Before cutting the shapes, double-check measurements and adjust the size depending on how large you want your oven glove to be. A standard oven glove usually measures around 12 inches long, but you can customize yours based on hand size. Accuracy during this stage will enhance the final quality of your project.
Finally, cut all pieces carefully using fabric scissors. Keep your cut pieces grouped together so nothing is misplaced. When everything is prepared, you are ready to move on to the next steps in this How To Make an Owl Oven Glove-Step by Step Tutorial.
Assembling the Owl Body and Decorative Details
Once your pieces are cut, it’s time to begin assembling the main body of your owl oven glove. The first step in this How To Make an Owl Oven Glove-Step by Step Tutorial is to position the eye shapes, beak, and wings onto the main glove fabric. Arrange them in a way that creates a cute and expressive face. Pin each piece to keep them in place before sewing.
Start sewing the decorative pieces using a straight stitch or a zigzag stitch, depending on your preferred look. A zigzag stitch gives a more whimsical appearance, while a straight stitch is more discreet. Each piece should be secured firmly so it withstands constant handling and washing. This careful stitching step ensures that your owl features remain intact for long-term use.
Next, add any additional details you desire. Some crafters enjoy using embroidery thread to create feather textures or outline certain shapes. Others add small fabric circles or felt layers to give more depth to the eyes. This How To Make an Owl Oven Glove-Step by Step Tutorial encourages personalization, allowing you to make your glove truly unique.
After attaching the decorative details, prepare the front and back glove pieces. Place them on top of your heat-resistant batting, then pin them together. This step ensures proper insulation, an essential part of any oven glove design. The batting adds thickness and makes the glove safe for handling hot cookware.
Trim any excess batting around the edges after pinning. Make sure all layers align smoothly. Keeping the alignment clean will make the sewing process easier and your final product more polished. You should now have two layered glove pieces ready for stitching around the edges.
Before sewing the main glove shape, check that you are satisfied with the placement of the owl features. If everything looks aligned and secure, you are ready for the next section of this How To Make an Owl Oven Glove-Step by Step Tutorial.
Sewing the Oven Glove Shape
To begin forming the glove shape, place the front and back glove layers together with their right sides facing inwards. This common sewing technique allows the seams to remain hidden once the glove is turned right side out. Pin around the edges carefully, keeping the layers smooth. This step in the How To Make an Owl Oven Glove-Step by Step Tutorial is crucial for achieving a clean finish.
Start sewing around the glove shape, leaving the wrist opening unstitched. Use a medium stitch length and go slowly around the curves. The curved parts require extra attention to ensure the seams stay even. A well-sewn edge will help your glove maintain its shape and durability.
Once the outer seam is complete, trim the seam allowance slightly to reduce bulk. Be careful not to cut too close to the stitches. Snipping small notches along the curves helps the glove turn smoothly without bunching. This refining step gives your oven glove a professional appearance.
Turn the glove right side out by gently pulling it through the opening. You will now see the owl design beautifully taking shape. Use a blunt tool, such as the back end of a crochet hook or a chopstick, to push out the edges and curves. This ensures your glove maintains its full form.
Try inserting your hand into the glove to confirm the fit. If adjustments are needed, you can flip it back inside out and trim or reinforce areas as necessary. Comfort is very important, especially for kitchen accessories, so take time to make sure the fit is satisfactory.
Once satisfied, prepare the wrist opening for sewing. Fold the raw edges inward and pin them neatly. This step prepares the glove for the final seam in this How To Make an Owl Oven Glove-Step by Step Tutorial.
Finishing Touches and Final Assembly
The wrist opening is one of the final steps, and neat finishing is essential. Sew around the edge using a straight stitch, ensuring the seam is clean and durable. This closing seam not only completes the glove but also enhances the overall look. Good finishing makes your handmade item stand out with quality craftsmanship.
Consider adding a small fabric loop to the inside of the wrist area. This makes it easy to hang your oven glove on a hook in the kitchen. Simply fold a strip of fabric, place it between the layers at the wrist opening, and sew it in securely. This How To Make an Owl Oven Glove-Step by Step Tutorial highlights this optional addition for practical use.
After sewing the wrist opening, inspect the entire glove for loose threads, uneven stitches, or bumps. Trim any excess threads and flatten seams with a warm iron if needed. Ironing helps smooth the fabric and gives your owl glove a tidy appearance.
Test your glove with warm cookware to ensure the insulation is adequate. If the glove feels thin, you may want to add an extra layer of batting in your next project. This first glove will help you understand how much padding you prefer. Customizing insulation improves both comfort and safety.
If you wish to make multiple gloves, prepare templates in different sizes or fabric combinations. Handmade kitchen accessories make wonderful gifts, especially during the holidays. The owl theme is universally appealing and adds charm to any kitchen.
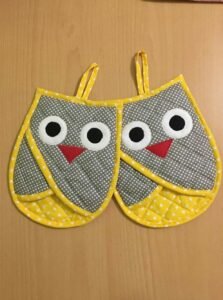
By now, your adorable owl oven glove is complete. The finishing touches bring personality and durability, making this How To Make an Owl Oven Glove-Step by Step Tutorial a fun and rewarding craft.
How To Make an Owl Oven Glove-Step by Step Tutorial
1. Is this project suitable for beginners?
Yes, this How To Make an Owl Oven Glove-Step by Step Tutorial is perfect for beginners. The steps are simple, and the project allows you to learn basic sewing techniques at a comfortable pace.
2. What type of fabric is best for the glove?
Cotton fabrics are recommended because they are sturdy, easy to sew, and heat resistant when layered with insulated batting.
3. Do I need a sewing machine for this project?
A sewing machine makes the process faster and more precise, but the glove can be sewn by hand if you use strong stitches.
4. How can I make the owl design more detailed?
You can add embroidery, fabric paint, layered felt pieces, or decorative stitching to enhance the owl’s features.
5. How thick should the glove be?
Your glove should have at least one layer of heat-resistant batting to ensure proper hand protection.
6. Can I resize the template for smaller hands or children?
Yes, simply adjust the template before cutting the fabric to create different glove sizes.
Conclusion
This How To Make an Owl Oven Glove-Step by Step Tutorial has guided you through every stage of crafting a functional and charming kitchen accessory.
From selecting materials and preparing templates to sewing and adding final touches, each step helps you build skills and confidence.
Now that you have completed your owl oven glove, I invite you to leave a sincere opinion and share suggestions for future tutorials. Your feedback helps inspire new creative projects.