
How to Make Hanging Storage- Step by Step Tutorial is one of the most practical and creative DIY projects you can try at home. With just a few materials, a little bit of time, and some imagination, you can transform unused spaces in your home into functional storage areas. Hanging storage is not only useful for organizing everyday items, but it also helps keep rooms looking neat, spacious, and clutter-free. Whether you are working on organizing a small apartment, a nursery, or your craft corner, this guide will walk you through everything you need to know.
The great thing about hanging storage is that it is versatile. You can create designs that suit your personal style, whether modern, rustic, or minimalist. It also allows you to maximize vertical spaces, which is especially helpful for those living in smaller homes. By following this step by step tutorial, you will learn how to choose materials, cut and assemble pieces, and even add finishing touches that give your storage a professional look.
Before we dive into the detailed How to Make Hanging Storage- Step by Step Tutorial, it’s important to understand that this project is beginner-friendly. You don’t need advanced woodworking or sewing skills to get started. With some basic tools and simple instructions, you will be able to complete your first hanging storage project successfully. Let’s explore the process together and create something both practical and beautiful.
Choosing Materials for Your Hanging Storage
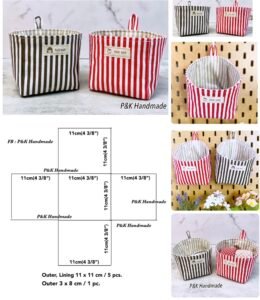
The first step in How to Make Hanging Storage- Step by Step Tutorial is gathering the right materials. Depending on the style you want, you can use fabric, wood, rope, or even recycled items. Fabric is one of the most popular options since it is easy to work with, washable, and available in countless colors and patterns. Strong cotton, denim, or canvas work well for creating durable storage pockets.
If you prefer a rustic or modern look, using wooden planks or dowels combined with rope is an excellent choice. Wood provides structure and durability, while rope adds flexibility and style. Another great option is to use recycled materials such as old jeans or unused tablecloths to create eco-friendly storage solutions. This not only saves money but also reduces waste.
For those who want lightweight storage, plastic pockets or mesh fabric can be used. These are especially useful for kids’ rooms or bathrooms where you might want to see what’s inside each pocket at a glance. Always consider the weight of the items you plan to store before deciding on your material, as this will determine how sturdy your storage needs to be.
You will also need some basic tools and supplies. A pair of scissors, sewing machine or needle and thread, measuring tape, wooden dowels, and hooks are commonly required. Having everything ready before starting will make the process smooth and enjoyable. Remember, the quality of your materials directly impacts how long your hanging storage will last.
Another tip is to select materials that match your home décor. If your room has a neutral theme, consider beige, white, or grey fabrics. For children’s spaces, bright colors and playful prints are ideal. The goal is to make your hanging storage not only functional but also a decorative addition to your home.
By carefully choosing materials, you ensure that your project will meet both your aesthetic and practical needs. With your supplies ready, you’re prepared for the next step: creating a design that works for your space.
Designing Your Hanging Storage
In this section of How to Make Hanging Storage- Step by Step Tutorial, we will focus on the design process. Design is essential because it determines how useful your storage will be. Start by measuring the area where you plan to hang your storage. This could be behind a door, on a wall, inside a closet, or even in the kitchen.
Once you know the dimensions, sketch out a simple design. Decide how many pockets or shelves you want and how large they should be. For example, larger pockets are perfect for toys, magazines, or kitchen towels, while smaller ones work well for accessories, tools, or craft supplies. Planning your design carefully will help avoid mistakes later.
If you are making fabric storage, decide whether you want flat pockets or expandable ones. Flat pockets take less space but hold fewer items, while expandable designs allow for more storage capacity. Using elastic bands or pleats can also give your pockets extra flexibility.
For wooden or rope-based hanging storage, design becomes even more important. You might want to create a hanging shelf with multiple layers, or a simple rack with hooks. Rope macramé storage designs are also popular, combining style with functionality. These look beautiful in living rooms, bedrooms, or even bathrooms.
Keep in mind that the placement of your hanging storage affects its usability. If it’s for a child’s room, make sure it’s at their height so they can access their toys easily. For kitchen storage, placing it near your cooking area ensures that utensils and towels are always within reach.
Once your design is finalized, you’re ready to move to the exciting part: assembling and constructing your hanging storage.
Step by Step Construction Process
Now let’s dive into the hands-on part of the How to Make Hanging Storage- Step by Step Tutorial. This is where your ideas come to life. Start by cutting your fabric or wood pieces according to your measurements. Always measure twice before cutting to avoid wasting materials.
If you are working with fabric, hem the edges to prevent fraying. Then, sew the pockets onto a backing fabric, leaving the top of each pocket open. Reinforce the stitches for extra durability, especially if you plan to store heavier items. Add a wooden dowel at the top to keep the structure straight, and attach a string or rope for hanging.
For wooden hanging storage, sand your wooden pieces to remove rough edges. Use screws or nails to attach shelves or racks to a sturdy backing board. If you are creating a hanging shelf, drill holes and thread rope through them to suspend the shelf from hooks. Make sure the knots are secure to prevent accidents.
One important step is attaching the hooks or brackets where your storage will hang. Choose strong wall anchors if you plan to store heavy items. For lighter storage, adhesive hooks may be enough. Always check the weight limits before hanging your finished piece.
As you construct, regularly test the strength of your storage. Place a few items inside and see if it holds up well. This will help you adjust your design before finishing everything. Remember that safety and durability are just as important as appearance.
After construction, consider adding finishing touches. You can paint wooden storage, decorate fabric with embroidery, or personalize with labels. These small details make your project look polished and unique.
By following these steps carefully, you’ll have a functional and stylish hanging storage solution that fits perfectly in your home.
Decorating and Maintaining Hanging Storage
Once your hanging storage is built, the final step in this step by step tutorial is decorating and maintaining it. Decoration adds personality, while maintenance ensures that it lasts a long time.
For fabric storage, you can decorate using fabric paint, iron-on patches, or embroidery. Personalizing each pocket with labels is also a smart idea, especially if the storage is for children or a shared space. This helps everyone know exactly where items belong.
If you made wooden storage, you can paint it to match your room’s theme. Using varnish protects the wood and gives it a polished finish. Rope or macramé storage can be dyed or decorated with beads for a boho-inspired look. Always let paint or finishes dry completely before using your storage.
Maintenance is equally important. Wash fabric storage occasionally to keep it fresh and clean. For wooden storage, dust regularly and check the screws or nails to make sure they remain tight. Rope storage may need occasional re-knotting or tightening if it starts to loosen.
Another great tip is to reorganize the items in your storage every few weeks. This helps prevent clutter from building up again and ensures that everything stays functional. If you notice certain items are too heavy for a pocket, move them to a sturdier spot.
Remember that hanging storage is meant to make life easier. If it becomes overloaded, it won’t serve its purpose well. Be mindful of balance and weight distribution, especially with wall-mounted designs.
With regular care, your hanging storage will remain a practical and stylish solution for many years.
FAQ – How to Make Hanging Storage
1. What materials are best for making hanging storage?
Canvas, denim, and strong cotton are great for fabric storage. For sturdier designs, wood and rope are excellent choices.
2. Can I make hanging storage without sewing?
Yes, you can use fabric glue, adhesive pockets, or even wooden racks if you don’t want to sew.
3. How much weight can hanging storage hold?
This depends on the materials and how it is attached. Fabric storage usually holds light to medium items, while wooden designs can carry heavier loads if secured properly.
4. Where can I use hanging storage at home?
It works in kitchens, bathrooms, bedrooms, closets, and even garages. Anywhere you need extra organization, hanging storage is useful.
5. Is hanging storage safe for children’s rooms?
Yes, as long as it is placed at a safe height and securely attached. Always avoid sharp edges or small detachable parts.
6. Can I recycle materials for this project?
Absolutely! Old jeans, tablecloths, or wooden scraps can be transformed into eco-friendly storage solutions.
Conclusion
In this How to Make Hanging Storage- Step by Step Tutorial, we explored everything from choosing materials and designing to constructing, decorating, and maintaining your storage project.
With a little creativity and effort, you can transform empty wall space into practical, stylish organization solutions.
Now that you’ve learned how to make your own hanging storage, I’d love to hear from you. Share your honest opinion, let me know what you think of this tutorial, and feel free to suggest other DIY projects you’d like to see covered. Your feedback is always welcome!