
If you’ve been looking for a fun, easy, and practical sewing project, then learning How to Sew Cute Little Mini Pouch – Step by Step Tutorial is the perfect choice for you. These adorable mini pouches are not only simple to make but also incredibly useful. You can use them to store coins, jewelry, keys, lip balm, or any small items that tend to get lost in your bag. Plus, they make excellent handmade gifts for friends and family. Whether you’re a beginner just starting to explore sewing or an experienced crafter looking for a quick project, this tutorial will guide you through every detail of making your own cute little mini pouch.
Creating a cute little mini pouch allows you to combine creativity with functionality. You can personalize it with different fabrics, colors, and embellishments to match your style or the recipient’s personality. These pouches are also great for reducing waste, as they can be made using small pieces of leftover fabric. In this Step by Step Tutorial, you’ll learn how to cut, sew, and assemble a mini pouch with precision and ease. Each step has been carefully explained to ensure your sewing experience is both enjoyable and rewarding.
In this guide, we’ll cover everything you need to know—from choosing the right materials to sewing the final stitches. By following the How to Sew Cute Little Mini Pouch – Step by Step Tutorial, you’ll have a beautiful handmade item in no time. You can even adjust the size or add zippers, buttons, or drawstrings to make your design unique. Now, let’s dive into the details and start your creative journey!
Materials You’ll Need for the Mini Pouch
Before you begin this How to Sew Cute Little Mini Pouch – Step by Step Tutorial, it’s important to gather all the necessary materials. Having everything ready makes the process smoother and helps you stay focused while sewing. The basic materials required for this project are quite simple and easy to find.
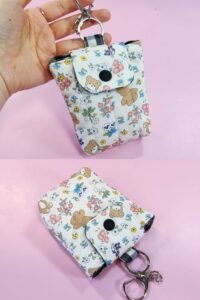
You’ll need two small pieces of fabric—one for the outside and one for the lining. Cotton fabric is a great option for beginners because it’s easy to handle and comes in a variety of patterns and colors. Choose something that reflects your personality, like floral prints, polka dots, or pastel shades.
You’ll also need a zipper or snap button to close the pouch securely. Zippers are ideal for keeping contents safe, but if you prefer a more vintage or handmade touch, snap buttons or Velcro are good alternatives. Make sure the closure matches the size of your pouch.
Other essential tools include sewing scissors, pins or clips, a fabric marker or chalk, a ruler or measuring tape, and, of course, your sewing machine or needle and thread if you’re hand-sewing. A small iron will also be helpful to press your fabric and seams for a neat, professional finish.
If you want to make your pouch sturdier, consider using a layer of fusible interfacing between the outer fabric and the lining. This helps the pouch maintain its shape and gives it a more polished appearance.
Finally, choose coordinating thread colors to complement your fabric. Matching thread gives your stitches a clean look, while contrasting thread can add a fun decorative detail. With your materials ready, you’re all set to start sewing your mini pouch!
Step-by-Step Instructions to Sew the Mini Pouch
Now it’s time to get into the main part of this How to Sew Cute Little Mini Pouch – Step by Step Tutorial. Follow each step carefully, and you’ll be amazed at how quickly your mini pouch takes shape.
-
Cut your fabric pieces: Start by cutting two rectangles of fabric—one for the outer layer and one for the lining. The standard size can be around 6 inches by 4 inches, but feel free to adjust it depending on how large or small you want your pouch to be.
-
Attach the interfacing (optional): If you’re using fusible interfacing, iron it onto the wrong side of the outer fabric following the manufacturer’s instructions. This will make your pouch more durable and structured.
-
Prepare the zipper: Place the zipper face down along the top edge of the outer fabric, with the right sides together. Align the edges carefully and pin them in place. Then, place the lining fabric on top of the zipper, also right side facing down. Sew along the edge using a zipper foot if you have one.
-
Sew the other side: Once one side of the zipper is attached, repeat the process on the other side with the remaining fabric pieces. You should now have the zipper neatly sewn between the outer and lining layers, forming a tube-like piece.
-
Sew the sides: Open the zipper halfway (so you can turn the pouch right side out later). Align the outer fabrics together and the lining fabrics together, with right sides facing each other. Pin or clip the edges and sew around the perimeter, leaving a small opening at the bottom of the lining.
-
Turn and finish: Trim the corners slightly to reduce bulk, then carefully turn the pouch right side out through the opening in the lining. Push out the corners using a blunt tool for a crisp finish. Sew the opening in the lining closed, tuck it inside, and give the pouch a final press with the iron.
Congratulations! You’ve completed your cute little mini pouch. It’s now ready to use, gift, or personalize further with embellishments like ribbons, lace, or embroidery.
Tips and Tricks for a Perfect Mini Pouch
Even though this How to Sew Cute Little Mini Pouch – Step by Step Tutorial is simple, there are a few helpful tips to make your sewing project look more professional and polished. Paying attention to small details can make a big difference in the final result.
First, always take time to press your fabric before and during sewing. Pressing seams helps them lie flat and gives your pouch a crisp, finished look. It also makes sewing more precise, especially when working with small pieces.
Second, when sewing close to a zipper, go slowly and use a zipper foot if available. This allows you to stitch neatly without the needle hitting the metal teeth of the zipper. Consistent stitching helps your pouch look neat and well-made.
Third, always check your measurements twice before cutting. Mini pouches require precision, and even a small difference in size can affect how well the pieces fit together.
If you’re new to sewing, practice on scrap fabric first to get comfortable sewing straight lines and corners. Once you’re confident, start with your main fabric.
Another helpful tip is to choose fabrics that aren’t too thick. Thick fabrics can make it harder to sew small pouches, especially around corners and zippers. Lightweight cotton or linen works best for beginners.
Lastly, don’t forget to have fun with it! Sewing should be a creative and relaxing activity. Experiment with different colors, textures, and accessories to make each pouch unique and personal.
Creative Ideas for Customizing Your Mini Pouch
One of the most exciting parts of this How to Sew Cute Little Mini Pouch – Step by Step Tutorial is adding your personal touch. The design possibilities are endless, and small changes can completely transform the look of your pouch.
Try using patterned fabrics like floral, geometric, or animal prints to make each pouch stand out. You can also mix and match fabrics—use one color for the front and another for the back to create a fun contrast.
Adding small embellishments like lace trims, buttons, or embroidered initials can make your mini pouch even more special. These decorative touches give your pouch a handmade charm that reflects your creativity.
If you’re feeling more adventurous, you can add a small keyring loop or wrist strap to your pouch. This makes it more practical for carrying small items when you’re on the go.
For an eco-friendly touch, consider repurposing fabric from old clothes or leftover scraps. This not only saves money but also gives your pouch a unique story and character.
Lastly, you can use your pouches for different purposes. Make one for storing makeup, another for coins, or even one for travel-sized items. They also make adorable gift packaging—place small presents inside and tie with a ribbon for a thoughtful handmade gift.
Troubleshooting Common Sewing Issues
Even the simplest sewing projects can have challenges, so here are some solutions for common problems you might encounter while following the How to Sew Cute Little Mini Pouch – Step by Step Tutorial.
If your fabric slips while sewing, use pins or clips to keep the layers aligned. Sewing slowly also helps maintain control over small pieces.
Uneven stitching can occur if the tension on your sewing machine is off. Adjust the tension slightly until your stitches look balanced on both sides.
If your zipper looks bumpy or uneven, check that it’s aligned properly before sewing. Always sew with the zipper partially open to make it easier to turn the pouch right side out.
Sometimes, bulky seams can make the corners difficult to turn. To fix this, trim excess fabric near the corners, but be careful not to cut into the stitches.
If you notice puckering in your fabric, make sure your stitch length is appropriate for the fabric type. Lightweight fabrics usually need shorter stitches, while thicker ones require longer ones.
Finally, if your lining shifts or looks loose inside, try using a bit of interfacing or tack the lining to the outer fabric with a few hand stitches to keep it in place.
FAQ – How to Sew Cute Little Mini Pouch
1. Can I hand sew a mini pouch instead of using a sewing machine?
Yes! You can hand sew this project with small, neat stitches. It will take more time, but the result can be just as beautiful.
2. What type of fabric works best for mini pouches?
Cotton fabric is ideal because it’s easy to handle and comes in many patterns. You can also use canvas, denim, or linen for a sturdier pouch.
3. How can I make my mini pouch waterproof?
You can use a waterproof fabric like vinyl or add a water-resistant lining to keep items safe from moisture.
4. Can I make the pouch without a zipper?
Yes, you can use Velcro, snap buttons, or even a drawstring closure instead. Each option gives the pouch a different style.
5. How do I clean my handmade mini pouch?
Most fabric pouches can be gently hand washed with mild soap and air dried. Avoid machine washing if you’ve added embellishments.
6. Can I sell the pouches I make from this tutorial?
Absolutely! Handmade mini pouches are popular items at craft fairs or online shops. Just be sure to use your own creativity in design and presentation.
Conclusion
Learning How to Sew Cute Little Mini Pouch – Step by Step Tutorial is a wonderful way to express creativity while making something useful and adorable. With just a few pieces of fabric, a zipper, and some simple stitches, you can create a charming accessory that’s perfect for everyday use or thoughtful gifts.
This project is easy, fun, and suitable for all sewing skill levels. By following the steps carefully and adding your personal touch, you’ll end up with a mini pouch that’s truly one of a kind. We hope this guide inspired you to pick up your sewing tools and start creating today!
If you enjoyed this tutorial, please share your honest opinion and suggestions in the comments below. Your feedback helps us improve and continue bringing creative and easy sewing tutorials for everyone to enjoy!